Blueprint deployments
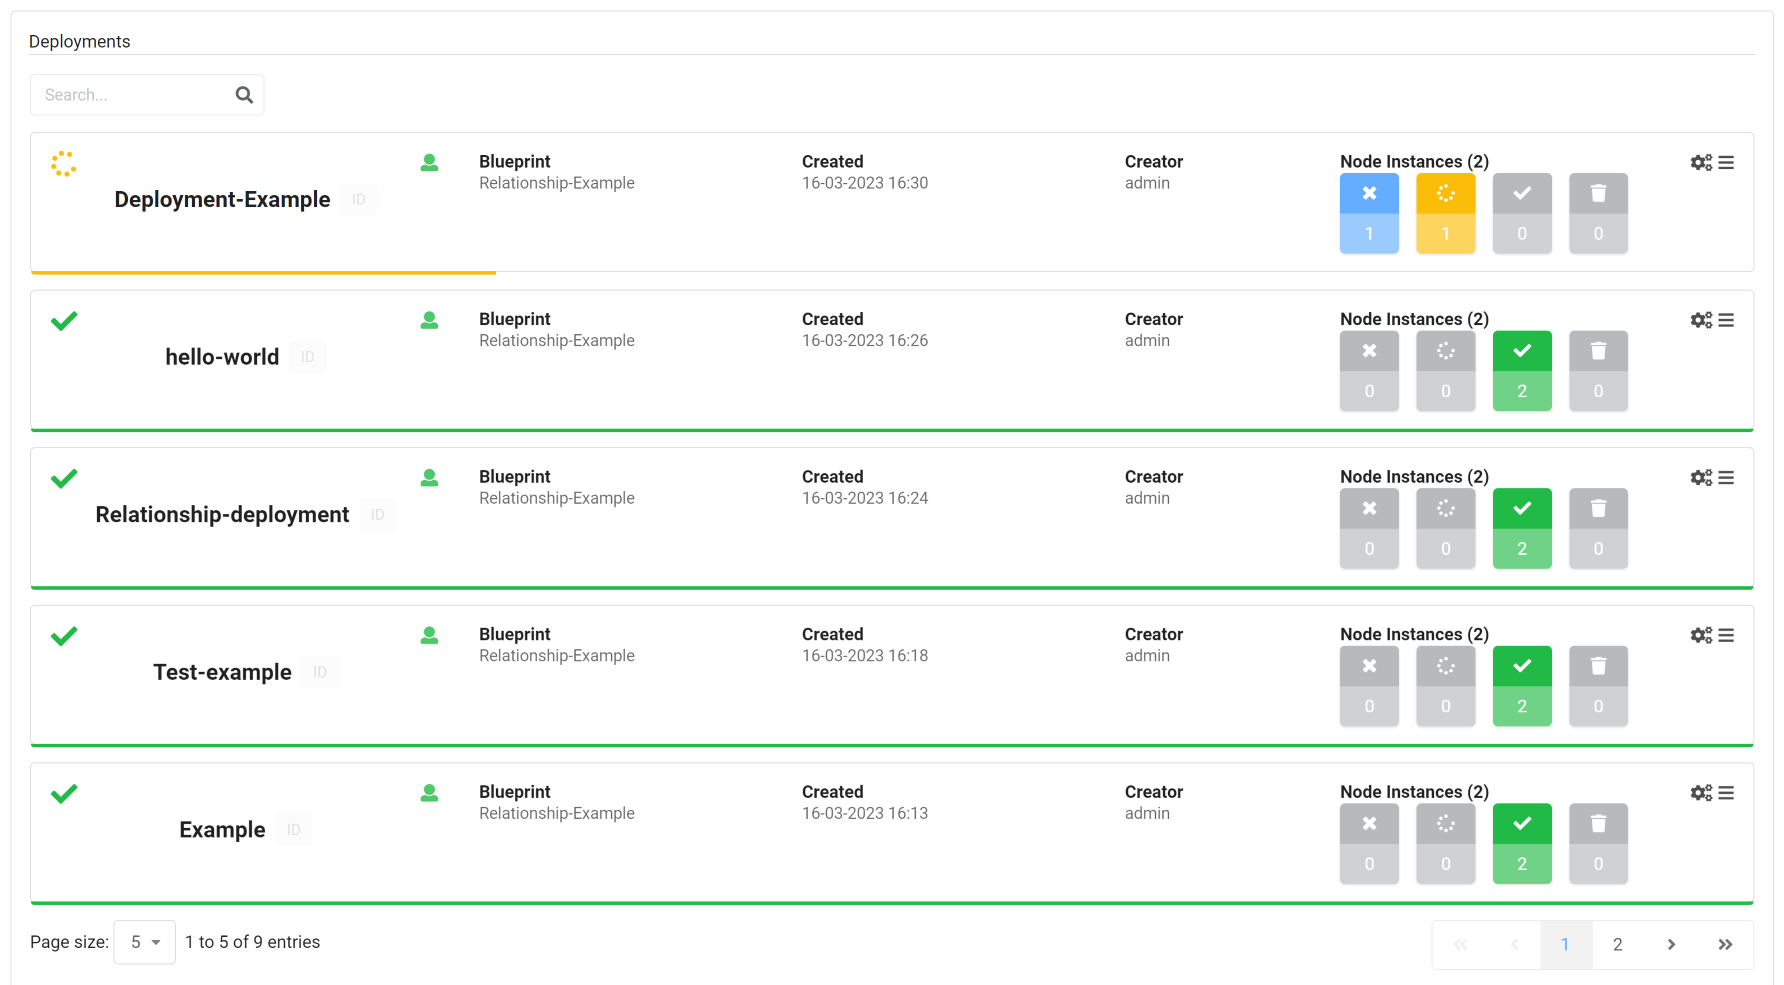
Displays the list of the deployments in the current tenant, according to the user’s permissions. The data can be displayed as a table or list.
Features
Deployment basic information
The Deployments widget displays a list of deployments in the current tenant. The displayed information is: Deployment name, the blueprint which the deployment is derived from, the deployments creation and last update dates, the name of the user who created the deployment, and the number of node instances per state.
Last execution status
You can also quickly check status and logs of the last workflow executed on the deployment by hovering over the status icon in the top left corner of deployment. Depending on the type of the execution there are additional action buttons there.
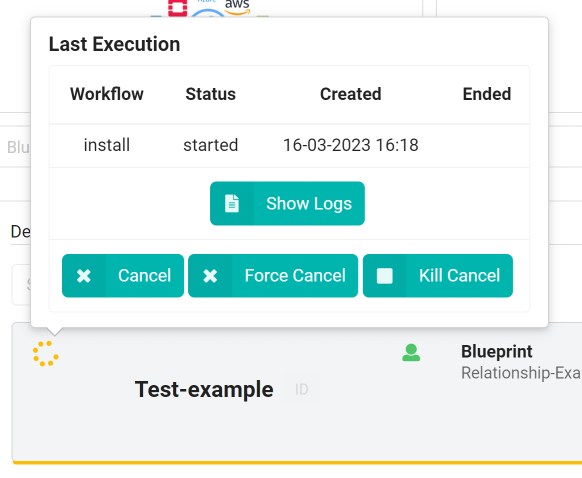
The last execution status is indicated as follows:
 - Failed - execution has failed
 - In Progress - execution is in progress (meaning that it is in one of the following states: pending, started, cancelling, force_cancelling, kill_cancelling)
 - Cancelled - execution has been cancelled
 - Waiting - execution has been either scheduled or queued and it is waiting
 - Completed - execution has been completed
Node instances status
The status of the deployments’ node instances is indicated as follows:
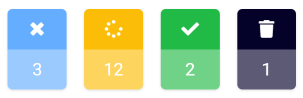
- Blue - the number of node instances that are not initialized
- Yellow - the number of node instances that are in active state (one of: initializing, creating, created, configuring, configured, starting, stopping, stopped and deleting)
- Green - the number of node instances that are started
- Black - the number of node instances that are deleted
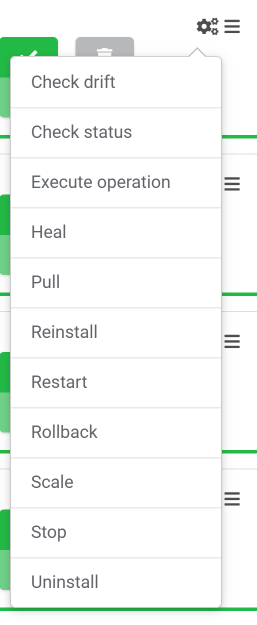
Executing an action
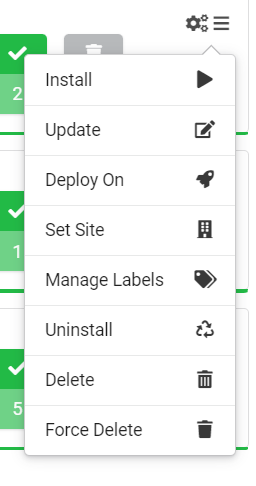
The hamburger menu (![]() )
on the right of every deployment allows performing the following operations:
)
on the right of every deployment allows performing the following operations:
- Install/Uninstall deployment
- Deploy blueprint on deployment - this option is only available when the deployment is containing
csys-obj-type: environmentlabel - Update deployment
- Set site for deployment
- Manage deployment labels
- Delete or Force Delete deployment
Updating a Deployment
- Click Update in the action menu.
- Select the blueprint for the updated deployment.
- Select the inputs file for the blueprint or provide values for the inputs.
- Set actions to be performed during the update or use defaults.
- Click Update.
For more information about updating a deployment, click here.
For more information about creating custom workflows, click here.
Setting a Site
- Click Set Site in the action menu.
- Select a new site for the deployment. The selected site must be in the same visibility context as the deployment or in a higher visibility context. (i.e. both site and deployment are in the same tenant or the site is defined as global)
- Click Update.
For detaching the current site, leave the Site name input empty and toggle the Detach button.

Managing Labels
- Click Manage Labels in the action menu.
- Add/Remove labels to/from the deployment. NOTE: New labels (not existing in the system) are marked with blue color.
- Click Apply.
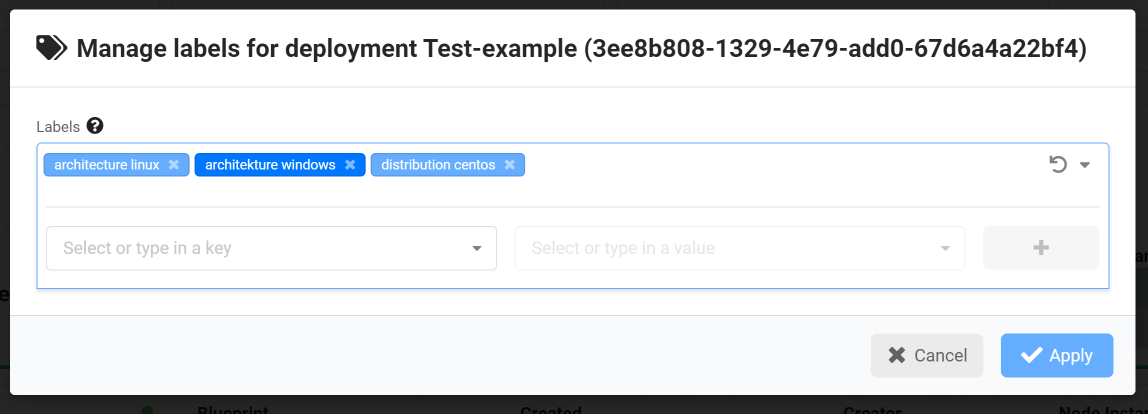
You can learn more about labels here.
Deleting a Deployment
- Click Delete or Force Delete in the action menu.
- When prompted for deployment removal confirmation, click Yes.
Executing a workflow
- Click the cogs icon (
 )
)
and select the workflow you want to execute. - Provide values for workflow parameters.
- Click Execute.
You will also be able to track the progress of the execution as at the bottom of the deployment row, there will be a thin line visible. Progress is calculated based on the number of execution operations finished. Check workflow execution model to get more details about workflows execution.

The color of the line indicates the status of the execution:
- Green - succeeded
- Yellow - in progress
- Red - failed
Each of the default workflows is described in detail here.
Deployments details
Clicking on a deployment’s name will bring us to deployment’s drill-down page, which provides additional data about the deployment.
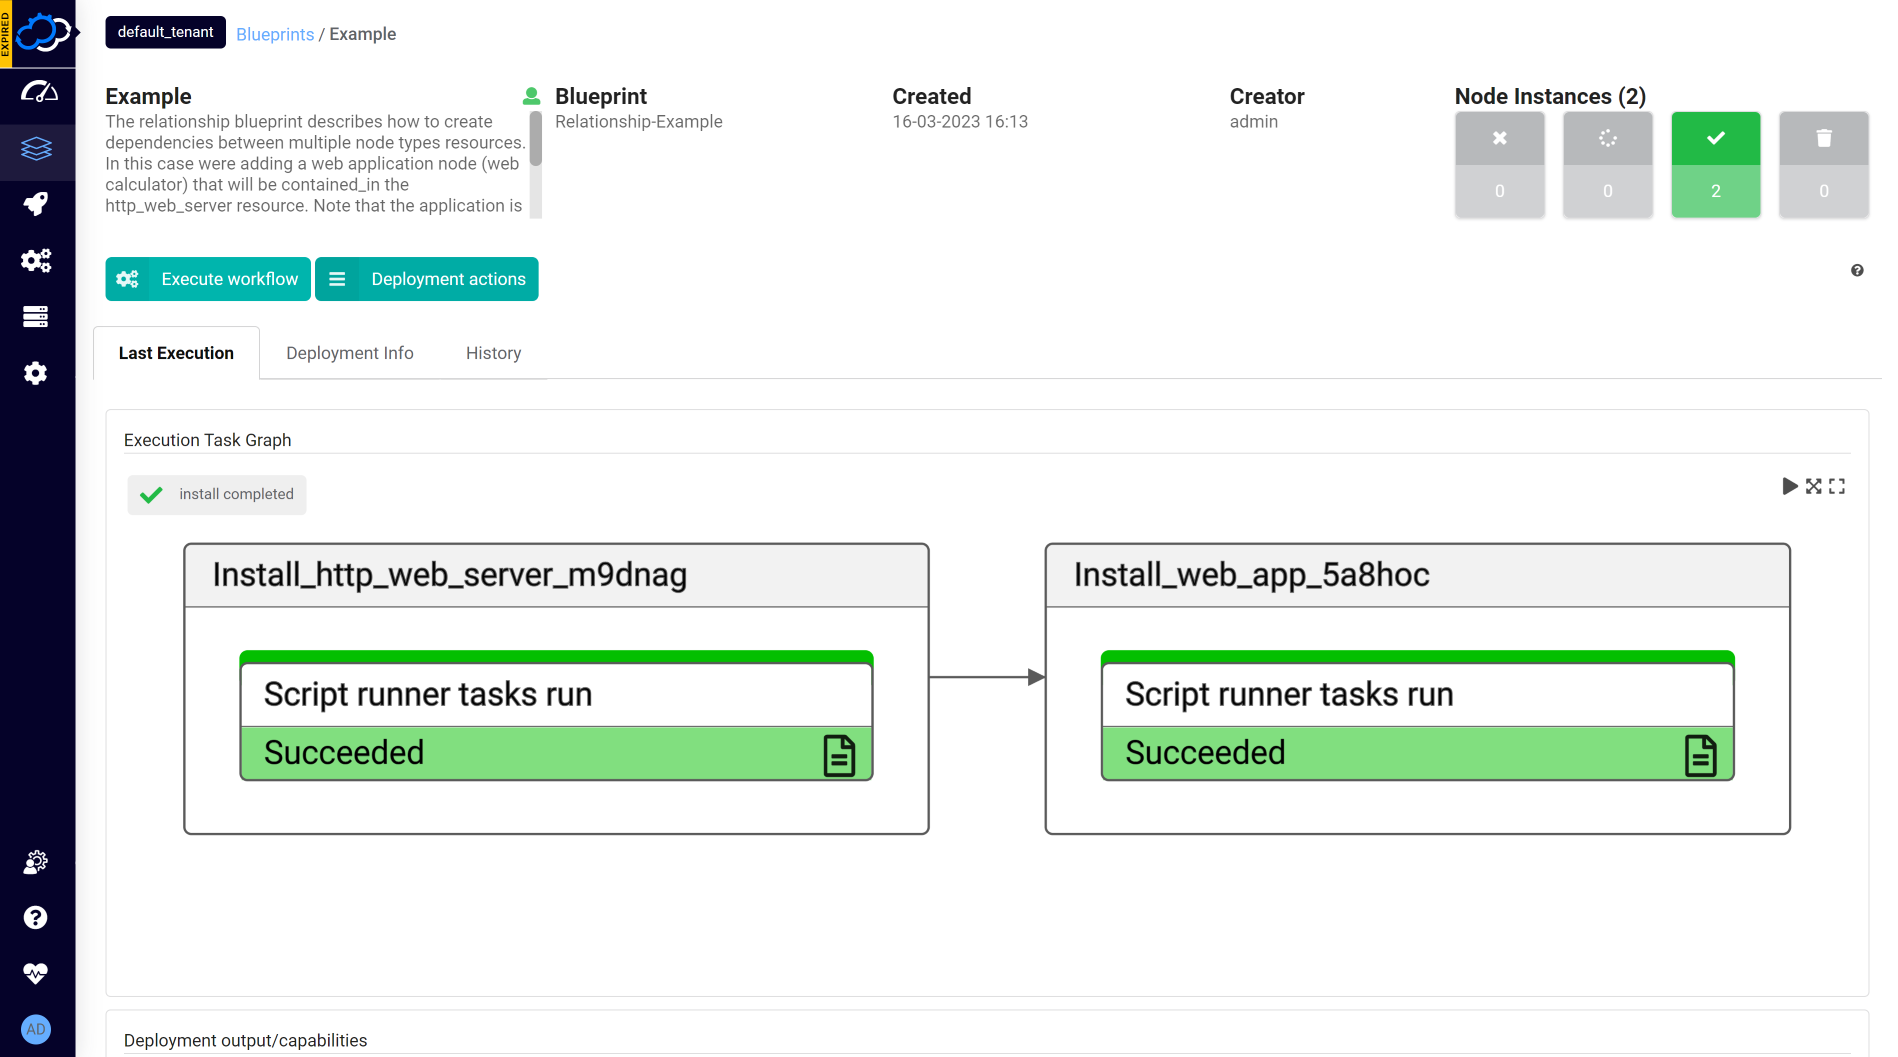
By default, that page displays the following:
- Deployment Info widget
- Deployment Action Buttons widget
- 3 tabs with deployment details:
- Last Execution tab with the following widgets:
- Executions (configured to display only task graph of the last execution)
- Deployment Events/Logs filter
- Deployment Events/Logs
- Deployment Info tab with the following widgets:
- History tab with the following widgets:
- Executions (configured to display list of executions)
- Deployment Events/Logs filter
- Deployment Events/Logs
- Last Execution tab with the following widgets:
Settings
-
Refresh time interval- The time interval in which the widget’s data will be refreshed, in seconds. Default: 10 seconds -
Enable click to drill down- This option enables redirecting to the deployment’s drill down page upon clicking on a specific deployments. Default: On -
Show execution status label- Allows showing last execution workflow ID and status near last execution status icon. Default: Off -
Show first user journey buttons- When there are no deployments, it presents a simplified view, as shown below.
There are 2 buttons in the view:Create new Deployment- redirects to Blueprint Marketplace page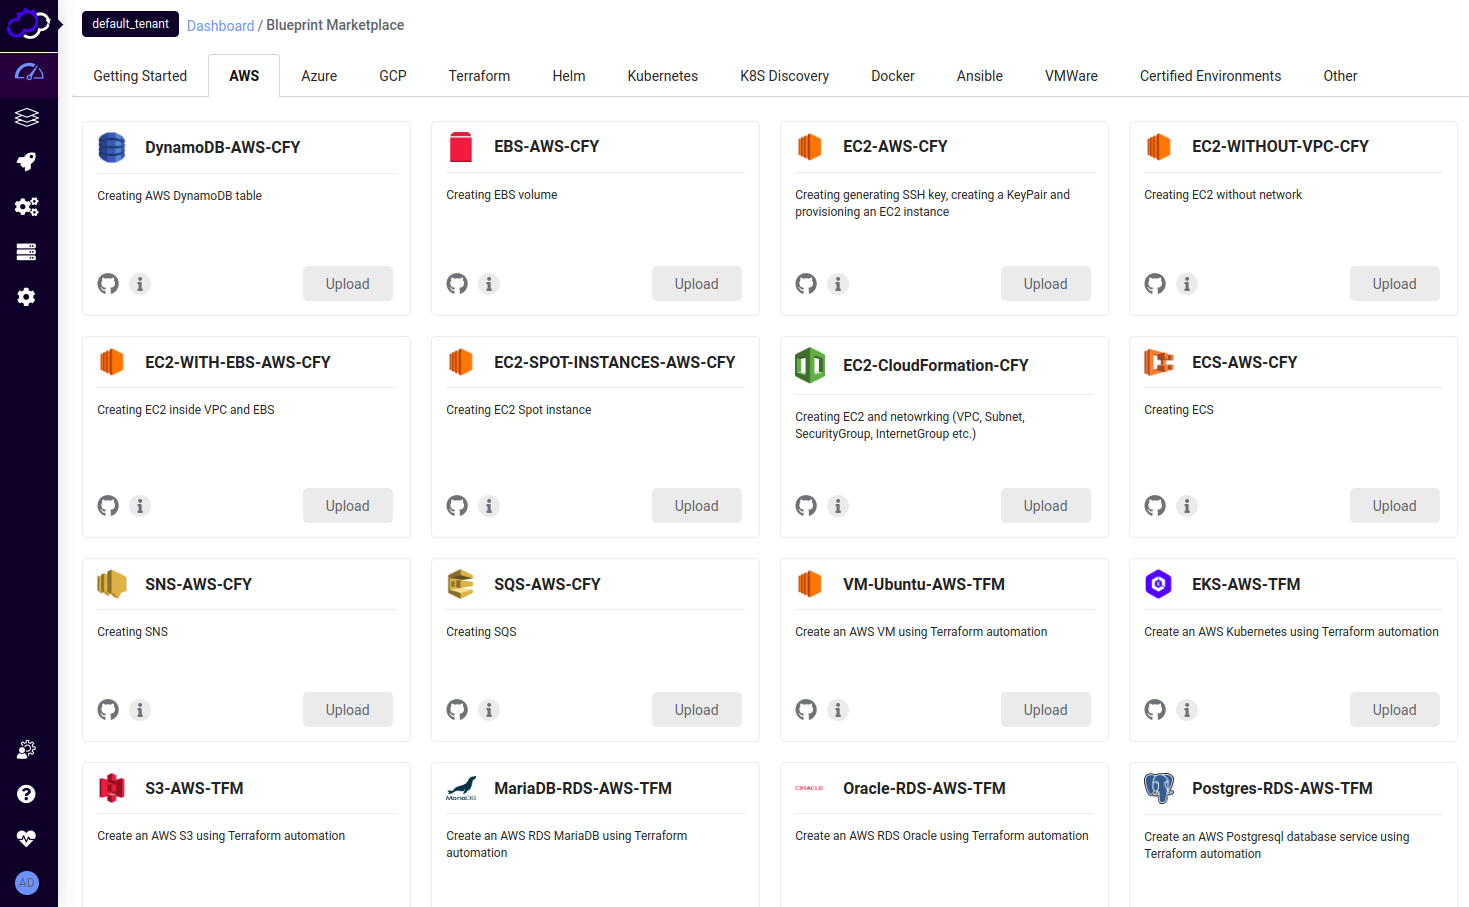
Upload from Terraform- shows Create blueprint from Terraform modal
-
Blueprint ID to filter by- Allows filtering the deployments in this list to those derived from a specific blueprint, by providing its ID (the blueprint ID is its name). Default: empty -
Display style- Can be either list or table. The deployments status column is only available in list mode. Default: List