Terraform AWS - Infrastructure provisioning basics
This example demonstrates a simple infrastructure setup in Amazon Web Services (AWS) using an Terraform template, the deployment consists of:
- Instance
- Security Group
- Network
- All of the essential peripherals in AWS (IP address, NIC, etc…).
In this example we will deploy only the infrastructure. Later, in the more advanced examples (multi cloud examples) we will leverage this setup as the basis for deploying a generic application server and an application.
Prerequisites
This example expects the following prerequisites:
- A Cloudify Manager setup ready. This can be either a Cloudify Hosted service trial account, a Cloudify Premium Manager, or a Cloudify Community Manager.
- Access to AWS infrastructure is required to demonstrate this example.
Cloudify CLI or Cloudify Management Console?
Cloudify allows for multiple user interfaces. Some users find the Cloudify Management Console (web based UI) more intuitive while others prefer the Cloudify CLI (Command Line Interface). This tutorial and all following ones will describe both methods.
Community version - Some of the options described in the guide are not available in the community version management console (web UI). An example would be setting up secrets. You can still perform all of the functionality using the Cloudify CLI.
Cloudify Management Console
This section explains how to run the above described steps using the Cloudify Management Console. The Cloudify Management Console and Cloudify CLI can be used interchangeably for all Cloudify activities.
Create Secrets
To connect to AWS, credentials are required. Cloudify recommends storing such sensitive information in a Cloudify secret. Secrets are kept encrypted in a secure way and used in run-time by the system. Learn more about Cloudify secrets here.
AWS credentials can be created by following the guide here.
To store the access keys as secrets in the Cloudify Manager, login to the Cloudify Management Console and select the System Resources page. Scroll to the Secret Store Management widget and use the Create button to add the following new secrets:
- aws_access_key_id
- aws_secret_access_key
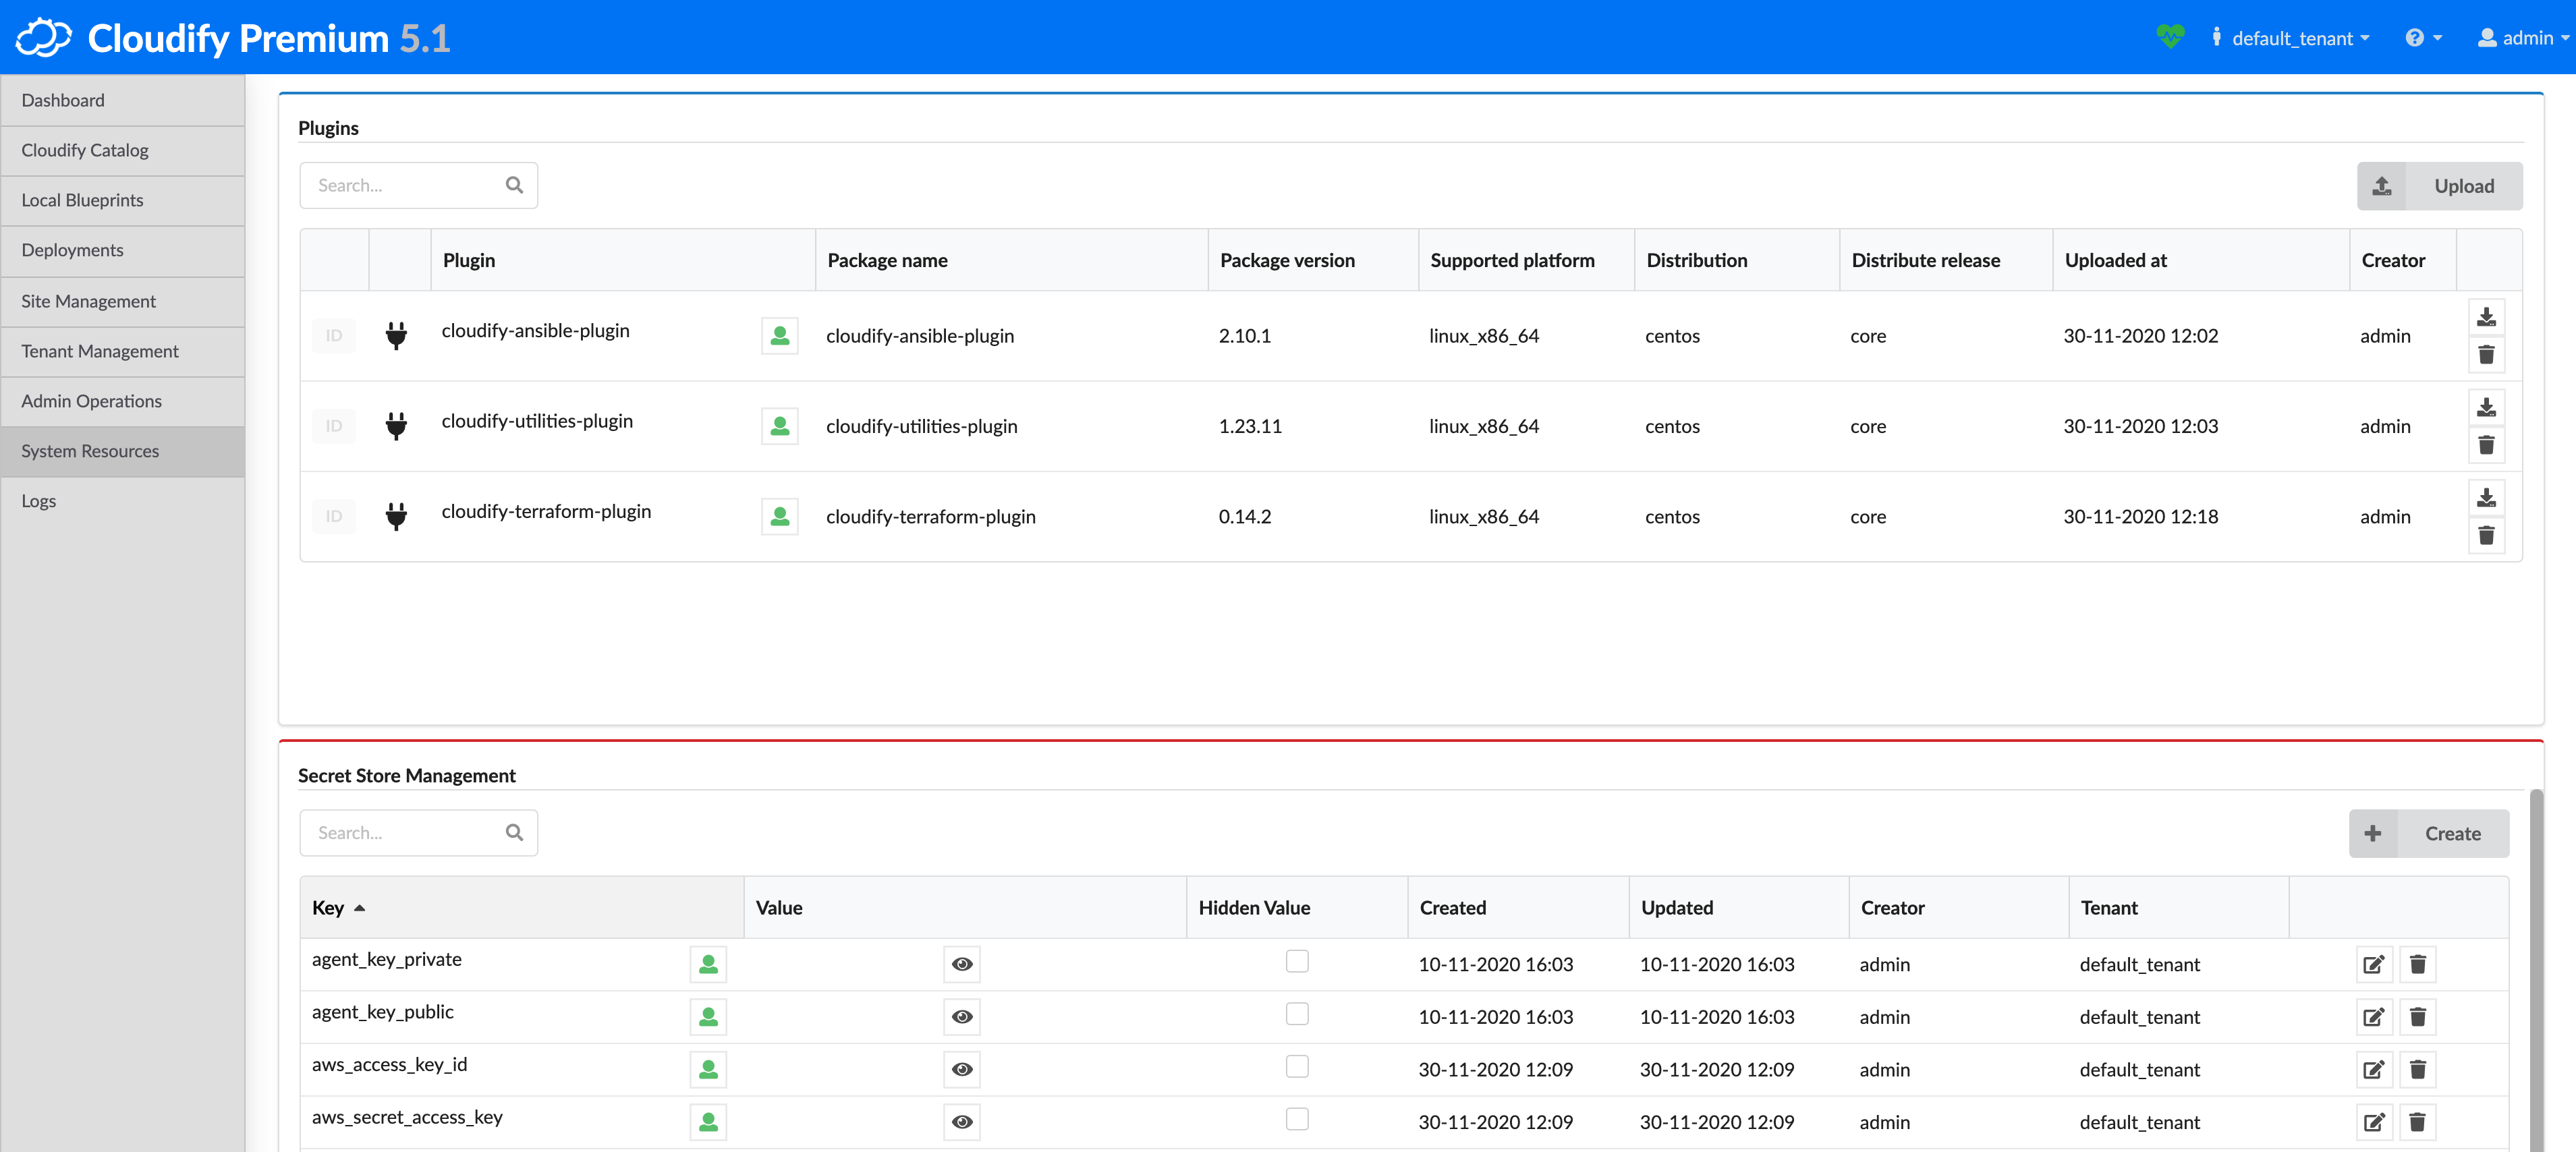
Upload Plugins
Plugins are Cloudify’s extendable interfaces to services, cloud providers and automation tools. I.e., connecting to AWS requires the AWS plugin.
To upload the required plugins to your manager, select the Cloudify Catalog page, scroll to the Plugins Catalog widget and select the plugins you wish to upload.
For this example, upload the following plugins:
- Utilities
- Terraform
- AWS
Upload Blueprint
A blueprint is a general purpose model for describing systems, services or any orchestrated object topology. Blueprints are represented as descriptive code (yaml based files) and typically stored and managed as part of the source repository. The AWS infrastructure blueprint is available here.
The flow required to setup a service consists of:
- Upload the blueprint describing the service to the Cloudify Manager.
- Create a deployment from the uploaded blueprint. This generates a model of the service topology in the Cloudify database and provides the “context” needed for running workflows.
- Run the install workflow for the created deployment to apply the model to the infrastructure.
Let’s run these one by one.
To upload a blueprint to the Cloudify Manager, select the Cloudify Catalog page, and use the Upload blueprint button next to the AWS-Basics-VM-Setup blueprint.
Deploy & Install
Once the blueprint is uploaded, it will be displayed in the Blueprints widget. to deploy the blueprint click the Create deployment button next to the blueprint you wish to deploy. Specify a deployment name, update any inputs (such as the AWS region), and click Deploy & Install. Changing inputs is completely optional and the defaults are safe to use.
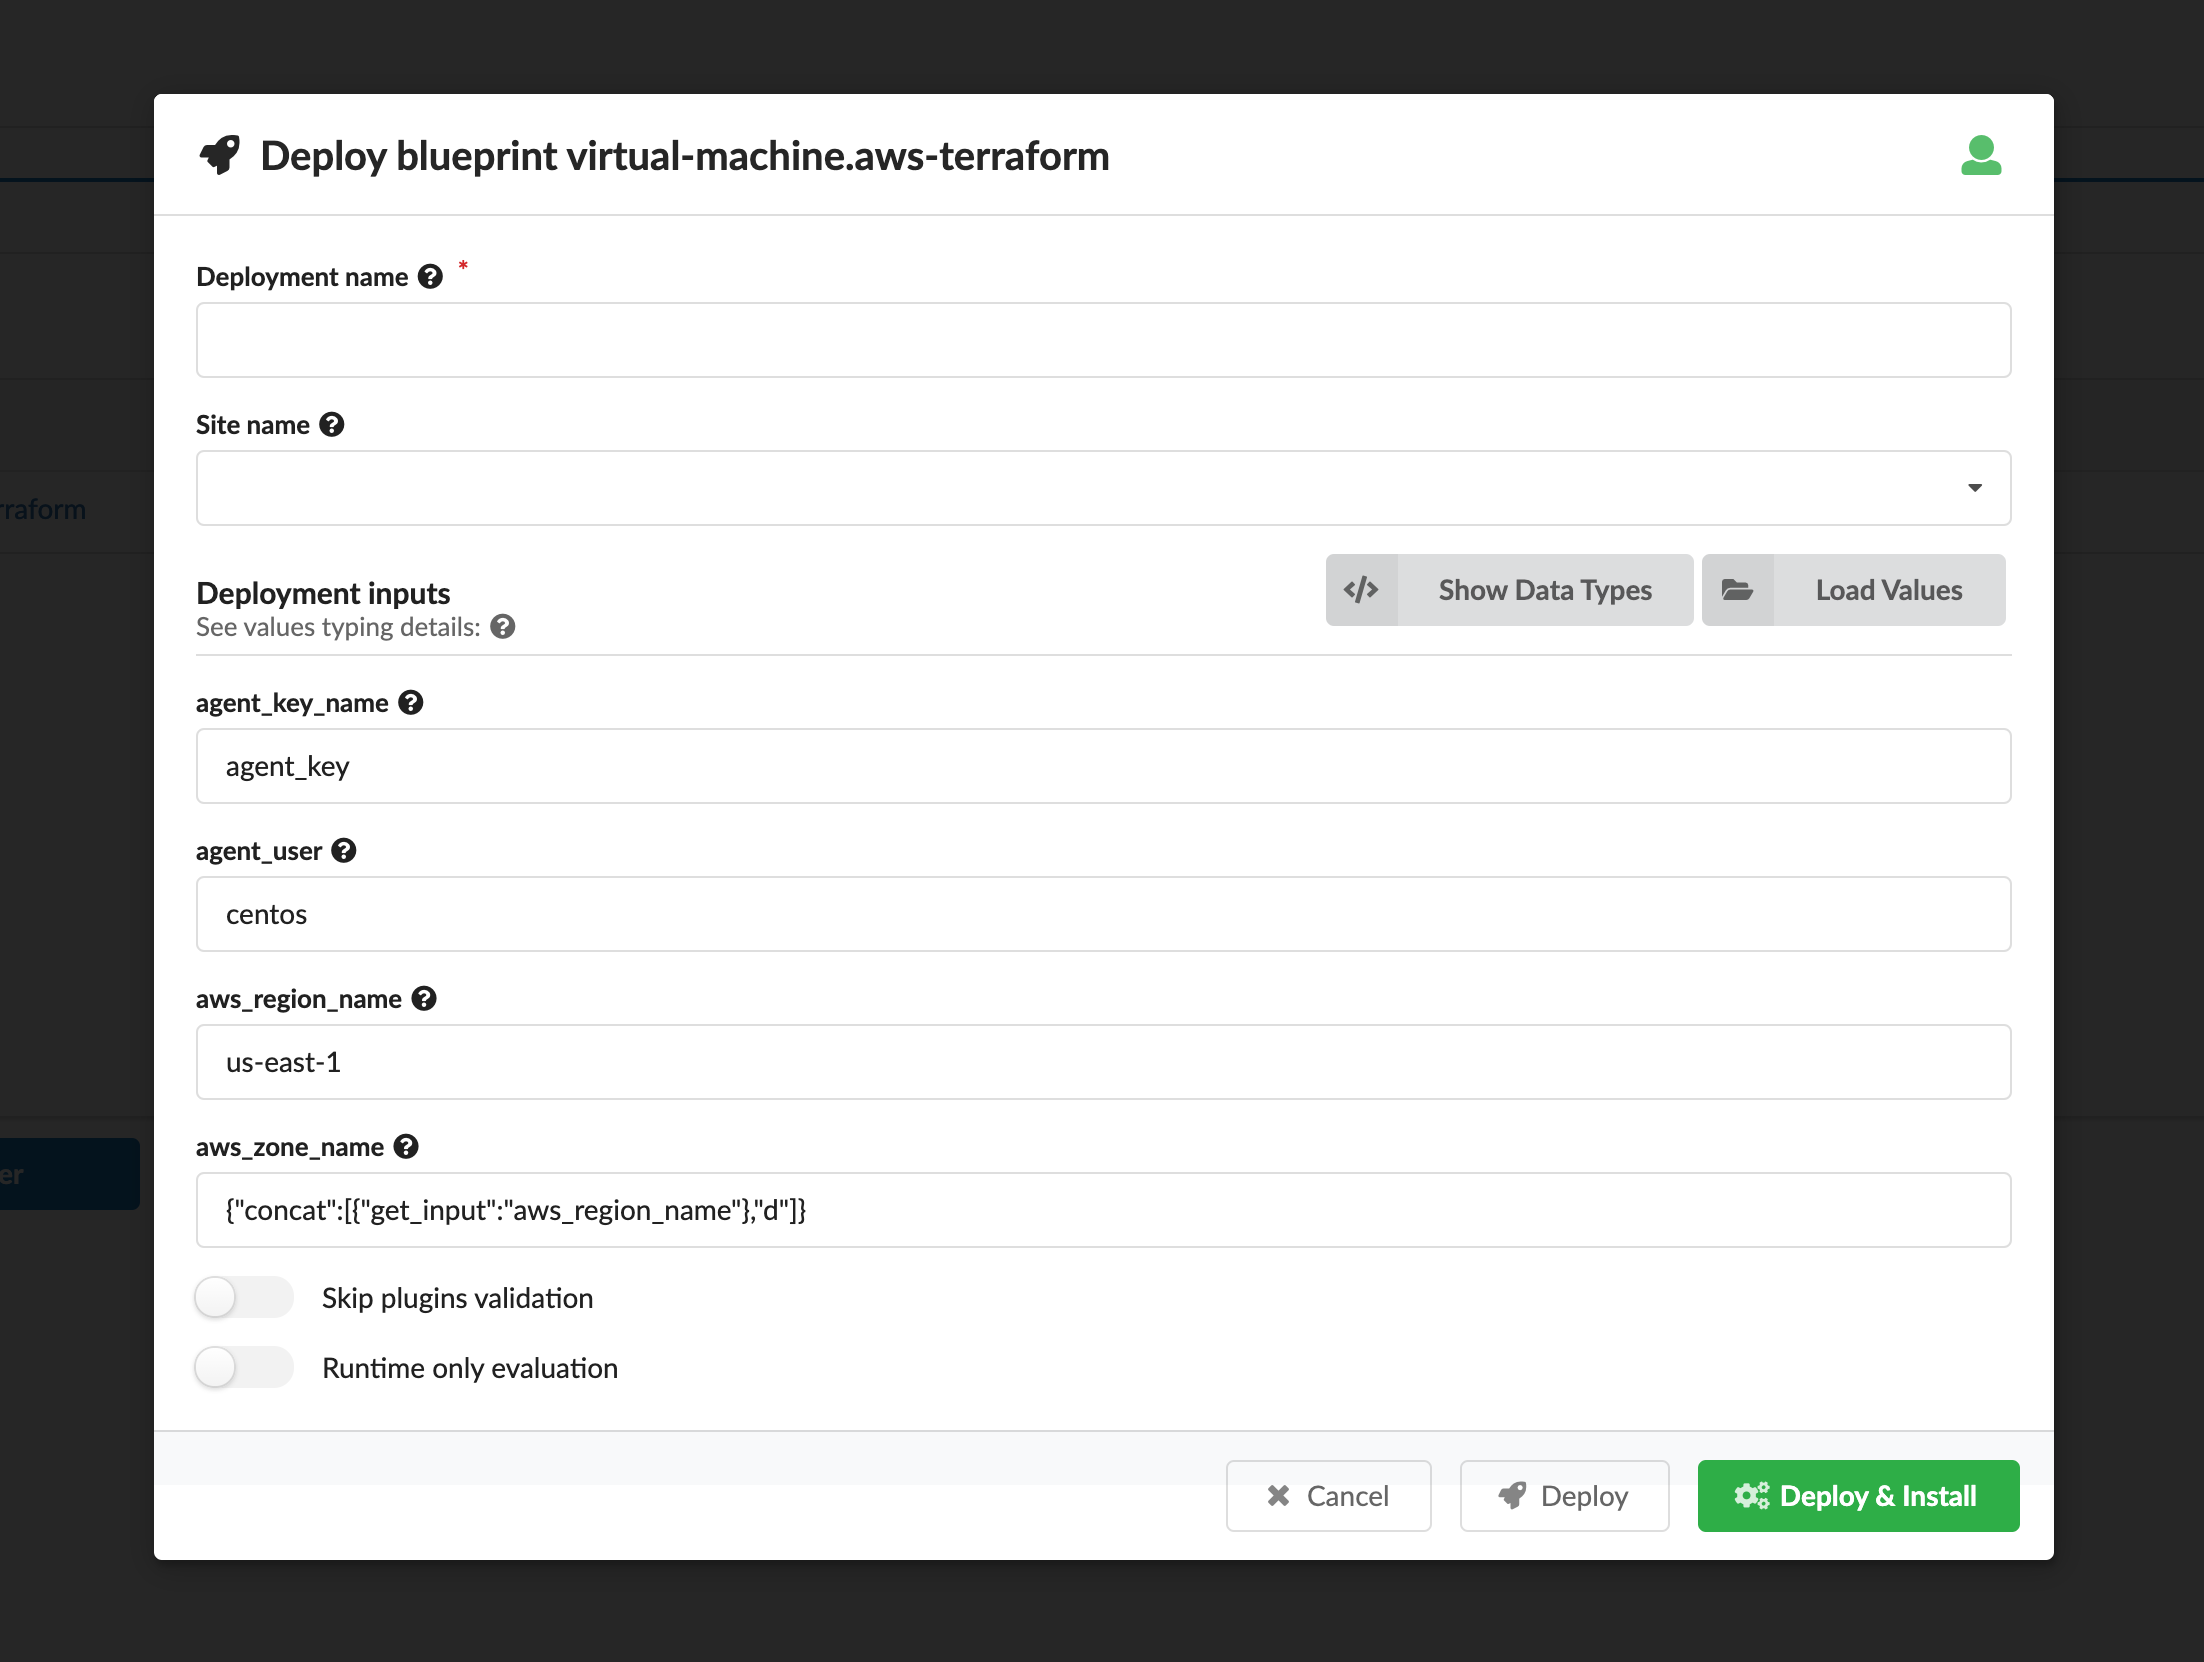
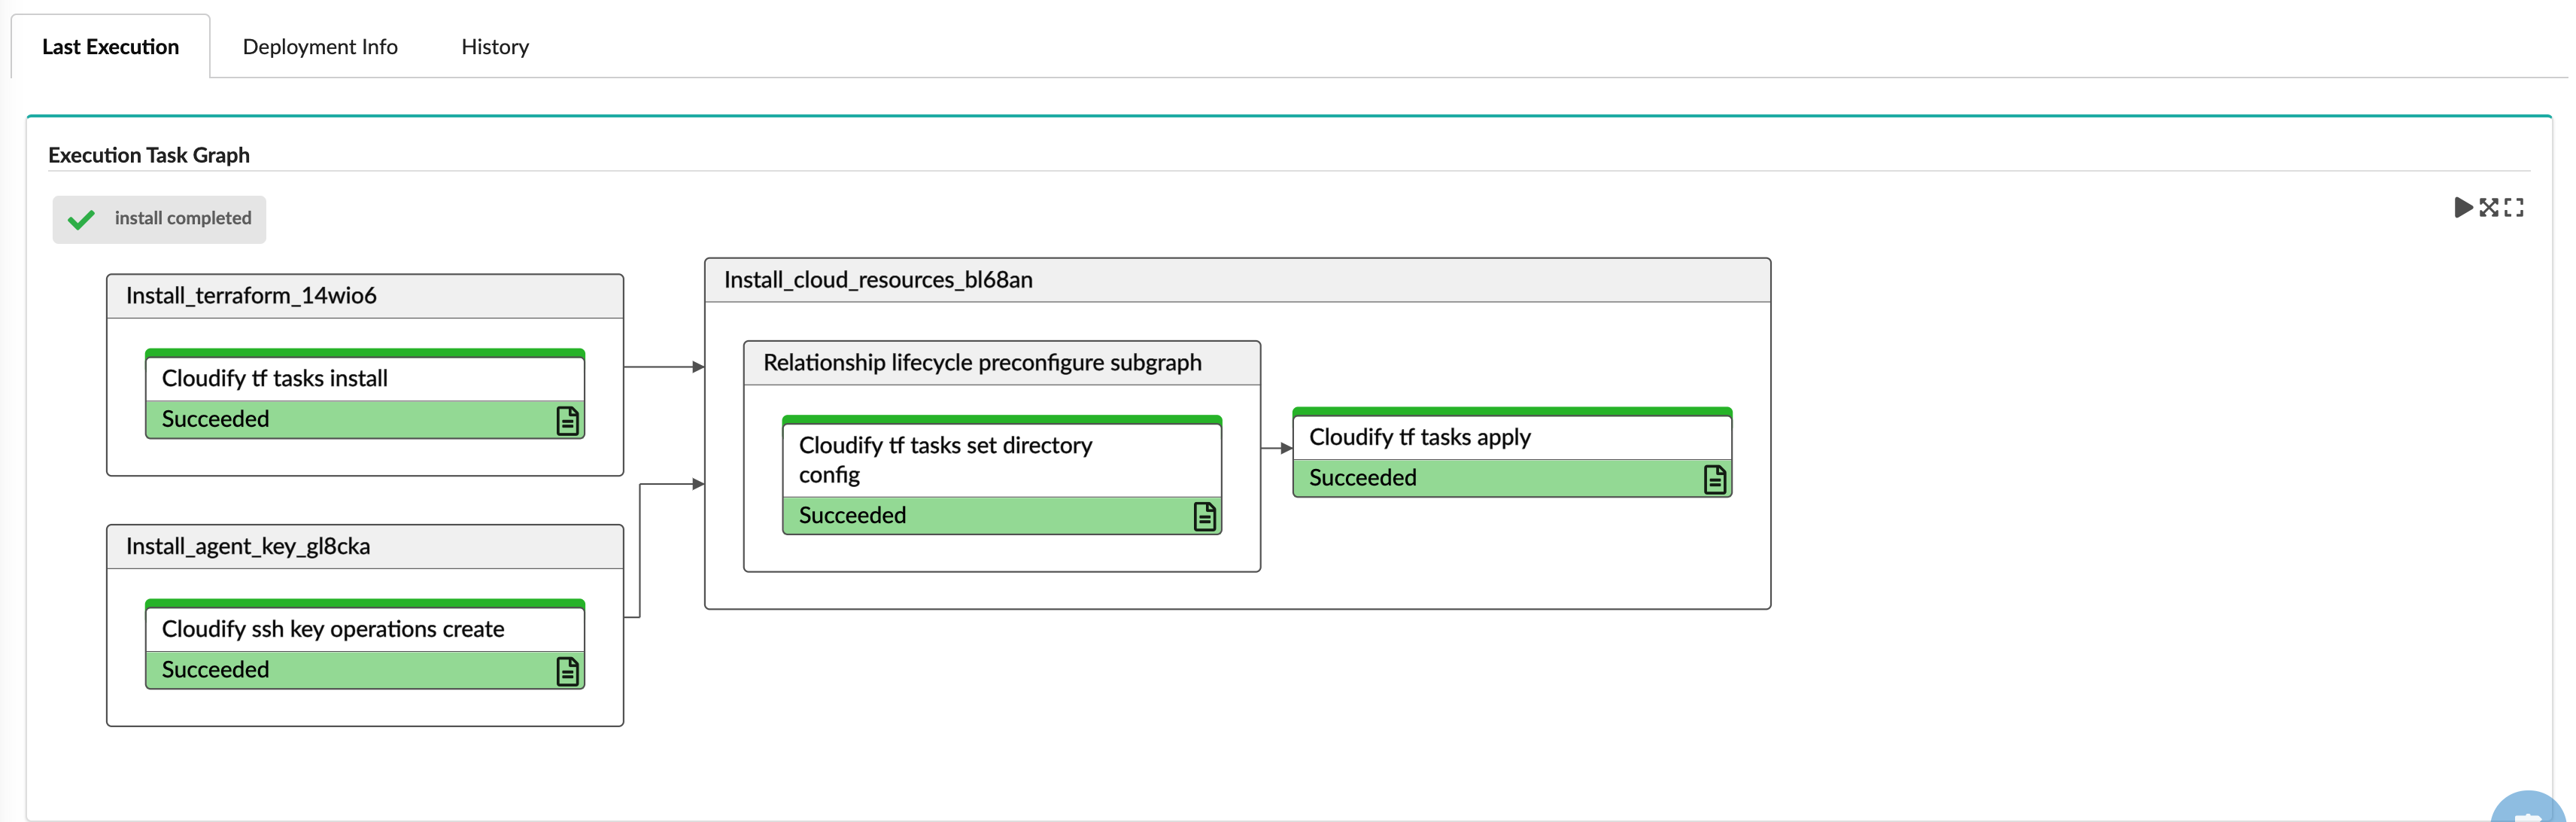
You will be directed to the Deployment page and will be able to track the progress of the execution.
The deployment you have created should be displayed in the deployments list in the Deployments page.
Validate
In this example we have setup a simple infrastructure. A virtual instance (VM) was created in the region specified in the Deployment inputs alongside a new network and various other resources.
- Go to your AWS console and see the new instance and other resources that were created.
- Examine the Deployment page in the Cloudify Management Console for more information about your deployed nodes, topology, and view the installation logs.
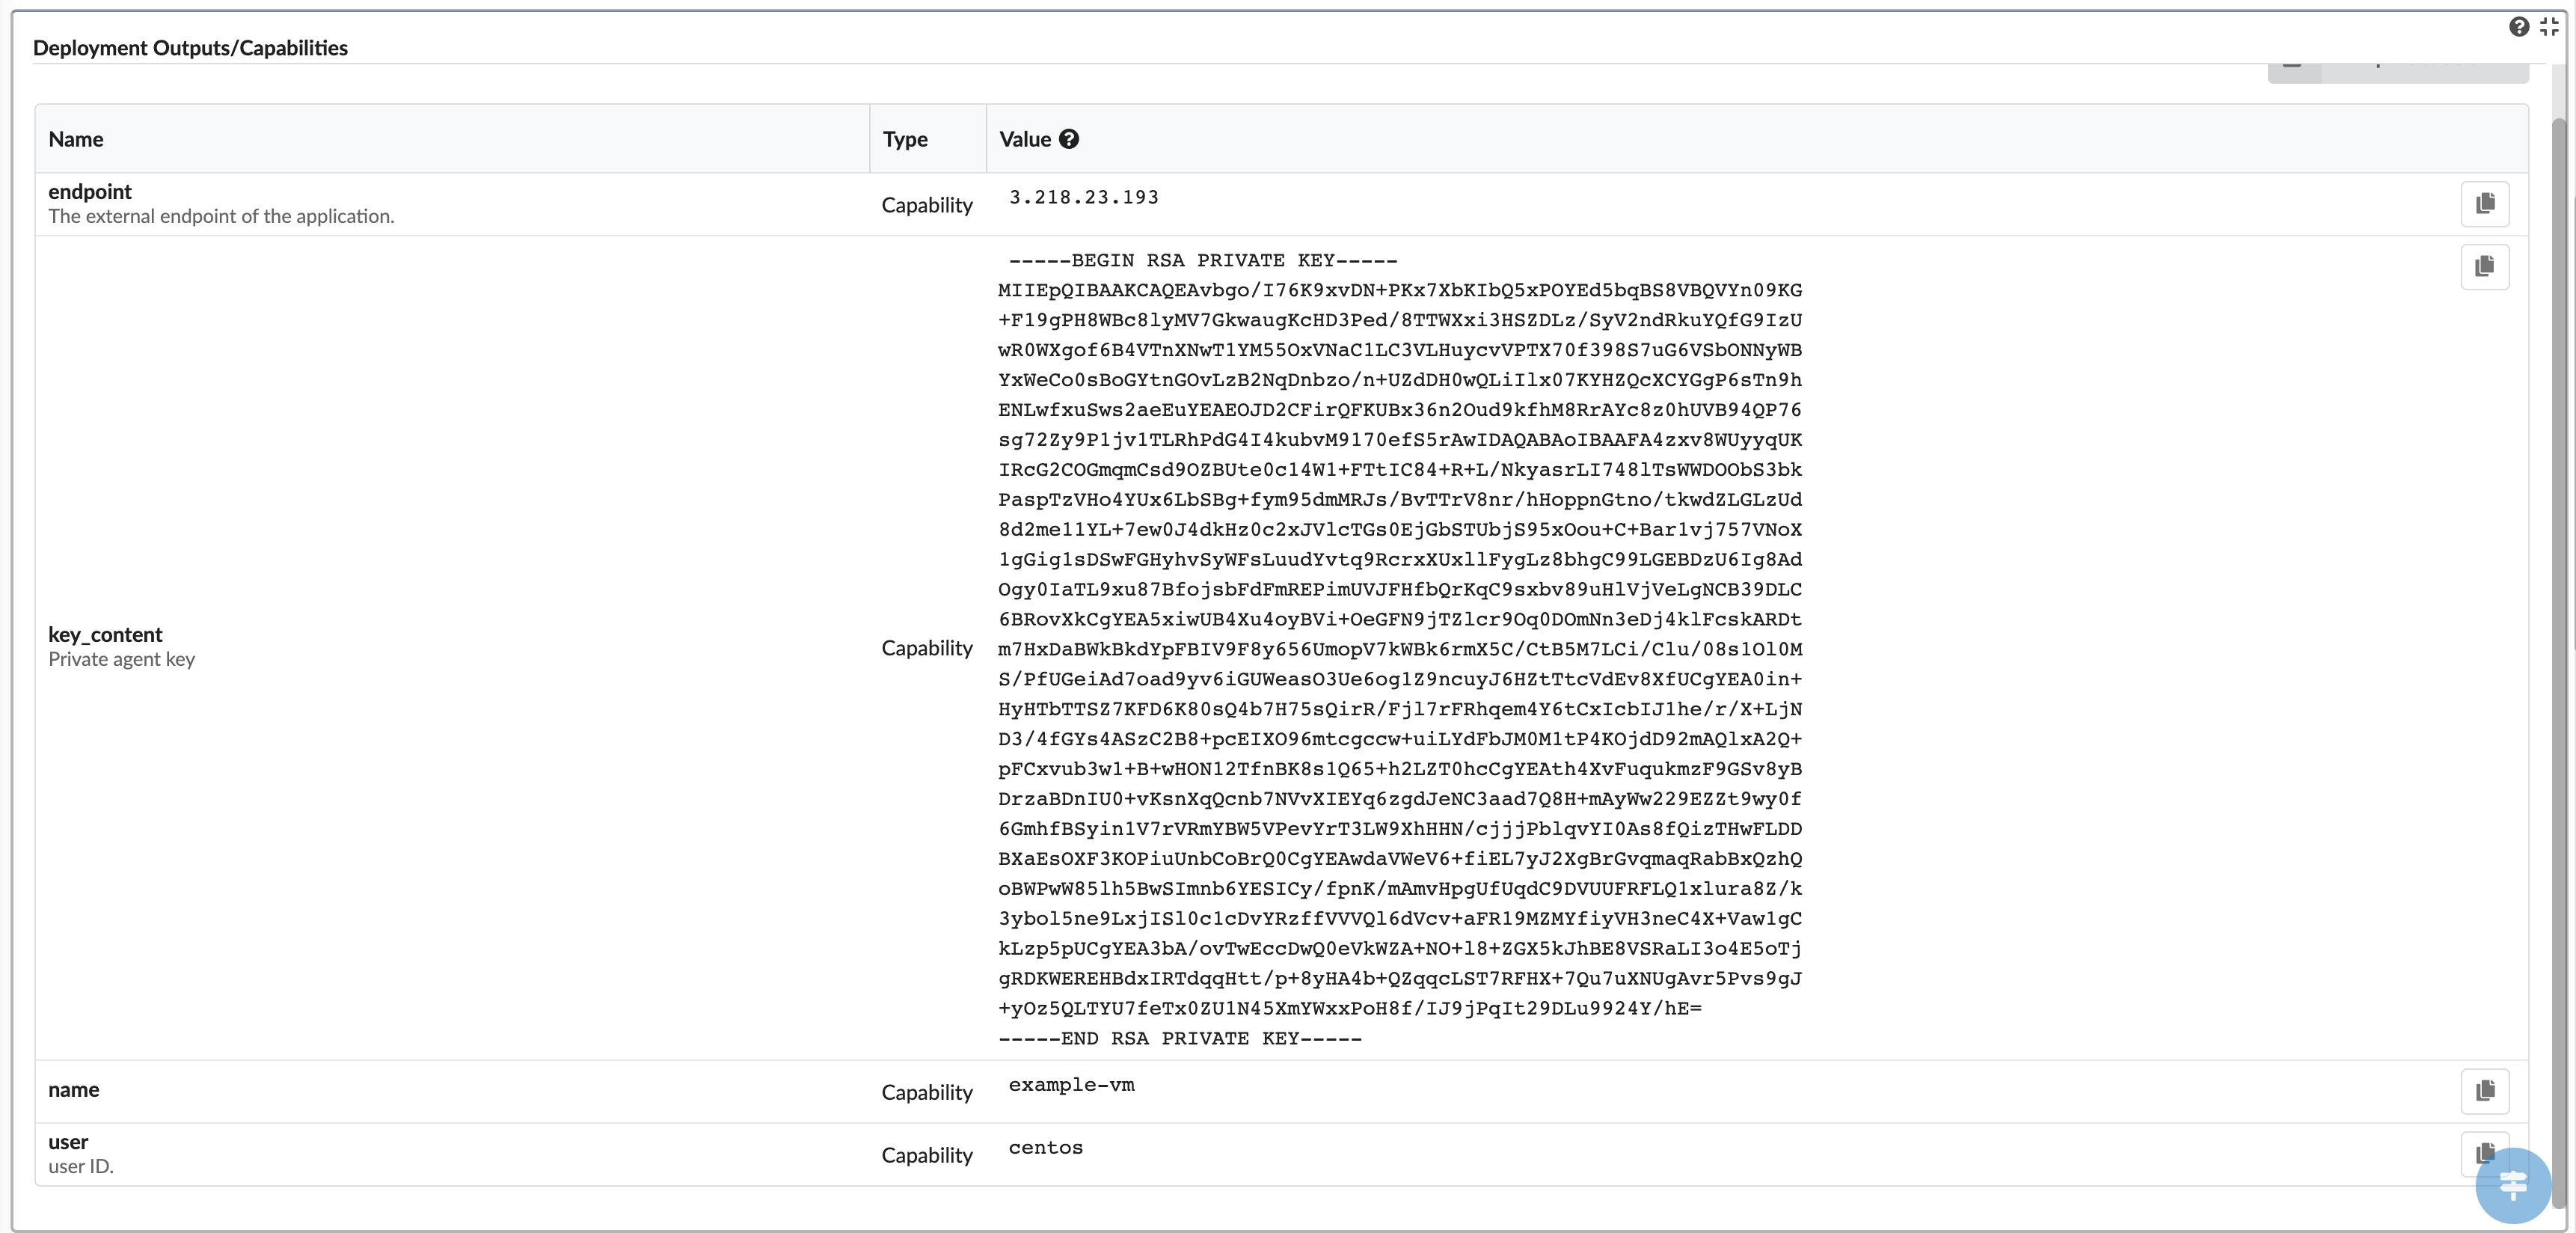
To login to your new AWS instance, you can look at the Deployment Outputs/Capabilities widget on the Deployment screen to find your AWS instance public IP, SSH username, and SSH private key.
Teardown
To remove the deployment and destroy the orchestrated infrastructure resources, run the Uninstall workflow by clicking the Execute workflow menu next to the deployment, expanding Default workflows, and selecting Uninstall.
Cloudify CLI
Create a CLI profile instructing your CLI how to connect with the Cloudify Manager by running the following CLI commands
cfy init
cfy profiles use <your manager hostname / URL / IP> -u admin -p <the admin  password> --ssl
cfy profiles set --manager-tenant default_tenant
Create Secrets
To enable Cloudify to connect to AWS, credentials are required. Cloudify recommends storing such sensitive information as a Cloudify secret. Secrets are encrypted in a secure way and used during run-time by the system. Learn more about Cloudify secrets here.
AWS credentials can be created by following the guide here.
To store the access keys as secrets via the Cloudify CLI, run the following (replacing
cfy secrets create aws_access_key_id --secret-string <value>
cfy secrets create aws_secret_access_key --secret-string <value>
Upload Plugins
Plugins are Cloudify’s extendable interfaces to services, cloud providers, and automation tools. Connecting to AWS requires the AWS plugin. You may upload specific plugins or, for simplicity, upload the plugin bundle containing all of the basic, pre-packaged, plugins.
To upload the default plugins bundle (this may take a few minutes depending on your internet speed):
cfy plugins bundle-uploadTip: Read more about plugins and writing your own plugins.
Upload Blueprint and Deploy
A blueprint is a general purpose model for describing systems, services or any orchestrated object topology. Blueprints are represented as descriptive code (YAML-based files) and are typically stored and managed as part of the source code repository.
The AWS infrastructure blueprint is available here.
Uploading a blueprint to Cloudify can be done by direct upload or by providing the link in the source code repository. The flow to do that is:
- Upload the blueprint.
- Create a deployment from the uploaded blueprint. This generates a model of the service topology in the Cloudify database and provides the “context” needed for running workflows.
- Run the install workflow for the created deployment to apply the model to the infrastructure.
In order to perform this flow as a single unit, we will use the install command.
cfy install https://github.com/cloudify-community/blueprint-examples/releases/download/latest/virtual-machine.zip -n aws-terraform.yamlValidate
In this example we have setup a simple infrastructure. A virtual instance (VM) was created in the region specified in the Deployment inputs alongside a new network and various other resources.
- Go to your AWS console and see the new instance and other resources that were created.
You can easily get a list of all deployed nodes by running:
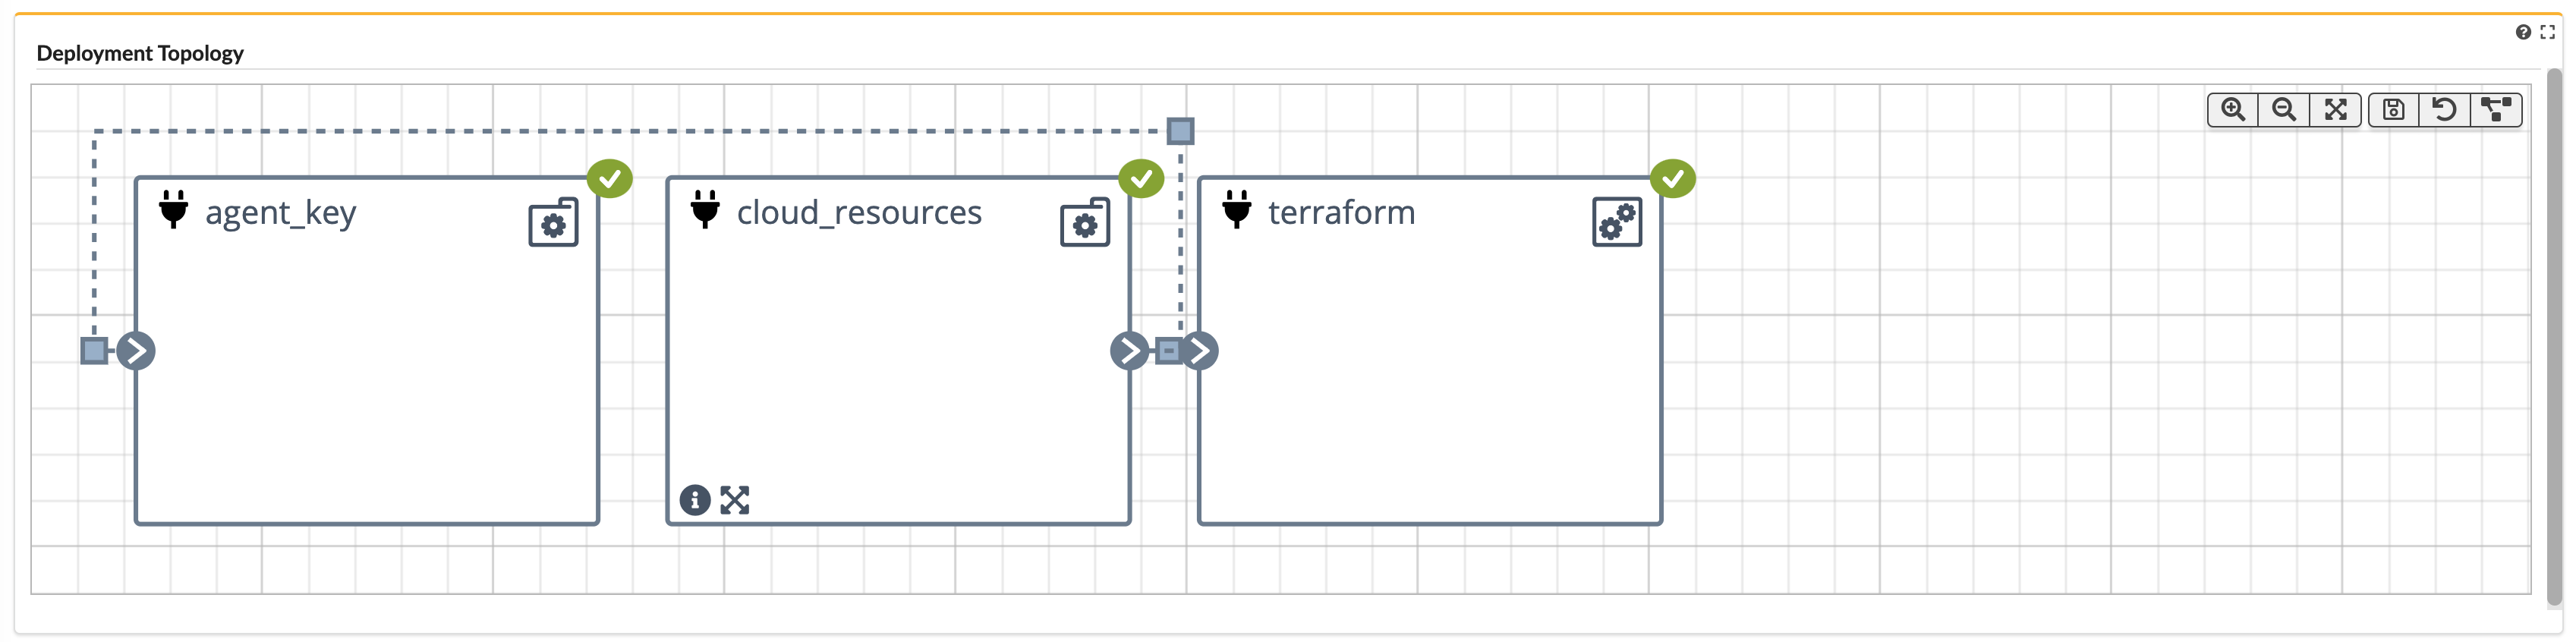
$ cfy nodes list -d {{< param deployment_name >}}

Listing nodes for deployment {{< param deployment_name >}}...

Nodes:
+-----------------+-------------------------------+-------------------------------+---------+---------------------------------+------------+----------------+---------------------+-----------------------------+------------+
|        id       |         deployment_id         |          blueprint_id         | host_id |               type              | visibility |  tenant_name   | number_of_instances | planned_number_of_instances | created_by |
+-----------------+-------------------------------+-------------------------------+---------+---------------------------------+------------+----------------+---------------------+-----------------------------+------------+
|    terraform    | {{< param deployment_name >}} | {{< param deployment_name >}} |         |     cloudify.nodes.terraform    |   tenant   | default_tenant |          1          |              1              |   admin    |
| cloud_resources | {{< param deployment_name >}} | {{< param deployment_name >}} |         | cloudify.nodes.terraform.Module |   tenant   | default_tenant |          1          |              1              |   admin    |
|    agent_key    | {{< param deployment_name >}} | {{< param deployment_name >}} |         |    cloudify.keys.nodes.RSAKey   |   tenant   | default_tenant |          1          |              1              |   admin    |
+-----------------+-------------------------------+-------------------------------+---------+---------------------------------+------------+----------------+---------------------+-----------------------------+------------+

Showing 3 of 3 nodes
Tip: To check out some more commands to use with the Cloudify Management Console, run cfy --help
An even easier way to review your deployment is through the Cloudify Management Console.
Login to the console and browse to the Deployments page.
Select the deployment ({{< param deployment_name >}}) and explore the topology, inputs, outputs, nodes, and logs.
This is also a good time to examine the blueprint used in the example. The blueprint can be examined in the Cloudify Management Console, however in this case we will go to the Cloudify examples repository in Github and examine it there: aws-terraform.yaml
Teardown
To remove the deployment and delete all resources from AWS simply run the uninstall command:
cfy uninstall {{< param deployment_name >}}