Updating a Deployment
With Cloudify, you can update a deployment. For example, if you have a sizable, complex deployment of webservers and databases, and you need to add a new type of database that must be connected to some of the existing webservers, you would update your deployment. Updating a deployment means that, instead of creating a new deployment from a blueprint to add the new nodes, you add and connect them in your existing deployment, while retaining the state of your current settings.
- A deployment update blueprint is a blueprint that contains the requested state of the deployment after the update. It is a normal and valid blueprint, that can be used to create new deployments as well, like any other blueprint on the manager. Since version 4.4, the blueprint is not uploaded specifically for the update, like in older versions. Instead, a blueprint that is already on the manager is used (passed by blueprint id).
- A step is a logical concept that represents a single change in a deployment update.
There are three different types of steps, add, remove, and modify. The scope of a step is determined by its most top-level change. For example, if a node is added that also contains a new relationship, this is an ‘add node’ step, not an ‘add relationship’ step. Similarly, if a node’s property is modified, it is not a ‘modify node’ step, but a ‘modify property’ step. A list of all possible steps is located here. - After you apply a deployment update, its composite steps are only accessible using the Cloudify REST API.
Describing a Deployment Update
The contents of the deployment update must be described in a yaml blueprint file, just as any with application in Cloudify (note that the blueprint represent the desired state of the deployment after the update). Using the example described in the introduction, the updated application blueprint would include a new database type, some new node templates of the new database type, and some new relationships that represent how these new nodes connect to the existing architecture.
Deployment Update Flow
Like any other workflow, the built-in update workflow must be a part of the deployment update blueprint in order to update a deployment using it. The recommended way of achieving this is to import types.yaml (v.3.4, or later) to your blueprint.
Updating a deployment comprises several stages:
- The steps composing the deployment update are extracted.
- All the ‘added’ and ‘modified’ changes are updated in the data model.
- The
updateworkflow is executed. As a part of the (default) update workflow execution:- The
unlinkoperation is executed in regard to each removed relationship. - The
uninstallworkflow is executed on each of the removed nodes. - Old plugins that were outdated are being uninstalled.
- The
installworkflow is executed on each of the added nodes. - The
establishoperation is executed in regard to each added relationship. - New plugins that were updated are being installed.
- The
reinstallworkflow (uninstall and install) is executed on each of the modified nodes and each of the nodes that were explicitly marked for reinstall.
- The
- All ‘removed’ changes are updated in the data model.
Workflow/operation execution during a deployment update
Stage 3 of the deployment update flow comprises only the cases in which a workflow or an operation is executed during a deployment update. That is, when changing description, removing a workflow, modifying the install-agent property or any other step that is not add/remove/modify node or relationship, no workflow or operation is executed. Note that since version 4.4, modifying an existing node (changing its properties and/or operations) will cause automatic reinstallation of this node, unless the flag --skip-reinstall has been supplied.
Using Cloudify Console to Update a Deployment
To update deployment from the Cloudify Console you can follow one of these methods:
- On the Deployments page, click on the menu icon on the right side of the deployment row and click Update.
- On the Deployments page, click on the deployment row to go into deployment’s page and on that page click Update deployment button.
You will then see Deployment Update modal window:
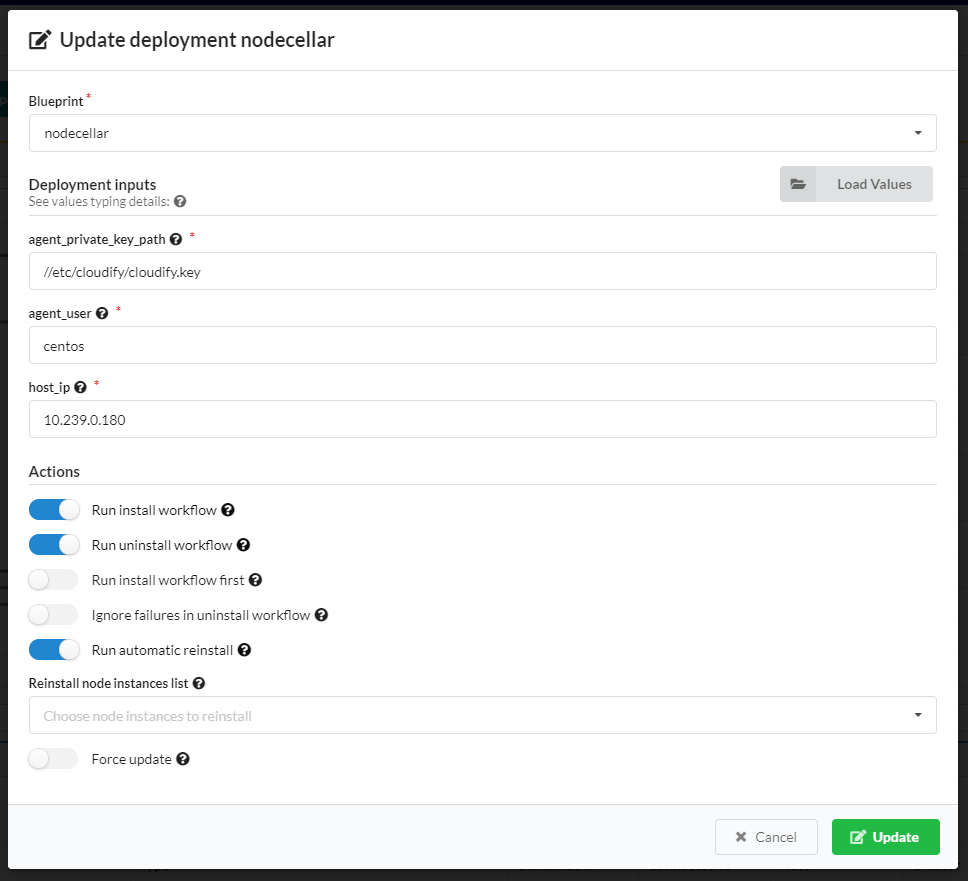
In that window you can:
- set new Blueprint for the deployment,
- set new Inputs for the deployment either automatically using inputs YAML file or providing each input value directly to the form,
- set specific Actions to be taken upon deployment update like enabling/disabling Install/Uninstall workflows on specific node instances.
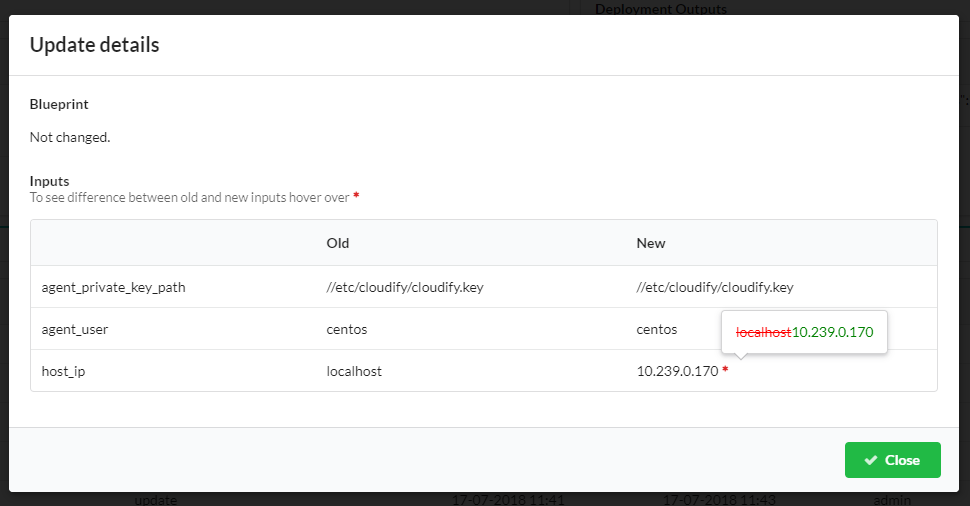
If you want to get information regarding what has been changed during an update performed in the past:
Go to Executions widget on specific deployment page
Click on the menu icon (
 ) on relevant execution and select Show Update Details option (only available in executions associated with update workflows)
See changes in Deployment Update Details modal window:
Using the CLI to Update a Deployment
You can update your deployment using the CLI. Updating a deployment via the CLI is similar to creating a deployment, besides the fact that you supply an argument of the existing deployment’s id. You must also supply either a blueprint id or new inputs (or both) for the deployment update to use. The deployment’s blueprint and inputs will be updated in the data model.
- Run the following command to update a deployment (must supply either blueprint id, or new inputs, or both):
cfy deployments update ID_OF_DEPLOYMENT_TO_UPDATE -b BLUEPRINT_ID -i UPDATED_INPUTS- Run the following command to get data about a deployment update:
cfy deployments get-update DEPLOYMENT_UPDATE_ID- Run the following command to list deployment updates (if the deployment id parameter is supplied - list updates for a specific deployment, otherwise - list updates for all deployments):
cfy deployments history [-d DEPLOYMENT_ID]See more of the CLI usage in the CLI deployments documentation.
Automatic and manual reinstall
Nodes that were modified in the update (their properties and/or operations) were changed, will be automatically reinstalled, so the modifications will take affect.
It is possible to avoid automatic reinstallation of modified nodes, by supplying the flag --skip-reinstall.
It is also possible to manually supply a list of node instances to be reinstalled by using the parameter --reinstall-list or -r. This parameter can be passed multiple times in a single command, to pass a list of node instances ids. Those node instances that were explicitly supplied will be reinstalled even if the flag --skip-reinstall has been supplied (in fact, the flag --skip-reinstall is for skipping only the automatic reinstall of modified nodes).
Note: If node’s properties that are required for the node’s uninstallation has been modified, it is recommended to use the --skip-reinstall flag, since the reinstall takes place after the properties has been updated in the data model, and the original properties that could be required for the uninstall may no longer exist. In those cases it is recommended to either split the update into 2 phase that will be performed in 2 different updates (removing the old nodes and then adding the updated ones), or to change the node names in the blueprint, to have them being treated as different nodes.
It is also recommended to use the --skip-reinstall flag in case of a plugin update that may cause reinstallation of all the nodes installed by this plugin, that may not be necessary (especially central deployment plugins, e.g: update of the openstack plugin may trigger automatic reinstallation of all the openstack nodes). It may be wise to update plugins in a separate deployment update dedicated for this action.
In case of changed properties that are not critical for a successful uninstallation, but can still cause some of the uninstall tasks to fail, the --ignore-failure flag can be used, to ignore those irrelevant failures and move on normally (more on that later).
Skipping the Install/Uninstall/Reinstall Workflow Executions
You can skip the execution of the install and/or uninstall and/or reinstall workflows during the deployment update process.
- If you skip the
installworkflow, added nodes are not installed, added relationships are not established and updated agent-host plugins are not installed (central-deployment plugins are not effected). - If you skip the
uninstallworkflow, removed nodes are not uninstalled, removed relationships are not unlinked and outdated agent-host plugins are not uninstalled (central-deployment plugins are not effected). If you skip the
reinstallworkflow, modified nodes are not reinstalled automatically (nodes that were manually chosen to reinstall will still be reinstalled).To skip the
installexecution, run the following command:cfy deployments update ID_OF_DEPLOYMENT_TO_UPDATE -b BLUEPRINT_ID --skip-installTo skip the
uninstallexecution, run the following command:cfy deployments update ID_OF_DEPLOYMENT_TO_UPDATE -b BLUEPRINT_ID --skip-uninstallTo skip the automatic
reinstallexecution, run the following command:cfy deployments update ID_OF_DEPLOYMENT_TO_UPDATE -b BLUEPRINT_ID --skip-reinstall
Manually supplying node instances to reinstall
You can explicitly supply a list of node instance ids to be reinstalled as part of the update. They will be added to the list of modified node instances that need to be reinstalled.
Even if the flag --skip-reinstall was supplied, the nodes that were explicitly passed to the reinstall list will be reinstalled.
To manually supply node instance ids to reinstall, run the following command (the parameter is passed multiple times as either
--reinstall-list, or simply-r, to form a list of node instances to reinstall):cfy deployments update ID_OF_DEPLOYMENT_TO_UPDATE -b BLUEPRINT_ID --reinstall-list NODE_INSTANCE_ID_1 -r NODE_INSTANCE_ID_2 -r NODE_INSTANCE_ID_3 --reinstall-list NODE_INSTANCE_ID_4In this case, when the update will take place all the nodes that were modified and all the nodes that were passed to the list will be reinstalled. If a node instance id is illegal (the node instance either doesn’t exist, about to be installed or about to be uninstalled) an error will be thrown and the update will not take place.
To manually supply node instance ids to reinstall, while avoiding the automatic reinstall, run the following command:
cfy deployments update ID_OF_DEPLOYMENT_TO_UPDATE -b BLUEPRINT_ID --reinstall-list NODE_INSTANCE_ID_1 -r NODE_INSTANCE_ID_2 --skip-reinstallIn this case, only the node instances that were explicitly passed (NODE_INSTANCE_ID_1, NODE_INSTANCE_ID_2) will be reinstalled. The node instances that were modified will not be automatically reinstalled.
Ignoring failures while uninstalling nodes
When running uninstall (including uninstall as part or a reinstall) there are 2 possible ways of handling a recoverable error in a task:
- Like any other workflow, retry the task until it succeeds (and then move on to the next task), or until reached the maximum retries number (and then fail the execution). This is the default behavior.
Ignore the failure and simply move on to the next task (this methods assumes that a failure in uninstall workflow is not critical and less likely to have negative affect). This behavior is used when the parameter
ignore_failureis set totrue.To set ignore_failure to be true (by passing the –ignore-failure flag), run the following command:
cfy deployments update ID_OF_DEPLOYMENT_TO_UPDATE -b BLUEPRINT_ID --ignore-failureIn this case, all failures in tasks that are part of uninstalling nodes will be ignored, and the update will continue as planned.
This can be used in different situations, for example:
- Some of the nodes that has to be uninstalled/reinstalled are damaged and their uninstallation may not work perfectly.
- The nodes that are being uninstalled have properties that were modified in this update and are being used at the nodes uninstall workflow (but not necessarily critical to its success) and the fact that they were modified may fail some tasks.
- This update is a roll-back after a failing update, so it is likely that some of its tasks will fail (uninstallation of nodes that were not installed properly in the original update).
Recovering from a Failed Update
If a deployment update workflow fails during its execution, you can try to perform a force deployment update to recover, using the -f flag. A common solution is to attempt a ‘rollback’, using a deployment update blueprint that represents the previous deployment.
To force a deployment update execution, run the following command:
cfy deployments update ID_OF_DEPLOYMENT_TO_UPDATE -b ID_OF_THE_ORIGINAL_BLUEPRINT_BEFORE_THE_FIRST_UPDATE -fAs mentioned before, in this situation it makes sense to also use the
--ignore-failureflag, like this:cfy deployments update ID_OF_DEPLOYMENT_TO_UPDATE -b ID_OF_THE_ORIGINAL_BLUEPRINT_BEFORE_THE_FIRST_UPDATE -f --ignore-failure
Changing execution order
By default, the update workflow first uninstalls deleted nodes, then installs added nodes and at last - reinstalls modified nodes.
The --install-first flag can be used to run install before uninstall (not recommended since some resources required for the nodes that are about to be installed may still be taken by the nodes that are about to be uninstalled).
To update a deployment with install running before uninstall, run the following command:
cfy deployments update ID_OF_DEPLOYMENT_TO_UPDATE -b BLUEPRINT_ID --install-firstTo update a deployment with the old behavior, before version 4.4 (install running before uninstall, and reinstall not running at all), run the following command:
cfy deployments update ID_OF_DEPLOYMENT_TO_UPDATE -b BLUEPRINT_ID --install-first --skip-reinstall
Providing Inputs
You can provide new inputs while updating a deployment. You provide the inputs in the same manner as when creating a deployment, with the following important distinctions:
- Overriding inputs
If you provide an input with the same name as an existing deployment input, it overrides its value. Other new inputs will be added to the data model as usual.
Example: Overriding inputs of existing nodes
Assume that you have the following node in your deployment, and that the port input has a value of 8080:
    webserver:
        [...]
        properties:
            port: {get_input: port}
Any new nodes (including new webserver nodes) that were added as a part of that deployment update and use the port input, are assigned with the new port input value - 9090.
The overriden input will cause a modification in the webserver node (his port property was changed). This will trigger an automatic reinstallation of all the instances of the webserver node, so the updated port will take affect.
If the --skip-reinstall flag was passed, automatic reinstall will not be triggered, and although the input was overriden to 9090, the actual port on the existing server will remain 8080.
- Referencing Existing Resources and Uploading New Ones
Since the blueprint has to be uploaded before using it to update the deployment, it has to be a valid blueprint that can be used to create new deployments as well. Therefore, each resources that are being used in this blueprint must be imported or attached to it (cannot rely on resources from the original deployment blueprint). Any resource (scripts, data files, etc.) that will be uploaded with the same name as a resource in the original deployment, will overwrite it. However, entries from theimportssection that were part of that deployment’s blueprint, or of a previous deployment update, must also be a part of the deployment update blueprint. For example, if thehttp://www.getcloudify.org/spec/cloudify/4.4/types.yamlentry was contained in the imports in the blueprint of the original deployment, the deployment update blueprint must also contain the content of that file. (This is generally achieved by importing the sametypes.yamlfile, or a newer version).
Unsupported Changes in a Deployment Update
If a deployment update blueprint contains changes that are not currently supported as a part of an update, the update is not executed, and a message indicating the unsupported changes will be displayed to the user. Following is a list of unsupported changes, together with some possible examples.
Node Type
You cannot change a node’s type.
# original deployment blueprint
node_templates:
    node1:
        type: my_type
# deployment update blueprint
node_templates:
node1:
type: my_updated_type # unsupported update - can't modify a node's type!contained_in Relationship Target
You cannot change the target value of a cloudify.relationships.contained_in type relationship, or any type that derives from it.
# original deployment blueprint
node_templates:
    node1:
        relationships:
          - type: cloudify.relationships.contained_in
            target: node2
# deployment update blueprint
node_templates:
node1:
relationships:
- type: cloudify.relationships.contained_in
target: node3 # unsupported update - can't modify a contained_in relationship's targetRelationship Properties
You cannot change a relationship’s property, for example, connection_type.
# original deployment blueprint
node_templates:
    node1:
        relationships:
          - [...]
            properties:
                connection_type: all_to_all
# deployment update blueprint
node_templates:
node1:
relationships:
- [...]
properties:
connection_type: all_to_one # unsupported update - can't modify a relationship's propertyGroups, Policy Types and Policy Triggers
You cannot make changes in the top level fields groups, policy_types and policy_triggers as a part of a deployment update blueprint.
What Can be Updated as a Part of a Deployment Update
The following can be updated as part of a deployment update, subject to the limitations that were previously described in the Unsupported Changes section.
Nodes
You can add or remove nodes, including all their relationships, operations, an so on. Remember that adding or removing a node triggers the install/uninstall workflow in regard to that node.
Assume that the original deployment blueprint contains a node named node1. Then, in the deployment update blueprint, you decide to ‘rename’ that node, to node2. Now the deployment update blueprint’s node2 is identical to node1 in the original blueprint, except for its name. But in practice, there isn’t really a ‘renaming’ process. In this scenario, node1 is uninstalled and node2 is installed, meaning that node1 does not retain its state.
# original deployment blueprint
node_templates:
    node1:
        [...]
# deployment update blueprint
node_templates:
node2: # node1 will be uninstalled. node2 will be installed
[...]Relationships
With the exception of being added or removed as part of adding or removing a node, you can add or remove relationships independently. Adding a relationship triggers an execution of its establish operations (assuming a default install workflow). Similarly, removing a relationship triggers an execution of the unlink operations. You can also change a node’s relationship order. The operations of the added and removed relationships are executed according the order of the relationships in the deployment update blueprint.
# original deployment blueprint
node_templates:
    node1:
        relationships:
          - type: cloudify.relationships.connected_to
            target: node2
# deployment update blueprint
node_templates:
node1:
relationships:
- type: cloudify.relationships.connected_to
target: node3 # the previous relationship to node2 will be removed (unlinked), and a new relationship to node3 will be added (established)Operations:
You can add, remove or modify node operations and relationship operations.
# original deployment blueprint
node_templates:
    node1:
        interfaces:
            interface1:
                operation1:
                    implementation:
                        plugin1.path.to.module.taskA
                operation2:
                    implementation:
                        plugin2.path.to.module.taskA
        relationships:
          - [...]
            source_interfaces:
                interface1:
                    operation1:
                        implementation:
                            plugin1.path.to.module.taskB
plugins:
    plugin1:
        [...]
    plugin2:
        [...]
# deployment update blueprint
node_templates:
node1:
interfaces:
interface1:
operation1:
implementation: # modified operation1 (changed implementation)
plugin1.path.to.module.taskB
# removed operation2
operation3: # added operation 3
implementation:
plugin2.path.to.module.taskB
relationships:
- [...]
source_interfaces:
interface1:
operation1:
implementation: # modified operation1 (changed implementation to a different plugin)
plugin2.path.to.module.taskC
plugins:
plugin1:
[...]
plugin2:
[...]Properties
You can add, remove, or modify properties. Note that overriding a default property value is treated as a property modification.
# original deployment blueprint
node_templates:
    node1:
        type: Cloudify.nodes.Compute
    node2:
        type: my_custom_node_type
        properties:
            prop1: value1
# deployment update blueprint
node_templates:
node1:
type: Cloudify.nodes.Compute
properties:
ip: 192.0.2.1 # modified the property by overriding its default (from types.yaml)
node2:
type: my_custom_node_type
properties:
# removed property prop1
prop2: value2 # added property prop2Outputs
You can add, remove or modify outputs.
# original deployment blueprint
outputs:
    output1:
        value: {get_input: inputA}
    output2:
        [...]
# deployment update blueprint
outputs:
output1:
value: {get_input: inputB} # modified the value of output1
# removed output2
output3: # added output3
[...]Workflows
You can add, remove or modify workflows.
# original deployment blueprint
workflows:
    workflow1: plugin_name.module_name.task1
    workflow2:
        [...]
# deployment update blueprint
outputs:
workflow1:
value: plugin_name.module_name.task2 # modified the value of workflow1
# removed workflow2
workflow3: # added workflow3
[...]Plugins
You can add, remove or modify plugins.
# original deployment blueprint
imports:
  - plugin:plugin-name-1?version=1.0
  - plugin:plugin-name-2?version=1.0
# deployment update blueprint
imports:
- plugin:plugin-name-1?version=2.0
- plugin:plugin-name-3?version=1.0In this example, plugin-name-1 will be updated from version 1.0 to version 2.0, plugin-name-3 will be added to the deployment, and plugin-name-2 removed from it.
In cases of updating a plugin that was used to install nodes in the deployment (for example, openstack plugin used to install openstack nodes), the plugin update may trigger automatic reinstallation of those nodes. It can be avoided by using the --skip-reinstall flag.
Note: it is possible to import plugins without stating a specific version. In this case, the newest plugin available with the matching name and distribution will be used. The plugin is being associated with the blueprint when the blueprint is uploaded, so it is possible that the same blueprint that was uploaded twice will be associated each time with a different plugin version. When updating a deployment with a specific blueprint, the plugins that will be used in this deployment from now on are those associated with the blueprint. So updating a plugin’s version in a deployment can be done by uploading the same blueprint again without any changes, if a newer plugin is available (and this version update can also happen unintentionally and needs to be considered).
Description:
You can add, remove or modify the description.
Adding a description:
# original deployment blueprint
# no description field
# deployment update blueprint
description: new_description # added descriptionRemoving a description:
# original deployment blueprint
description: description_content
# deployment update blueprint
# removed the descriptionModifying a description:
# original deployment blueprint
description: old_description
# deployment update blueprint
description: new_descriptionKnown Issues
Policy types - Unsupported Changes
When using a types.yaml file of version 3.3.1 or older, you might encounter the following error while trying to update your deployment, even if your policy types are identical between the original and deployment update blueprints:
The blueprint you provided for the deployment update contains changes currently unsupported by the deployment update mechanism.
Unsupported Changes:
followed by one or two of the following lines:
policy_types:cloudify.policies.types.ewma_stabilized
policy_types:cloudify.policies.types.threshold
This problem originates from a DSL issue, and will be resolved in versions 3.4.1 and above.
To mitigate this problems, use a types.yaml of version 3.4 and above, or at least use the policy_types section of it.