Integrating with LDAP
Cloudify provides a user management mechanism, so you can define different users with different permissions, and upon login perform authentication and authorization to control the users’ access to resources.
The users can be either defined and managed in Cloudify itself, or you can configure your Manager to integrate with an LDAP-based user-management system.
You must select one of these options, as you cannot do both, and you must configure your manager accordingly upon installation or immediately afterwards, when no actions were performed on it yet.
User management can be performed using the CLI or the Cloudify Console.
You must have Cloudify Manager administrator permissions to perform user-management related actions.
Managing users by Integrating with an LDAP System
If you choose to integrate with an external user-management system, make sure your manager is configured accordingly:
First, you must know the URL of the LDAP service and have sufficient credentials to an LDAP user with search permissions.
You then configure Cloudify with the LDAP configuration during the installation process, in the ldap section of the config.yaml file. You can also use the API to configure an LDAP connection after Cloudify Manager is installed, using the cfy ldap set command, as long as the Manager is clean, meaning that no tenants, groups, users or resources exist in it.
Usage
cfy ldap set [OPTIONS]
Options
-s, --ldap-server TEXT The LDAP server address to authenticate against [required]
-u, --ldap-username TEXT The LDAP admin username to be set on the Cloudify manager [required]
-p, --ldap-password TEXT The LDAP admin password to be set on the Cloudify manager [required]
-d, --ldap-domain TEXT The LDAP domain to be used by the server [required]
-a, --ldap-is-active-directory Specify whether the LDAP used for authentication is Active-Directory
-e, --ldap-dn-extra TEXT Extra LDAP DN options
-h, --help Show this message and exit
Example
cfy ldap set -a -s ldap://<LDAP SERVER IP>:389 -u <LDAP ADMIN USER> -p <LDAP ADMIN USER PASSWORD> -d <DOMAIN.com>
How Cloudify Manager Works with the LDAP Service
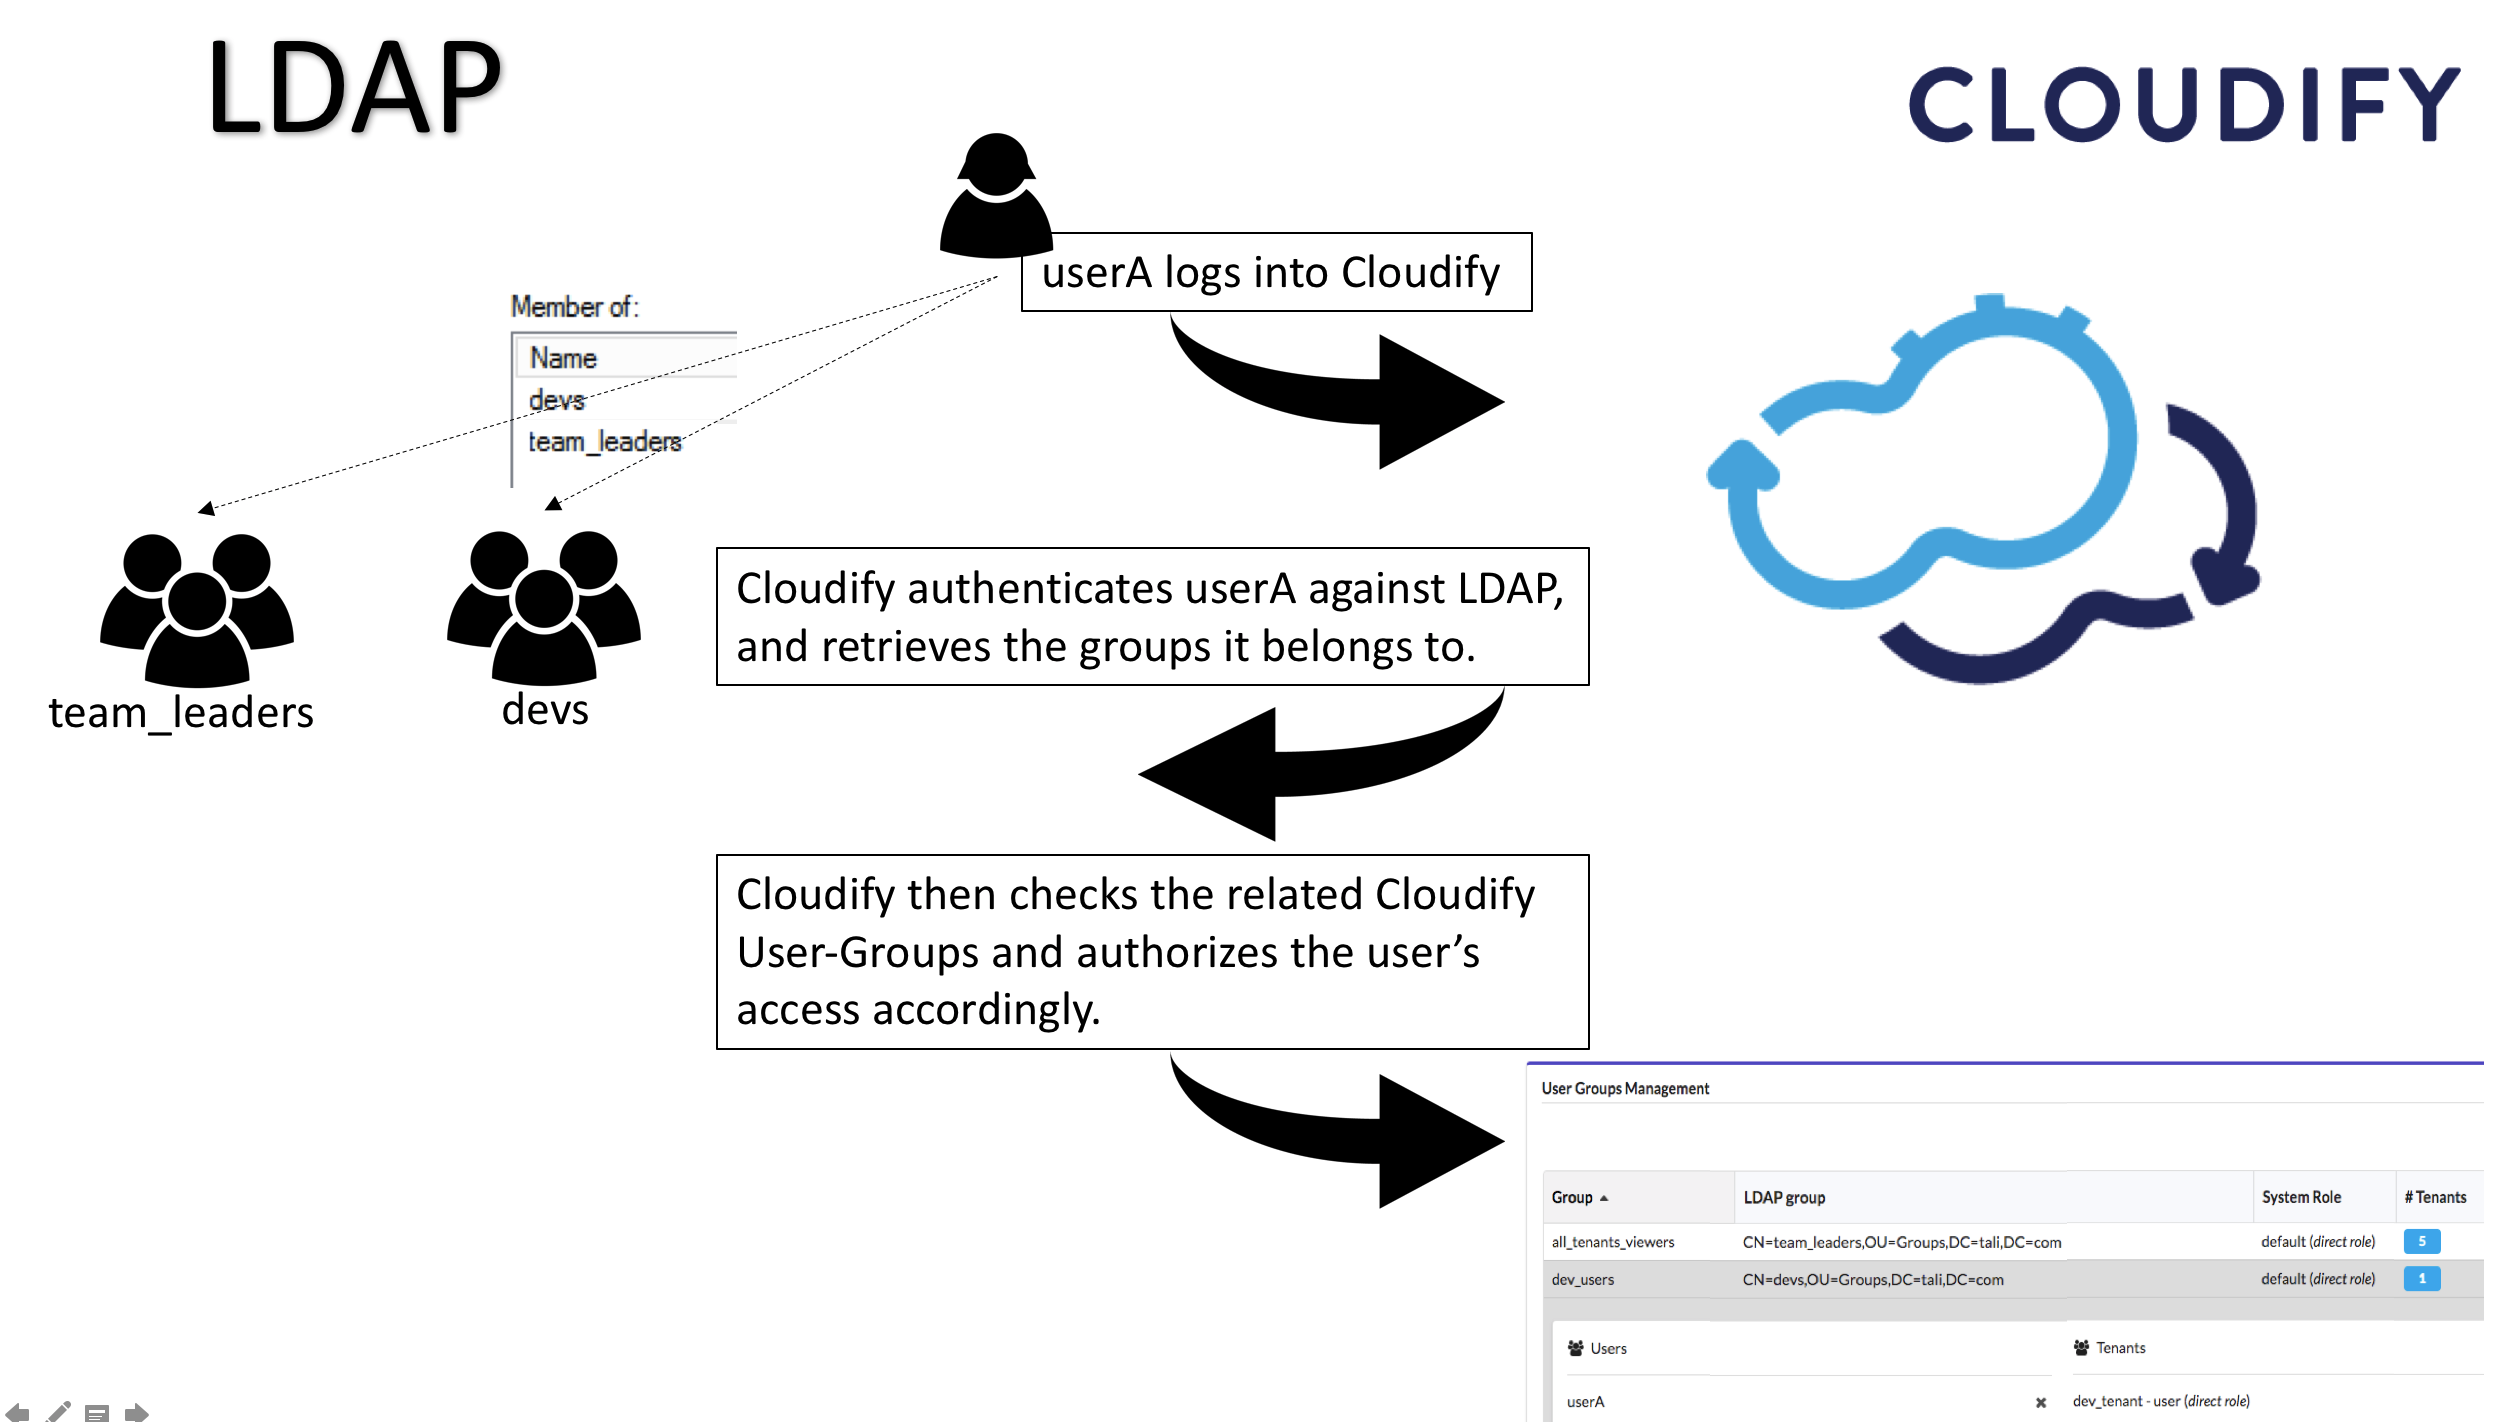
When integrating with an LDAP system, Cloudify will not allow you to manage users from the Manager, to prevent conflicts between the two systems which might cause security problems. Instead, users will log into Cloudify with their LDAP credentials, and the Manager will authenticate them against the LDAP service. To finish the authorization process into Cloudify, the users will have to belong (directly, or via nested groups) to an LDAP group connected to one or more Cloudify Tenants.
Connecting Cloudify user-groups with the LDAP groups
To create this connection between the LDAP system and Cloudify you must create user-groups in Cloudify that represent your LDAP user groups. You then assign those Cloudify groups to tenants in Cloudify Manager, with the desired roles. When a user logs into Cloudify, a request is sent to the LDAP system for authentication and identification of the groups to which the user belongs (including groups that contains groups that eventually contains the user - aka nested groups). Cloudify then identifies the tenants that the Cloudify groups (that represent the LDAP groups) can access, and allows user access according to the permissions the roles of the groups provide. For more information on creating a user group, see either the CLI command, or the Cloudify Console.
In case a user belongs to multiple groups which are assigned to the same tenant with different roles, the user’s permissions in the tenant will be a sum of all the permission it receives from the different groups. For example, let’s say userA is a member of two Groups in LDAP – “team_leaders”, and “devs”. The team_leaders group is associated in Cloudify with the group “all_tenants_viewers”, which is assigned to all of the manager’s tenants with the role “Viewer”. The “devs” group is associated in Cloudify with the group “dev_users”, which is assigned to dev_tenant with the role “User”. So, userA is now assigned to dev_tenant twice – once as a Viewer and once as a User. Upon logging into this tenant, the permissions userA will have will be a sum of the permissions of the two roles. For more information regaring the user-roles, see Managing Roles. After users have logged in to Cloudify, they are visible in the users list, but you cannot perform any management actions on their profiles.
LDAP passwords are not saved in Cloudify Manager.
Roles management with Ldap
Upon assigning a user or a user-group to a tenant, we must specify their permissions in this tenant. This is being done by adding a User Role. In user creation, we define whether the users are admins or not. If admins, they will automatically have maximal permissions to all tenants. If not, they will be marked as “default” users, meaning they exist in the system but need to be explicitly assigned to specific tenants with specific roles.
When using LDAP, we don’t manage the users, but the user-groups, so we will manage the roles through them.
When a user-group is added to a tenant, a specific tenant role must be assigned to it. By adding a user to a specific user-group, that user will inherit that user-group tenant-association along with its tenant-role (and the same for all the groups that recursively contain this group).
Adding Users Manually
If you choose not to integrate Cloudify Manager with LDAP systems, you must add each user individually and set a password for them. You can also create user-groups and add users to them. The users and user groups can be assigned to one or more tenants.
For more information, see the users and user-groups commands in the CLI documentation.