Configuring Multi-Tenancy
Multi-tenancy is a Cloudify Premium-edition feature that enables you to create multiple independent logical groups of resources as isolated environments on a single Cloudify Manager. A tenant is a logical entity that contains a group of Cloudify resources such as blueprints, deployments, executions, plugins and secrets. Using multi-tenancy is useful when you want to limit access to a specific set of data to a defined set of users.
With the multi-tenant ability, you can create tenants and divide your Cloudify resources between them. To complete the resource management of you system you can also manage multiple users with different permissions in different tenants, using the User Management ability.
You must have Cloudify Manager administrator permissions to perform tenant or user management related actions.
Multi-Tenancy for Premium Users
Upon installing Cloudify Premium Edition, a default tenant (‘default_tenant’) and system-administrator user (‘admin’) are created. You can then add more tenants on your manager to create resources separation. Notice that ‘default_tenant’ acts as any other tenant – no users or resources as added to it by default.
Each Cloudify resource exists in the context of a tenant, so every cfy command regarding a resource is executed in the context of a tenant as well. If you don’t provide a specific tenant, the default will be the one you are currently logged into. However, it is possible to execute commands on another tenant, by specifying the tenant on which the command is to be executed. You must have permissions to access that tenant.
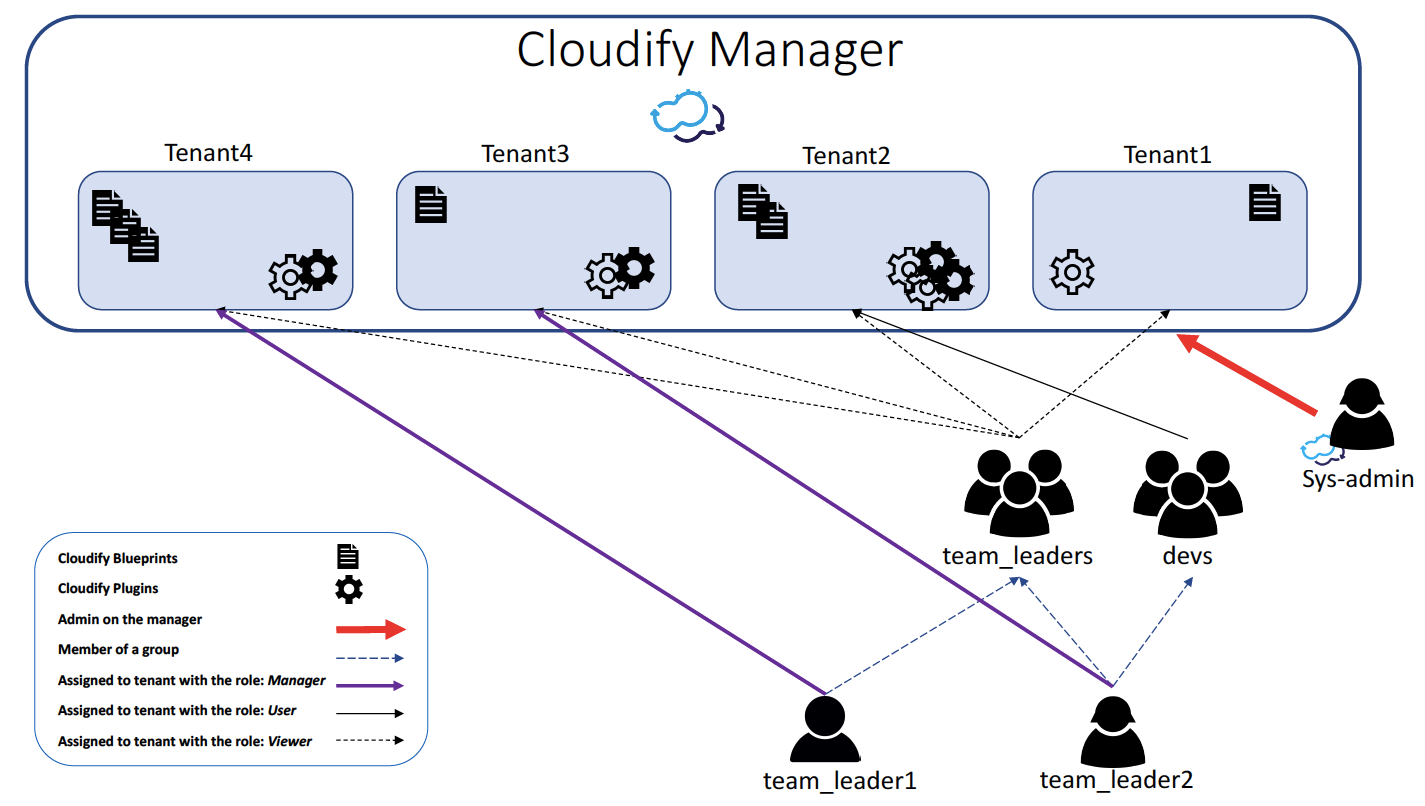
After creating the tenants, you can give users access to them either directly or by user-groups: If a user-group is assigned to a tenant, all its members will be assigned to this tenant as well. The assingment of users or user-groups to tenants requires specifying the role these users will have in the tenant. The roles represent the set of permissions they will have regarding the resources in the tenant. For more information, see Managing Roles ability. .
The relationship between users and tenants are many-to-many: Users and user-groups can be assigned to multiple tenants, and tenants can have multiple users assigned to them.
The next diagram
Implementing Resource Separation by Managing Tenants and Users:
This section describes a basic process for adding a tenant, then assigning one or more users to it. It is relevant only to Premium users.
Our first step will be to choose the tenant we want to work with. When installing Cloudify, a default tenant named
default_tenantis also automatically created. Either use this default tenant or create one or more new tenants with the following command: Usingadmincredentials in the Cloudify CLI (cfy), runtenants create [_tenant name_]to create a tenant:cfy tenant create my_tenantEach Cloudify Manager has a default “super-admin” user that cannot be deleted. This user is named
adminand have system administrator role, so it is permitted to perform all actions in all the tenants in the Cloudify Manager instance. Using the User Management feature, you can add other users as well.
In this example, we will use Cloudify-managed users, and not integrate with an external LDAP-based system. In case of using LDAP, assigning users to tenants is done via the user-groups representing the LDAP groups these users are members of. let’s create a new user and assign it with our tenant. Please notice upon creating a user we need to give it a password:cfy users create my_user -p _user_pass_
As we didn’t give the new user a sys-admin role, we need to explicitly assign it to the desired tenant. We’ll do that with the tenant’s add-user command. In this command, we will need to specify with which role the user will be assigned to the tenant. We will choose the ‘user’ role, but you can choose other roles instead.
cfy tenant add-user my_user -t my_tenant -r user
Now, we can upload resources to the tenant ‘my_tenant’, and the user ‘my_user’ will be able to perform all the actions that the ‘user’ role allows on the tenant’s resources. This way we can create more tenants and more users, and create the connections between them in whatever scenario suits our environment the best.
Deleting Tenants
You must ensure that any tenant that you want to delete is empty, meaning that it does not contain any resources or has users assigned to it. The default tenant that is created during the Cloudify Manager installation cannot be deleted. Deleting tenants, like any other tenant management operation, requires sys-admin permissions.
Listing Tenants
When a user runs the list command on a tenant, they see only the tenants to which they are assigned - both through individual assignment and through membership of an assigned group. Admins can of course list all the tenants on the manager.
Integrating Multi-Tenancy with LDAP-based user management systems
User management in Cloudify can be either implemented on the Manager itself, or by integrating to an LDAP-based system, in which case the users are managed in LDAP and upon login in to Cloudify, it authenticates them against the LDAP service. For more information, see User Management
Tenants in Community Edition
In Cloudify Community Edition, the same single tenant (default_tenant) and single system administrator user (admin) are created during installation. The Tenant and User Management features are not available in this edition.