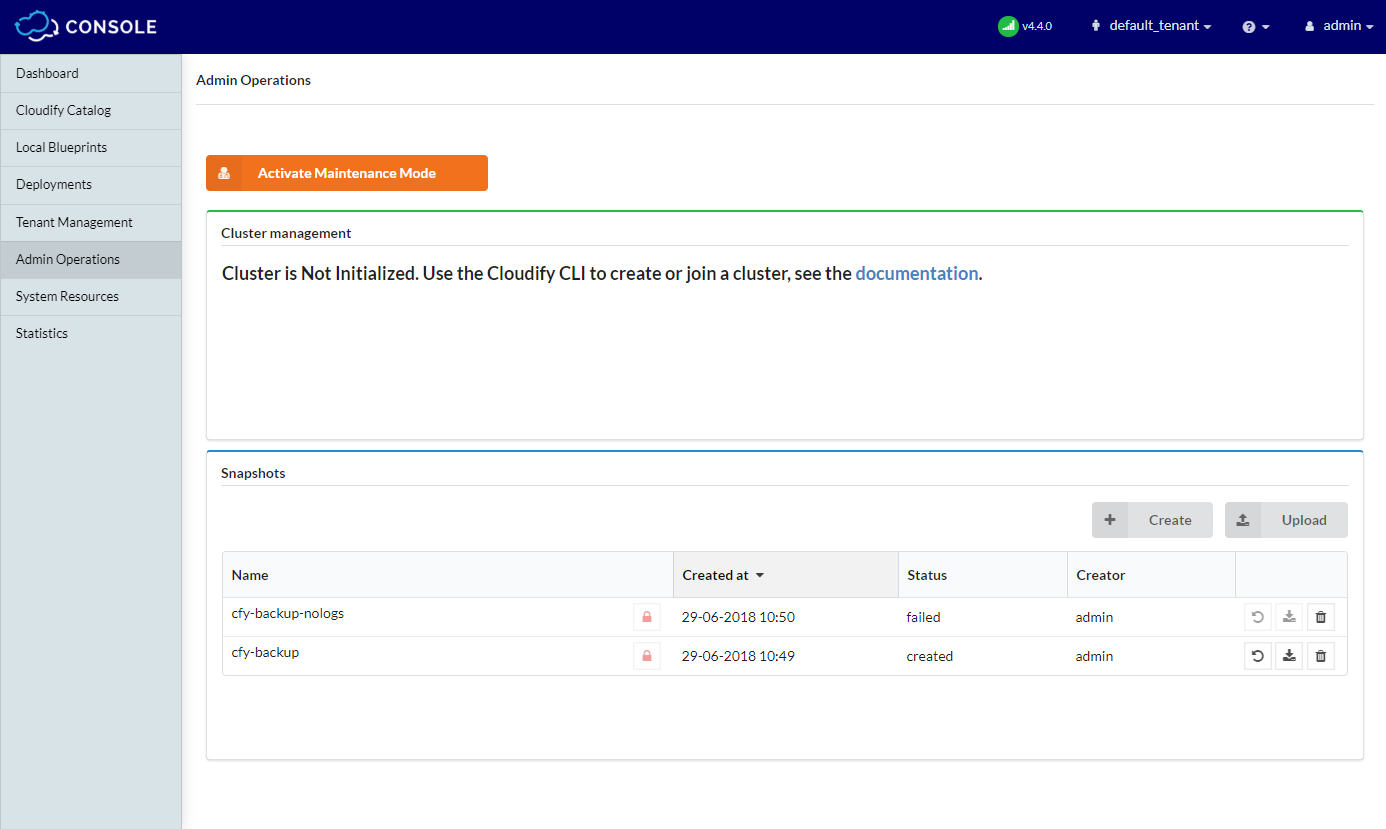
Admin Operations Page
If you are an admin user, you can access Admin Operations page.
The page contains Maintenance Mode activation button, Cluster Management widget and Snapshots widget.
Maintenance Mode
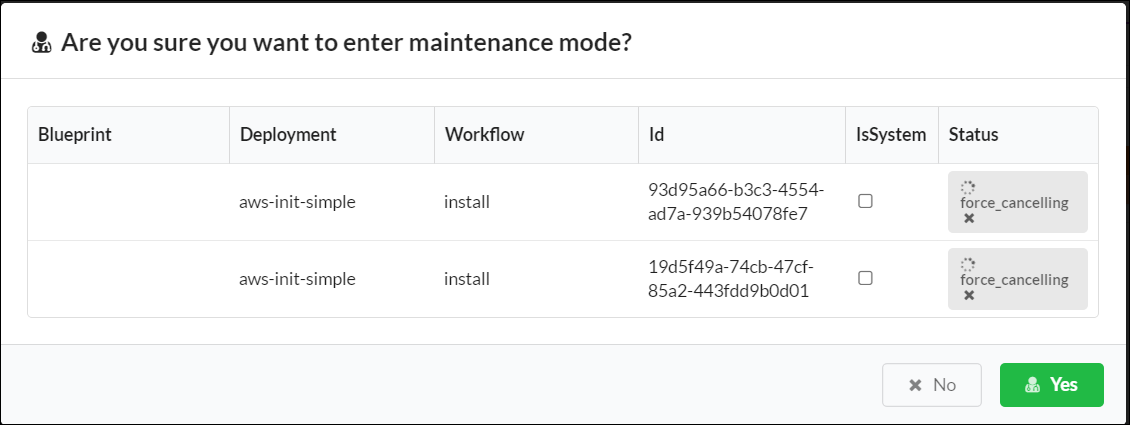
If you are an admin user, you can activate Maintenance Mode by clicking Activate Maintenance Mode button on top of the page.
To enter Maintenance Mode, click Yes in the Are you sure you want to enter maintenance mode? dialog.
In order for Maintenance Mode to be activated, all running workflows must be stopped. During the Maintenance Mode activation process, Cloudify Manager waits for all running executions to finish. During this time, you can see all running executions and cancel them manually, if necessary.
When Maintenance Mode is active, all Cloudify Console pages are not available and you are redirected to Maintenance Mode status page:
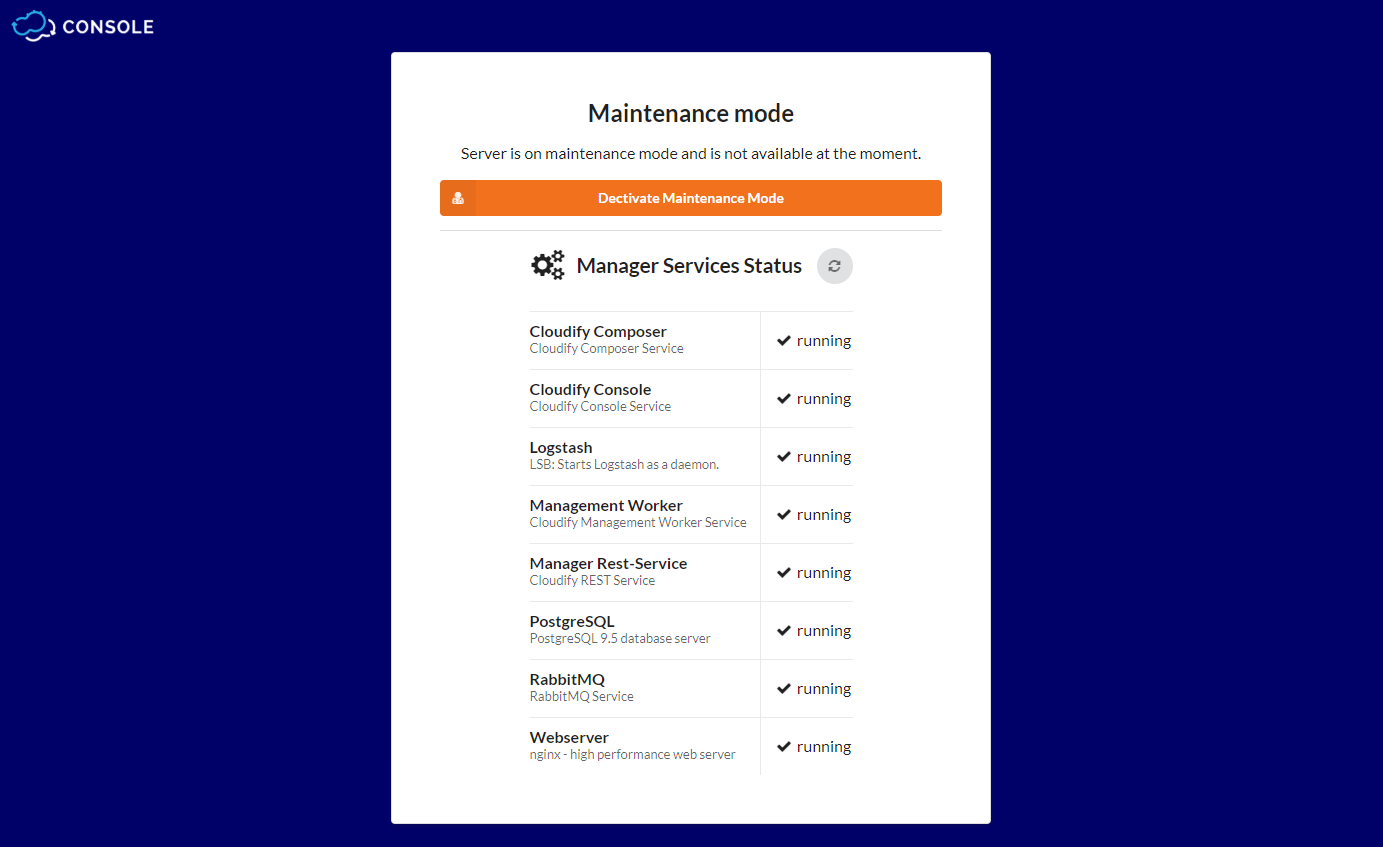
To exit Maintenance Mode, click Deactivate Maintenance Mode button and click Yes when you are prompted to confirm that you want to exit Maintenance mode.
Cluster Management
If you are an admin user and Cloudify Manager you are working on is configured in a cluster, you can see all the cluster nodes in Cluster Management widget.
More about high availability and cluster management you can find here.
Snapshots
The Snapshots table provides a list of all snapshots that have been uploaded or created. The Snapshots table is only available if you have admin credentials.
The snapshots creation process captures data in the entire Cloudify Manager, not just that of a specific tenant. However, the snapshot is created in the context of the current tenant, and therefore must be restored from it. Snapshots are created as a private resource by default and it cannot change.
Creating a Snapshot
- Click Create above the Snapshots table.
- Specify a unique ID for the snapshot and click Create.
It is good practice to use a name that will help you to easily identify the snapshot later.
The creation process begins. If there are active executions when you attempt to create the snapshot, the process waits until the executions are complete before creating the snapshot. You can see the status of executions in the Deployment executions widget.
The snapshot is saved as a ZIP file and appears in the Snapshots table, together with details of its creator, creation date and time, and current status.
Restoring a Snapshot
If you are restoring a snapshot from a Cloudify Manager instance prior to version 4.0, refer to the Restoring Snapshots of Legacy Cloudify Manager Instances section below.
If you restore a snapshot to a Cloudify Manager instance that already contains data, that data is overwritten. To prevent inadvertent overwriting of existing data, you must explicity state that you want to force data overwrite.
- Click Upload in the Snapshots widget.
- Either enter the URL of the snapshot or select the snapshot file from your file repository.
- Enter the Snapshot name.
- Click Upload and see that snapshot was uploaded and is available in Snapshots table.
- Click Restore icon
 on the far right of newly uploaded snapshot’s row
- If your snapshot is from a Cloudify Manager instance that was created earlier than version 4.0, see Restoring Snapshots of Legacy Cloudify Manager Instances.
- To restore a snapshot from a tenant-less (legacy) environment, toggle the relevant button.
- To overwrite all content in the existing Cloudify Manager, toggle the relevant button.
- Click Restore.
- The snapshot is restored and its details appear in the Snapshots table.
Restoring Snapshots of Legacy Cloudify Manager Instances
This subsection refers to the process for restoring snapshots of Cloudify Manager instances that were created prior to Cloudify Mananger 4.0.
If you are restoring a snapshot from an older, tenant-less (legacy) version of Cloudify to Cloudify Manager, it will be restored in a specific tenant that you must provide. The process enables you to migrate one or more legacy Cloudify Manager instances to a version 4.X instance, and to keep their resources separate.
To enable a snapshot to be successfully installed on a Manager, you must specify the name of a tenant. Depending on your requirements, the tenant may be prepared according to one of the following options. It is recommended that you select the first option, to ensure optimal performance of your plugins.
- If the snapshot’s resources use plugins as wagons, the tenant must be empty, as the restore process will install the wagons. if the snapshot does not include the wagons, to work in this way from now on, install the wagons on the tenant before performing the restore.
- if the snapshot’s resources use plugin installation from source, to keep working in this manner, restore directly to a clean tenant.
Deleting a Snapshot
- In the Snapshots widget, click
 for the snapshot entry that you want to delete.
 - Click Yes to delete the snapshot from Cloudify Manager.