Using Clusters to Provide High Availability
If you have a Premium version of Cloudify Manager, an admin user can create a cluster of Cloudify Managers to enable high availability.
It is recommended that you have three Cloudify Managers in a cluster for the following reasons:
- To ensure resilience in the case of a failure
- To reduce the probability of multiple hot standbys being activated as the active Manager in the event of a network failure (split-brain.)
A Cloudify Manager cluster is dynamic, meaning that you do not need to specify the size of the cluster in advance.
For more information about working with clusters, refer to the CLI cluster command.
How High Availability Works
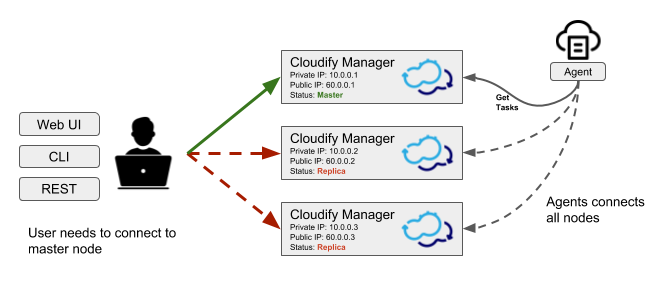
One Cloudify Manager is designated as the active Cloudify Manager, and the others are designated as hot standbys, that are constant mirrors of the data of the active Manager. In the event that the active Cloudify Manager health check fails, an automatic failover switch activates one of the hot standbys as the new active Manager. Both the CLI and the Cloudify Agents will then start contacting the new active Manager. When the previous active Manager is restored to a healthy state, it will become a hot standby node, and will mirror the data of the new active Manager.
The leader election is using a majority-based consensus algorithm, so it is recommended to use 3 Manager nodes for creating a cluster. The leader election and failover mechanisms are orchestrated using Consul. See the article in Consul docs to learn more about the failure tolerance for the given deployment size.
Synchronized Data
All Cloudify database and filesystem data is mirrored on the cluster hot standby nodes. This includes all objects that are managed using the REST service, such as blueprints and deployments, and management data, such as users and tenants.
Policies are not synchronized between Cloudify Managers in the cluster.
Health Checks
To determine the health of the a Cloudify Manager node, the following are verifed:
- The PostgreSQL database is up (listening on the port)
- The PostgreSQL database responds to a simple
select 1query - The PostgreSQL database follows correct active master (or if it’s a master on an active Manager)
- All Cloudify services are running (with the exception of rabbitmq and mgmtworker, which only run on the active Manager, but not on the hot standby Managers)
- A Consul internal health check
- A simple heartbeat is sent every 15 seconds
A Cloudify Manager that is down remains in the cluster unless you remove it. To remove a Cloudify Manager, run cfy cluster nodes remove.
Failure of the Master Cloudify Manager
In the event that the active Cloudify Manager fails, it is important to investigate and fix the issues that caused the original master to fail, or add another Cloudify Manager to the cluster, so that high availability is maintained, and to avoid having a single point of failure.
Because operations cannot be performed on a non-active Manager, you will need to connect to that Cloudify Manager using the SSH protocol.
Finding the Active Cloudify Manager
To find the active manager in a Cloudify Manager cluster, you can either:
- From the CLI: run cfy cluster nodes list. The active manager has the ‘leader’ value in the ‘state’ column.
- If you have the REST API credentials, get the status of each manager in the cluster. The active manager returns a 200 response, and all other managers return a 400 response.
curl -u admin:admin https://<manager_ip>/api/v3.1/statusSelecting a New Active Manager
To manage the situation in which the active Cloudify Manager fails one or more health checks, all Managers in the cluster constantly monitor the Consul next master function. When one of the standby Manager instances in the cluster detects that next master is pointing to it, it starts any services that are not running (RabbitMQ and mgmtworker) and changes PostgreSQL to master state. When the active Manager changes, the hot standby nodes begin to follow it with filesync and database.
If the original active Cloudify Manager was processing a workflow at the time it fails, the newly active Manager will attempt to resume the workflow (if the workflow is not declared as resumable, it will immediately fail).
Managing Network Failure
If there is a loss of connection between the Cloudify Managers in the cluster, the cluster might become partitioned into several disconnected parts. The partition that contains the majority will continue to operate as normal, while the other part - containing the minority of the nodes, so usually only one - will enter active minority mode. In this mode, the node becomes active and responds to requests, but the writes aren’t replicated to the majority of the cluster, and are at risk of being lost. Therefore, it is not recommended to continue using the cluster if the majority of the nodes are unreachable, as reported by cfy cluster nodes list. When the connection is resumed, the Cloudify Manager with the most-recently updated database becomes the active Manager. Data that was accumulated on the other Cloudify Manager cluster nodes during the disconnection is not synchronized, so is lost.
Creating a Cluster
Create a cluster after you complete installing your Cloudify Managers. When you run the cfy cluster start command on a first Cloudify Manager, high availability is configured automatically. Use the cfy cluster join command, following installation, to add more Cloudify Managers to the cluster. The Cloudify Managers that you join to the cluster must be in an empty state, otherwise the operation will fail.
The data on each Cloudify Manager mirrors that of the active Cloudify Manager. Operations can only be performed on the active Manager in the cluster, but are also reflected on the standby Managers. Similarly, upload requests can only be sent to the active Cloudify Manager.
Within the cluster, Cloudify uses the Consul utility and internal health checks to detect when the active Cloudify Manager is down, and which standby will become active.
Create Cluster Process
- Complete installing a Cloudify Manager.
- Run
cluster starton the installed Manager to designate this Cloudify Manager instance as the active Manager. - Run
cluster joinon two other clean Cloudify Manager instances. - (Optional) To remove a Cloudify Manager from the cluster, run
cfy cluster nodes remove <node-id>.
cfy profiles use <master IP>
cfy cluster start (on the Manager that you want to set active)
cfy profiles use <secondary IP>
cfy cluster join [--cluster-host-ip <new cfy manager IP>] --cluster-node-name <some name> <master ip> (on a Manager that you want to add to the cluster)
The cluster nodes will try to contact the new node using the IP passed to them by the CLI. By default, this is the IP that is the CLI profile name. Often this is not desirable, because the CLI might be using an external IP, while it is preferred for the cluster to be using a private network. In that case, use the --cluster-host-ip parameter, which must be an IP that is visible by other Managers in the cluster. Hostnames are not supported in --cluster-host-ip.
Cluster node options
When starting the cluster, or joining a node to the cluster, the --options
can be provided, to specify the following configuration options:
check_ttl_multiplier(default: 1) - a multiplier for the health check timeout. If a health check’s status is not updated for the TTL period - which varies from check to check - the check will be considered failing. This option allows changing that time. For example, setting it to 2 will make health checks take twice as long to timeout, which means it will take longer to detect a node becoming unresponsive, but there will be less chance of short-lived network failures to cause an unnecessary failover.check_fail_fast(default: True) - if this setting is True, an error thrown by a health check will immediately mark it as failing, and the failure will be detected immediately, without waiting for the check TTL periodconsul_raft_multiplier- controls the consul raft_multiplier setting
If the network is unstable, increasing check_ttl_multiplier to 3 and setting
check_fail_fast to False will help avoid unnecessary failovers, at the cost
of taking longer to detect a real failure.
Upgrading Clusters
Cloudify Manager snapshots do not include clusters. If you restore the snapshot of a Cloudify Manager that was the active Manager in a cluster to a new version, you must join the other Cloudify Managers to recreate the cluster. Managers in a cluster must all be the same Cloudify version.
Upgrade Cluster Process
Upgrading via Snapshot Restore on a New VM
In this process you create new VMs for all Cloudify Managers that will be part of the cluster.
Note that this procedure essentially creates a new cluster, with the data from the existing cluster.
- Create a snapshot of the active Cloudify Manager.
- Boostrap three Cloudify Managers with the upgraded version.
- Restore the snapshot to one of the Cloudify Manager instances.
- Run
cluster starton the Manager with the restored snapshot, to designate this Cloudify Manager instance as the active Manager. - Run
cluster joinon the two other installed Cloudify Manager instances to designate them as hot standbys.
Upgrading via Snapshot Restore on an Existing VM
In this process you teardown the active Cloudify Manager and install a new one on the same VM. You create new VMs for the Cloudify Managers that will become the hot standbys in the cluster.
- Create a snapshot of the active Cloudify Manager.
- Uninstall Cloudify Manager from the active machine.
- Install an updated Manager on the existing machine.
- Restore the snapshot to the Cloudify Manager instance.
- Run
cluster startto designate this Cloudify Manager instance as the active Manager. - Boostrap two new Cloudify Manager VMs with the upgraded version.
- Run
cluster joinon the two new installed Cloudify Manager instances to designate them as hot standbys.
Using a load balancer
While using the Cloudify CLI with a cluster profile will automatically find the active node, that mechanism is not available for the Cloudify Console. To allow users contacting a known static address to access the Cloudify Console, a load balancer such as eg. HAProxy can be used. The load balancer should be configured with a health check that contacts all the nodes in the cluster in order to find the current active node, and forward all traffic to the active node. The load balancer address can then be used for both accessing the Cloudify Console, and for creating a CLI profile.
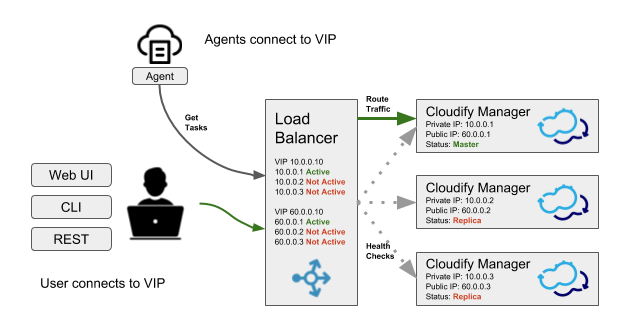
Implementing a load balancer health check
To configure the load balancer to pass traffic to the active node, implement a health check which queries all nodes in the cluster and examines the response code, as described in the finding the active manager section.
Example load balancer configuration
With HAProxy, the health check can be implemented by using the
http-check directive. To use it, first obtain the value for the Authorization HTTP header, by encoding
the Cloudify Manager credentials:
echo -n "admin:admin" | base64Use the resulting value in the HAProxy configuration, for example:
backend http_back
   balance roundrobin
   option httpchk GET /api/v3.1/status HTTP/1.0\r\nAuthorization:\ Basic\ YWRtaW46YWRtaW4=
   http-check expect status 200
   server server_name_1 192.168.0.1:80 check
   server server_name_2 192.168.0.2:80 check
In the example above, 192.168.0.1 and 192.168.0.2 are the public IP addresses of the two cluster nodes,
and YWRtaW46YWRtaW4= are the encoded credentials.
Tearing down clusters
If the active node is reachable and responding, we recommend that you to remove all nodes from the cluster before you uninstall them. This process avoids unnecessary failovers that put stress on the network and on the nodes.
Cluster teardown process
- Run
cluster nodes listand note the current active node and the non-active nodes. - For each non-active node, run:
cluster nodes remove <node name> - To remove each node from the cluster, from the command line of each non-active node run:
cfy_manager remove -f - To teardown the cluster, from the command line of the active node run:
cfy_manager remove -f
Additional Information
Cluster Tools
The following tools are used to facilitate clustering in Cloudify.
- Consul - Discovering and configuring services in the infrastructure
- PostgreSQL Cluster mechanism (master/follow states) - the Streaming Replication mechanism is used for replicating the database
- Synchthing - File system replicaton
Services Run with Cluster
The cluster function runs the following services:
check-runner- the service which periodically runs the health checks, and updates their status in Consulhandler-runner- the service which reacts to cluster status changes as reported by Consul, and updates the state of the local machine accordinglyconsul-watcher- the service which examines the state of the Consul servers on the other nodes in the cluster, and manages the active minority mode as required
Security
The following security mechanisms are implemented.
- SSL is used internally. All SSL certificates and keys for clustering are stored in
/etc/cloudify/cluster-ssl. - The only file that runs with
sudoprivileges is/opt/cloudify/sudo_trampoline.py. - All other services are run with users:
cfyuser,cfyuser_consul,postgres, they belong to cluster group
Internal CA certificate
The internal CA certificate, which is used by the agents to verify manager connections, is replicated between all cluster nodes. When joining the cluster, a new replica copies the internal CA certificate (and the key) from the active node, and uses that to sign a new internal certificate, which will be used by servers on that replica. This means that the agents can continue using the same internal CA certificate to access that replica, if it becomes the active node.
Troubleshooting
The primary log file for troubleshooting is /var/log/cloudify/cloudify-cluster.log.
All services log to journald. To view their logs, use journalctl:
journalctl -u cloudify-handler-runnerjournalctl -u cloudify-check-runnerjournalctl -u cloudify-consul-watcher
If required, direct access to Consul REST API is also possible from the Manager machine: it is listening locally on port 8500, and authentication requires passing the SSL client certificate which is located at /etc/cloudify/cluster-ssl/consul_client.crt (with the key located at /etc/cloudify/cluster-ssl/consul_client.key).