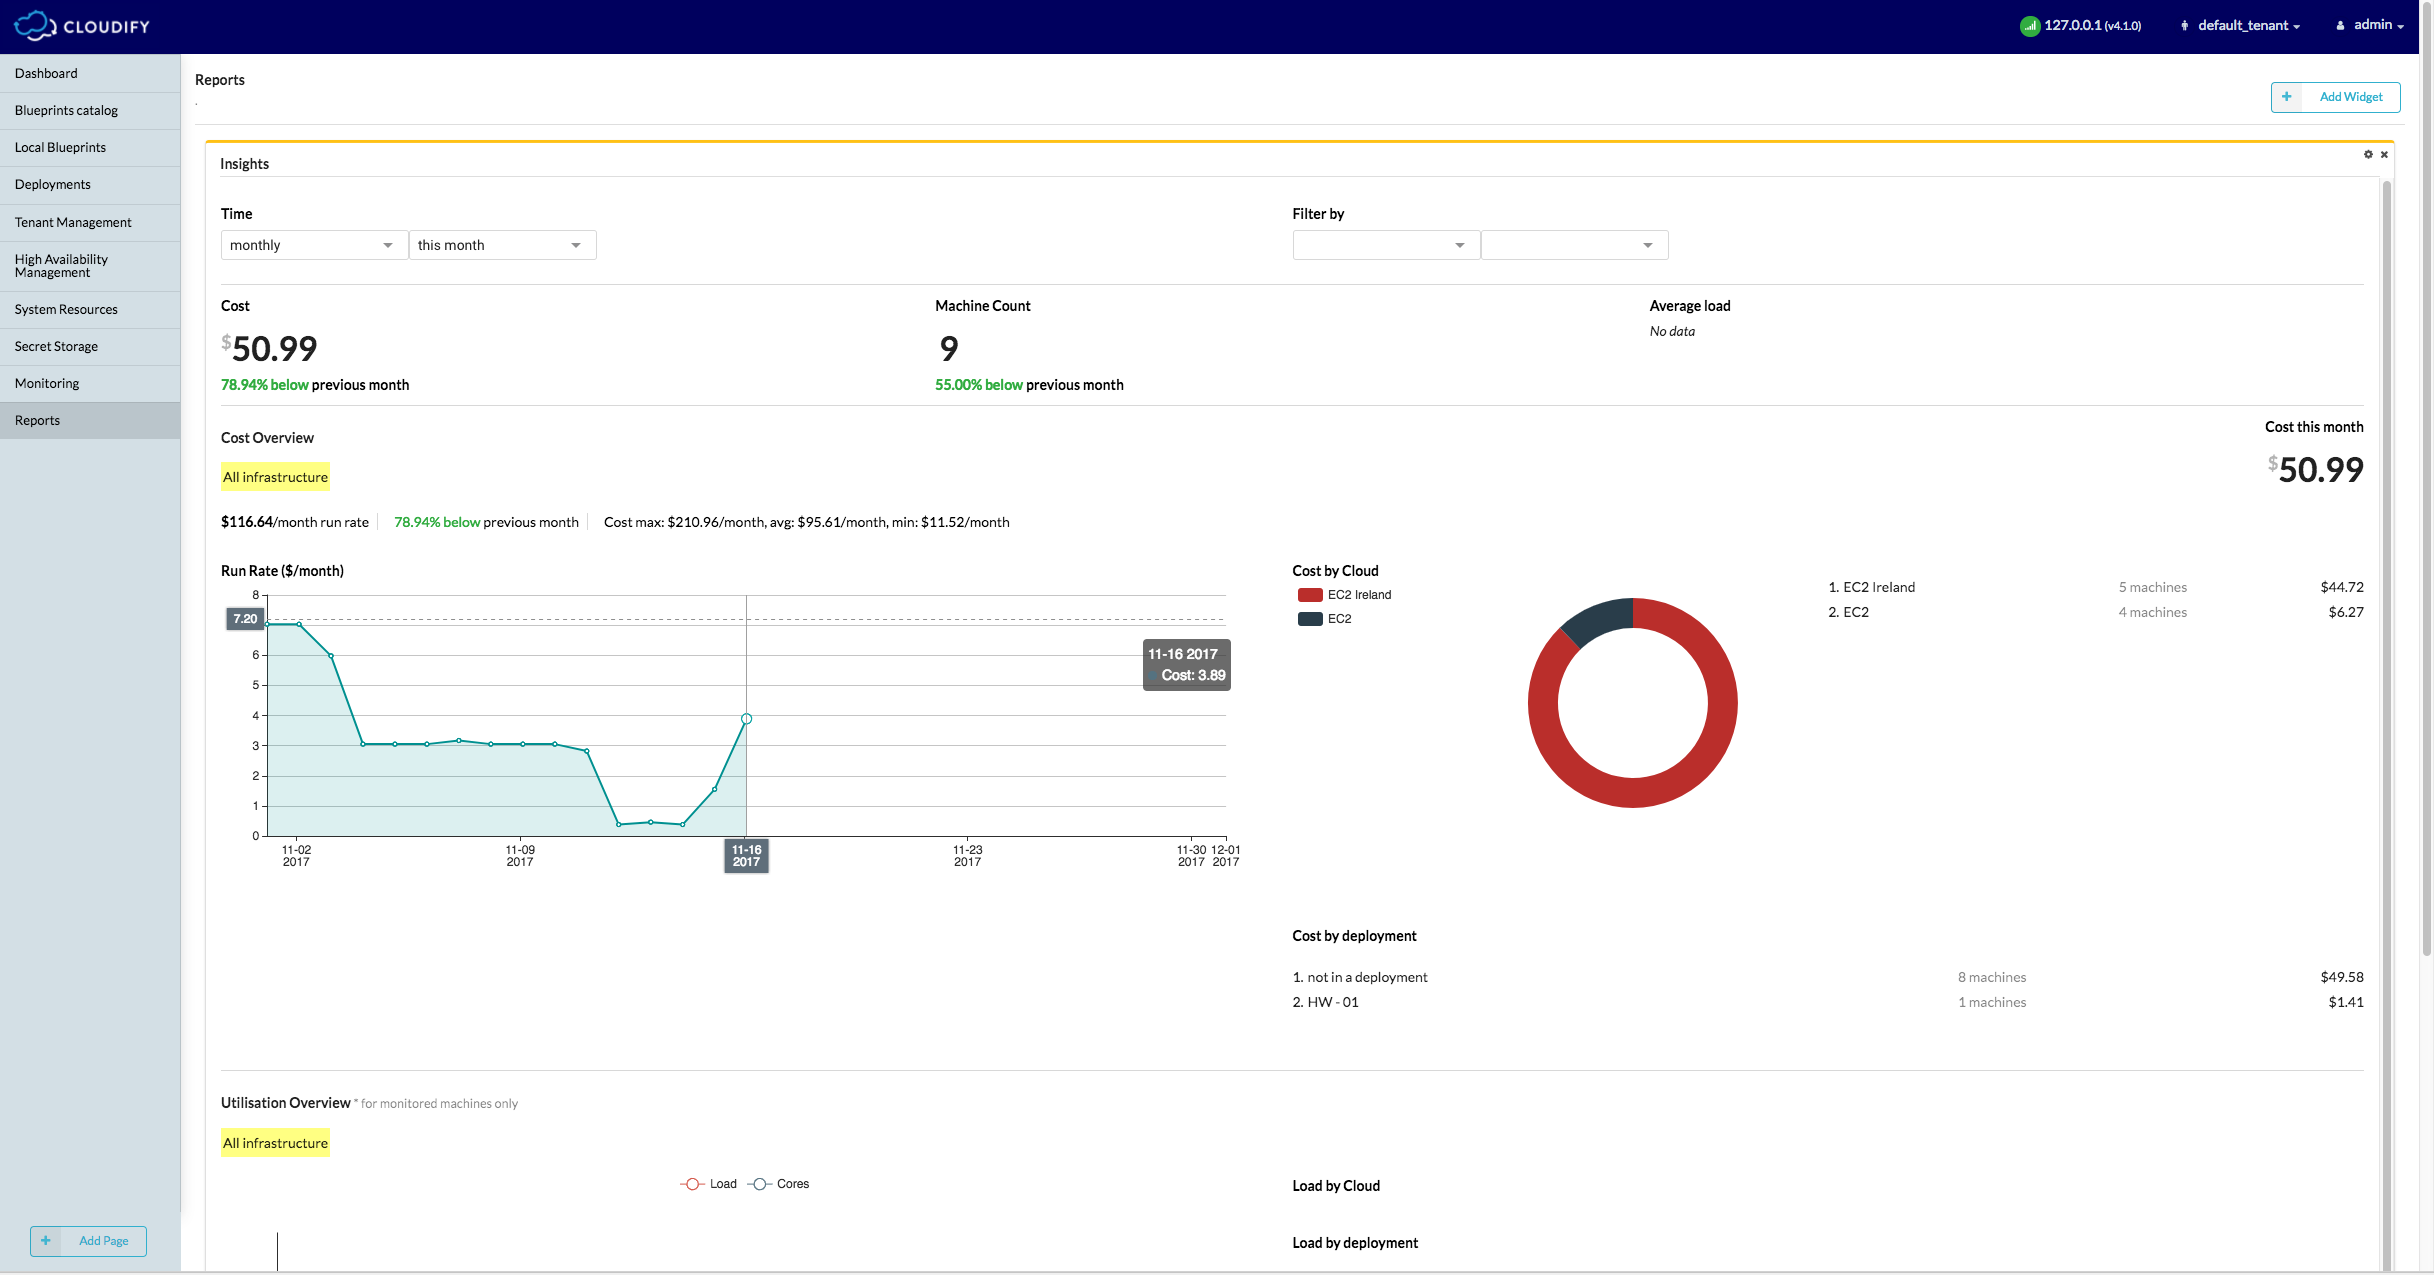
Insights Widget
Cost and Usage Analytics for Cloud
Insights shows analytics of cloud platform costs and usage. With the information shown in the Insights widget, business owners and IT managers can make decisions to control and reduce usage costs for their single, multi-, and hybrid-cloud infrastructure.
When you install Insights and add the Insights widget to the Cloudify Dashboard, the widget gives you an end-to-end environment monitoring and orchestration solution, so that you can make the best decisions regarding your resources based on the most critical considerations.
Supported Clouds
Insights supports these cloud platforms:
Public
- AWS EC2
- Azure Classic
- Azure Resource Manager
- Google Compute Engine
- IBM (SoftLayer)
- Rackspace
- Digital Ocean
- HostVirtual
- Linode
Private
- OpenStack
- VMware vSphere
- VMware vCloud
- KVM
- Packet.net
- Vultr
Reports
The reports shown in the widget are:
- Cost Overview - Real-time and historical VM cost reporting
- Utilisation Overview - Real-time and historical VM usage reporting
- Machines Overview - VM provisioning reporting
The filters in the widget let you choose the metrics shown by time period (hour, day, week, month, and quarter), by cloud, or by a specific Cloudify deployment.
Insights also shows a comparison of metrics in different timeframes. For example, it can show that current month costs are larger than costs from last month.
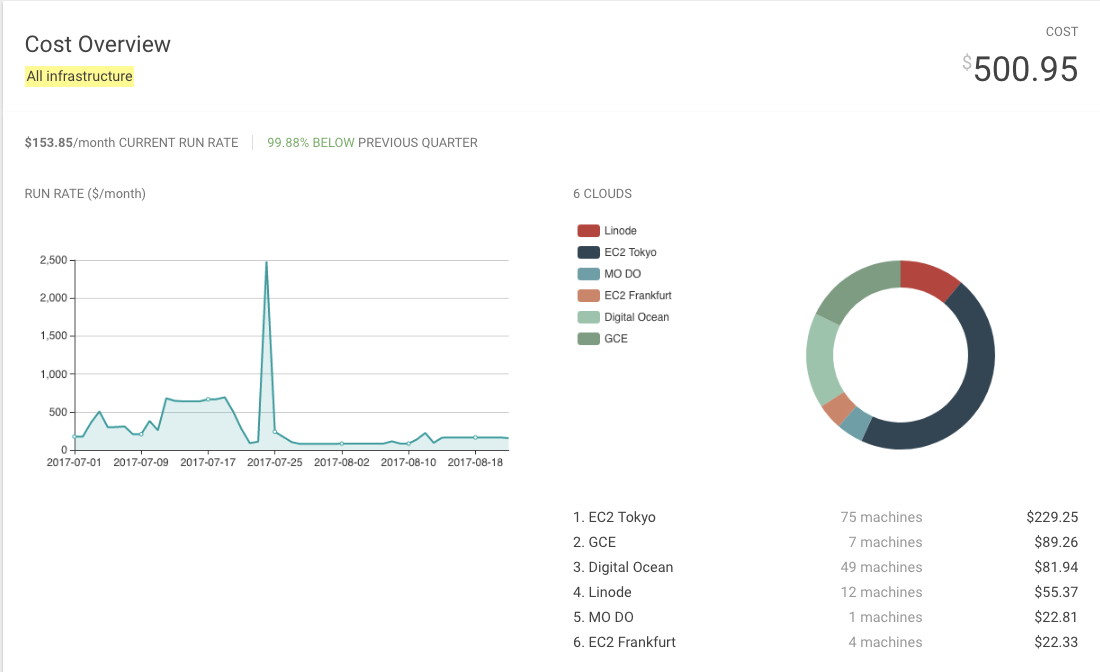
The Cost Overview Report
This report shows real-time and historical cost reporting for VMs. You can see time-period cost comparisons, the VM costs by cloud, and VM inventory per cloud or per deployment.
The Cost Overview report shows usage and costs trends over time and by cloud.
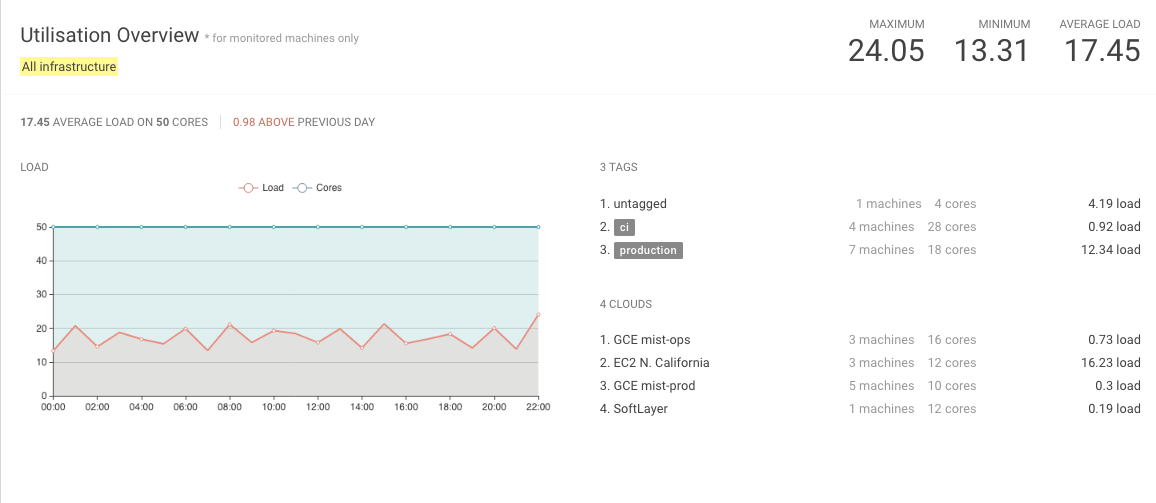
The Utilisation Overview Report
This report shows the amount of total/min/max/avg VM cores and loads, across all clouds. It can show time-period load comparison, or total cores and load per cloud.
The Utilisation Overview report gives a view into VM usage efficiency.
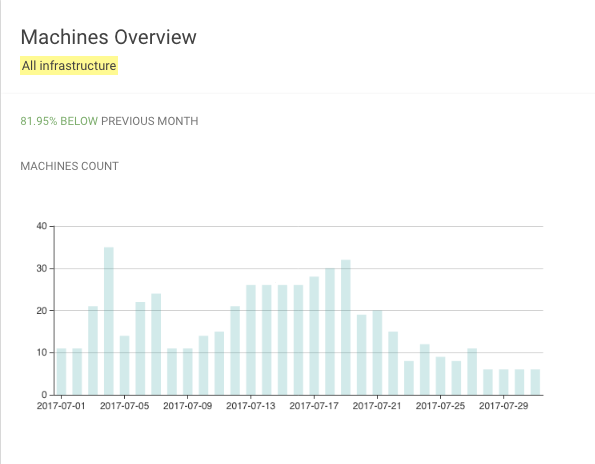
The Machine Overview Report
This report shows real-time and historical provisioning value of max/avg/and total, per VM or per cloud. It also shows the associated costs, and can show time-period VMs provisioned comparison.
The Machine Overview report gives insight to VM provisioning activity over a time period and by cloud.
Installation
Cloudify Insights Installation Overview
Cloudify Insights as a service or on-premises is not included in the Cloudify Manager installation and requires an additional subscription. Contact Cloudify Support for more information. You can use these steps to evaluate the service as an add-on to a running Cloudify manager:
- Make sure you have a manager up and running and a Cloudify CLI connected to it.
Make sure that the cfyuser has sudo privileges on the manager VM before you install the Insights blueprint.
NOTE: You can restore the default cfyuser permissions after the evaluation.
- Connect to the Cloudify manager with SSH.
Add this line to the /etc/sudoers file, if it is not there already:
cfyuser ALL=(ALL) NOPASSWD: ALLSave and exit the file:
wq!
Insights Manager Agent Installation
To install Insights, you must install the AMQP Middleware that lets the service access the Cloudify backend and import the widget to the Cloudify UI.
Install the Insights AMQP Middleware:
- Download and unzip the Insights widget from: https://github.com/mistio/Cloudify-UI-Widget-boilerplate/releases
Open the archive, and enter the inputs for the Insights service in the
local-blueprint-inputs.yamlfile in the amqp-middleware-blueprints directory.The inputs file comes with several configuration options. Each configuration option has a description that explains the option.
The inputs file is divided into these sections:
- Cloudify Manager Inputs: Inputs required for the AMQP Middleware to connect to the RabbitMQ server on the Cloudify manager, and query Cloudify Manager’s REST API to retrieve information on deployments and node instances.
- User Inputs: User information to create a new Insights SaaS account.
- Cloud Credentials: Users can specify their cloud credentials and the AMQP Middleware adds the cloud infrastructure to the Insights account.
Most of the parameters below come with default values. These settings that are not commented out MUST be provided by the user: manager_host, user_name, User_email
After you enter the inputs, save the file.
From the CLI connected to the manager, execute the blueprint installation:
cfy install <PATH-TO>/amqp-middleware-blueprints-master/local-blueprint.yaml -i <PATH-TO>/amqp-middleware-blueprints-master/inputs/local-blueprint-inputs.yamlThen show the deployment outputs:
cfy deployment outputs amqp-middleware-blueprints-masterYou can also go to the deployment’s drill-down page in the Cloudify UI and find the outputs widgets. The two outputs of the process are:
- credentials - The Insights account token
- insights - The path to the Insights web app with a read only token
You will need the read-only token for the widget configuration.
To configure the Insights widget:
- Download the Insights widget zip package from: https://github.com/mistio/Cloudify-UI-Widget-boilerplate/archive/master.zip
- Login to the Cloudify manager as admin role and switch to edit mode.
- Add a new page and name it, for example: Insights
- Click on the page and click: Add widget
- Browse to the zip file that you downloaded and click OK.
- Select the Insights widget and click Add Selected Widgets. The empty widget is shown on the page.
- Copy the read-only token from the outputs called “insights”.
- Click the widget configuration icon, paste the read-only token in the insights configuration field, and click OK After a few seconds, your widget shows the data collected in your insights account.
You can also install Cloudify Insights as an on-premise service. Contact Cloudify Support for more information.
Adding Cloud Accounts
To add clouds to an existing account:
Enter the details in the inputs/update-clouds.yaml file.
The file structure is the same as the clouds section in inputs/local-blueprint-inputs.yaml.
Run:
cfy execution start -d <PATH-TO>/amqp-middleware-blueprints-master -p <PATH-TO>/amqp-middleware-blueprints-master/inputs/update-clouds.yaml add_cloud
Removing Cloud Accounts
To remove clouds from your account:
Enter the details in the inputs/remove-clouds.yaml file. You must refer to the clouds by their title.
Run:
cfy execution start -d <PATH-TO>/amqp-middleware-blueprints -p <PATH-TO>/inputs/update-clouds.yaml remove_cloud
Manager Restore
Before you make a snapshot and restore your manager, you must run the uninstall workflow on the Insights deployment to teardown the service, and delete both the deployment and the blueprint. Then, perform the snapshot creation, restore on the new manager, and reinstall the Insights service on the new manager.