Tenant Management Page
The default Tenant Management page provides widgets to enable you to add users and user groups to a tenant, and to add a user to a non-LDAP user group. (In the case of LDAP user groups, users are not managed through Cloudify, but in the LDAP management system.) Additional information about security related to users and tenants is available on the Security page.
Tenant management actions are only visible and available to admin users.
Adding Users
The following sections provide two methods for adding users and user groups. The first describes how to add users and user groups through Cloudify. The second describes how to add users and user groups when working with a LDAP-based user management system.
User Management in Cloudify
Use the processes described in this section if you are not working with an LDAP system. You must have an admin role to create users in the User Management widget.
Adding Users
- Click Add in the User Management widget.
- Specify a name for the user.
The name must contain at least five alphanumeric characters and begin with a letter. It can also include the following characters-,_, or.. - Specify a password for the user, then confirm it.
The password must contain at least five alphanumeric characters and begin with a letter. It can also include the following characters-,_, or.. - You now need to select a system-wide role for the user. This is the general role of the user in the system, and it can either be a “sys-admin” or “default”. In order to have access to specific tenants in the system, the user will also need to be explicitly assigned with those tenants, and have a tenant-specific role for each of them. For more information about the roles and the differences between them, see Roles-Management section.
- Click Add.
The user is added to the table.
Assigning Users to Tenants
Starting cloudify 4.2, users must be assigned to tenants with a specific role for each tenant. The roles are sets of permissions defining what actions the users can perform in the context of the tenant. Users can have different roles in different tenants, and as long as at least one of those roles allows them to perform an action in the tenant, they will be able able to perform it. The available tenant-roles are: viewer, user, operations and manager. For more information regarding each role and the differences between them, see Roles-Management section
Once you click on the List icon on the far right of the user entry in the table and choose editing the user’s tenants, you’ll be able to select all the tenants you want to make available to that user, and specify a role for each.
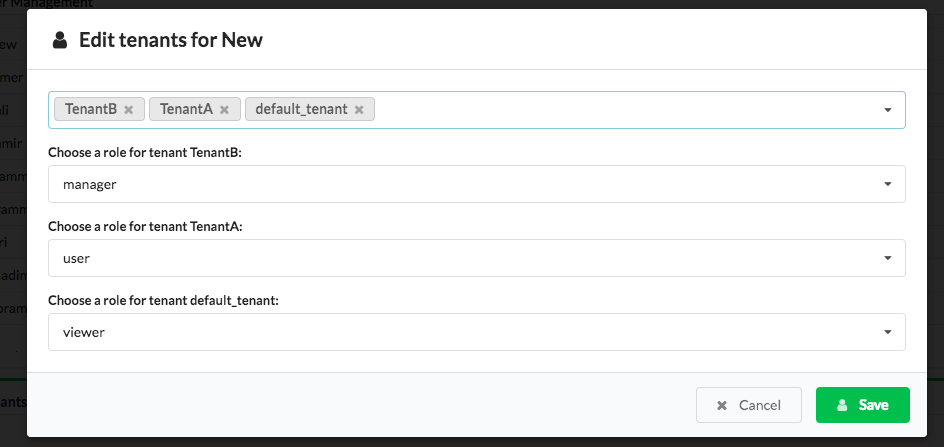
From the same List icon you can also perform other actions, including changing a password or system role, adding the users to groups, or deleting them from the system.
Adding a User Group
Users groups are not mandatory when you manage users in Cloudify, however creating groups might enable you to manage your users more efficiently. You can create groups of users and assign them to one or more tenants, specifying a tenant-role that will apply to all the users in the group. Please notice that by belonging to several groups, users might be assigned to a tenant with more than one role. As each role represents a set of permissions, if even one of those roles allows the users to perform an action in the tenant, they will indeed be able to perform it.
- Click Add in the User Groups Management widget.
- Enter a name for the group.
The name must contain at least five alphanumeric characters and begin with a letter. It can also include the following characters-,_, or.. - Click Add.
The group is added to the table.
Like Users, User-Groups need to be assigned with tenants in order to access Cloudify resources. The assignment of a group to a tenant is done in the exact same manner as single users, and likewise require specifying a role in the tenant.
User Management via an LDAP System
To integrate with an external user management system, you must first ensure that Cloudify Manager is configured accordingly. This can be achieved during the installation process, or you can run the following command on a Cloudify Manager instance on which no actions have been performed (a clean machine.)
Usage
cfy ldap set [OPTIONS]
Options
-s, --ldap-server TEXT The LDAP server address to authenticate against [required]
-u, --ldap-username TEXT The LDAP admin username to be set on the Cloudify manager [required]
-p, --ldap-password TEXT The LDAP admin password to be set on the Cloudify manager [required]
-d, --ldap-domain TEXT The LDAP domain to be used by the server [required]
-a, --ldap-is-active-directory Specify whether the LDAP used for authentication is Active-Directory
-e, --ldap-dn-extra TEXT Extra LDAP DN options
-h, --help Show this message and exit
Example
cfy ldap set -a -s ldap://<LDAP SERVER IP>:389 -u <LDAP ADMIN USER> -p <LDAP ADMIN USER PASSWORD> -d <DOMAIN.com>
After you have configured Cloudify to work with LDAP, you can only manage users through the LDAP-based system, to avoid conflicts between the systems. You cannot directly create or delete users, edit their passwords, add them to groups, or assign them to tenants in Cloudify. However, you can edit user roles.
You create the connection between the LDAP system and Cloudify through user-groups. You must create user-groups in Cloudify that represent your LDAP user groups. You then assign those Cloudify groups to tenants in Cloudify Manager, with the desired roles. When a user logs into Cloudify, a request is sent to the LDAP system for authentication and identification of the groups to which the user belongs. Cloudify then identifies the tenants that the Cloudify groups (that represent the LDAP groups) can access, and allows user access according to the permissions the roles of the groups provides.
After users have logged in to Cloudify, they are visible in the users list, but you cannot perform any management actions on their profile, other than editing their user role. The default role is user.
Adding a User Group
You can create user groups that are configured in your LDAP/AD system, and add them to tenants.
- Click Add in the User Groups Management widget.
- Enter a name for the group.
- Enter the LDAP Group Distinguished Name (DN).
The format must beCN=GroupName,OU=OUName,DC=Domaincomponent,DC= DomainComponent, for exampleCN=ldapwiki,OU=groups,DC=example,DC=com. - Click Add.
The group is added to the table. You can perform actions on a group profile, such as assigning a group to a tenant or deleting the group, using the dropdown menu on the right of their entry in the table.
Adding User Groups to a Tenant
- In the User Groups Management widget, click the List icon on the far right of the user group entry in the table that you want to add to a tenant.
- Click Add group to tenant.
- Select one or more tenants from the dropdown list. Now, choose the desired role for each of those tenants, and click save..
- The user group is added to the specified tenants.
All users within the group, unless they have a deactivated status, can perform actions on the tenant according to the specified role and the configuration privileges specified by theadmin.
Adding Users to a Tenant
Only in non-LDAP mode
- In the User Management widget, click the List icon on the far right of the user entry in the table that you want to add to a tenant.
- Click Add to tenant.
- Select one or more tenants from the dropdown list and click save..
- The user is added to the specified tenants.
Unless the users have a deactivated status, they can perform actions on the tenant according to the specified role.
Removing a User from a Group or Tenant
Only in non-LDAP mode
You can remove a user from a group or a tenant, without deleting them from the system. There are two ways in which a user can be removed.
a) In the User Management widget, click the List icon of the user that you want to remove and select Edit user’s groups or Edit user’s Tenants. Now remove the desired gruops/tenants from the users’s list and click Save.
b) In the Tenants or Groups Management widget, click the List icon of the tenant or group from which you want to remove a user and select Edit users. Select the user to remove and click Save.
The user is removed. If a user is a member of one or more user groups that are still assigned to a tenant, that user remains active on the tenant.
Deleting Tenants, Users and User Groups
Users can only be deleted from the system if they are not assigned to a group or to a tenant, and if they do not own resources in the system. User groups can be deleted if they have no users and are not assigned to any tenants. Tenants can be deleted if they have no resources, user-groups or users.
- In the widget that contains the entity that you want to delete, click the List icon on the far right of the entry and select the entity to delete.
- Click Delete.