Cloudify Plugin Development: Best Practices
Overview
Cloudify doesn’t impose too many requirements about how plugins should be developed. This, however, is a two-edged sword, because while there is a lot of flexibility on plugin development, there are certain design decisions that may make it easier to maintain and extend your plugins.
The purpose of this document is to outline what the Customer Success team perceives as “proper” plugin development.
Prerequisite Skills
- Cloudify:
- Node types
- Node templates
- Properties
- Runtime properties
- Interfaces
- Relationships
- Python development
Overall Structure
Interface First
The most important part of designing a plugin, is designing its TOSCA “view”. Even the most comprehensible plugin is almost entirely useless if customers can’t make proper use of it within blueprints (or TOSCA templates). Therefore, the first and foremost item to focus on should be the node types that are involved. The rationale:
- Node types are the mechanisms by which customers use the plugin.
- Our customers are not necessarily software developers, therefore simplicity is key.
- Separation of interface from implementation provides the ability to change the implementation without the customer having to worry about adjusting their blueprints.
Layered Approach
We propose the following layered approach for designing and implementing a plugin:
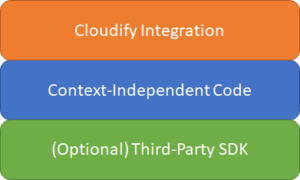
- The Third-Party SDK layer only applies for cases in which there exists a third-party Python-based API to the system we’re interacting with. Examples:
- The OpenStack plugin (currently using the legacy official OpenStack API libraries for Python)
- The AWS plugin (currently using
boto2) - The AWS-SDK plugin (supersedes the AWS plugin; currently using
boto3) - The GCP plugin (currently using the official Python-based GCP API)
- The Context-Independent Code layer comprises of Python classes that implement the plugin’s functionality, in a way that can be reused within any context, not only Cloudify.
- The Cloudify Integration layer, which provides the integration point through which Cloudify interacts with the rest of the plugin’s code.
The Third-Party SDK
Third-Party SDKs can offload much of the forward-support and API compatibility challenges. Official SDKs usually release changes in conjunction with feature and service changes.
We prefer to not reinvent the wheel. Therefore, we promote the usage of third-party SDK’s for systems that we integrate with; however, certain rules should be followed:
- Licensing: Make sure that we’re actually allowed to package the third-party SDK as part of the plugin. Some SDK’s may be freely distributed, some may not. If an SDK is not free, it doesn’t mean we can’t use it; it means that usage of that plugin may be restricted and subject to licensing fees (that’s to be handled by sales).
- Version pinning: when writing the
setup.pyfile for the plugin, always pin the Python version of the SDK you’re using. Also, ensure that you constrain the packages that the third-party SDK itself is using. This will ensure that any Wagon file created from the plugin, will be created using exactly the same libraries.
The Context-Independent Code
(This is the most important part of the entire plugin’s code)
Here comes the implementation of the plugin’s functionality, optionally using third-party SDK’s. The most important design principle here is context independence, which means that the code makes absolutely no assumptions about the context in which it is being run. As a consequence:
- No Cloudify-related code should be used in here, with the possible exception of loggers. In this case, consider passing a logger to this layer.
- Runtime dependencies should be provided to the code, rather than being looked-up or assumed
The rationale behind this principle is that we want to be able to use this code from anywhere, not only within a Cloudify operation or workflow, thus:
- Making writing unit tests significantly easier.
- Shielding the majority of the plugin’s code from changes in how the orchestrator interacts with plugins.
This layer should be designed with reuse and extensibility in mind.
The Cloudify Integration Layer
This should be the simplest layer in the plugin. A good indication of a well-designed plugin is how small this layer is: the more “responsibility” included in this layer, the more likely it is that the design of the context-independent layer could be improved.
In this layer, ideally, we would only have the Cloudify operation (or workflow) functions, doing minimum amount of work and delegating to the lower layer for processing, and then properly handling return values as well as exceptions.
Testing
Plugin code must include tests, as follows:
- The context-independent code should include unit tests, optionally using standard Python Mock libraries (but not Cloudify’s Mock libraries — remember that Cloudify-related code is a stranger here).
- The context-independent code may include system tests.
- The Cloudify integration code should include system tests.
Packaging
Writing setup.py
- Any third-party package mentioned in the
install_requiressection, should have a pinned version, rather than leaving it up topipto decide. That will ensure that whenever the plugin is installed viapip, exactly the same third-party libraries will be used. - For plugins developed by Cloudify, the
authorandauthor_emailfields should be generic rather than personal:authorshould beCloudifyauthor_emailshould beinfo@Cloudify.co
Coding
Referring to ctx
The ctx object is made available to operations in two ways:
- As a threadlocal that can be imported as a global element (”
from cloudify import ctx”) - As a function parameter called
ctx
The traditional approach was to import ctx as a threadlocal and use it:
from cloudify import ctx

...

@operation
my_operation(input1, input2, **kwargs):
  ctx.logger.info('Hello')
While this approach is straightforward when it comes to developing operations, it is cumbersome when considering writing unit tests. That’s because the ctx object needs to be placed as a threadlocal on the current thread, cleaned-up afterwards… leading to unnecessary boilerplate code.
The preferred approach is to avoid importing ctx altogether and just do this:
@operation
my_operation(input1, input2, ctx, **kwargs):
  ctx.logger.info('Hello')
Downloading Resources Using ctx.download_resource
The download_resource function may optionally receive a target_path argument. If it is not specified, the resource is downloaded into a brand new temporary directory, by preserving the original resource’s base name (see CFY-7629).
For example, the following code:
ctx.download_resource('resources/hello.html')— will result in a random directory created inside the operating system’s temporary directory, and the file hello.html downloaded into it (for example: /tmp/tmp123456/hello.html).
In that case, it is important to remember to not only delete the temporary resource once you’re done with it, but to also delete its parent directory (/tmp/tmp123456 in the example above).
A preferred approach is to provide the target_path argument, and properly dispose of the resource when it’s not needed anymore. For example:
import tempfile
import os
...
# Create temporary file
temp_resource = tempfile.mkstemp()
try:
  ctx.download_resource('resources/hello.html', target_path=temp_resource)
  ...
  ...
finally:
  os.remove(temp_resource)
Exception Handling
Using causes with RecoverableError / NonRecoverableError
When raising one of Cloudify’s exceptions (RecoverableError or NonRecoverableError), as a result of an underlying exception, you should use the “causes” feature when creating the exception class. This ensures that important troubleshooting data is not lost.
For example:
import sys
from cloudify.utils import exception_to_error_cause
from cloudify.decorators import operation
from cloudify.exceptions import NonRecoverableError
...
@operation
def my_operation(ctx):
  ...
  try:
    ... some code ...
  except SomeUnderlyingException as ex:
    _, _, tb = sys.exc_info()
    raise NonRecoverableError('Failed to perform operation', causes=[exception_to_error_cause(ex, tb)])