Installing and Configuring a Cloudify Manager Distributed Cluster
Cloudify Cluster Architecture
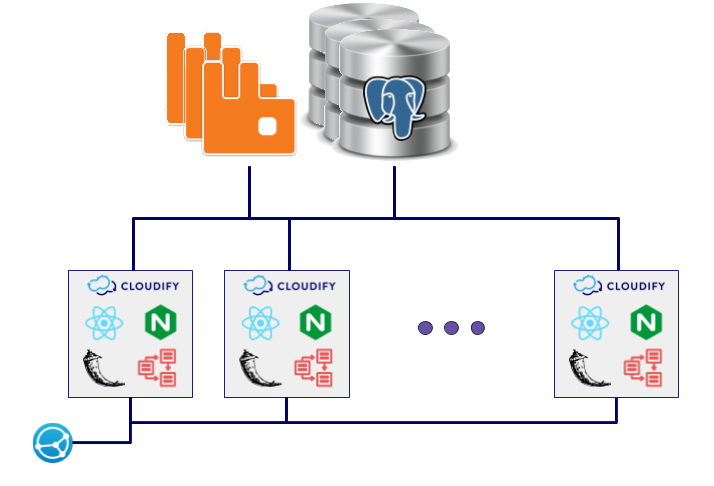
Cloudify Manager 5.0.5 introduces a new cluster architecture to Cloudify. This cluster is comprised of 3 separate services that construct the entire Cloudify solution:
- Cloudify Management service – The Management service embeds the Cloudify workers framework, the REST API, the User Interface infrastructure and other backend services. The Cloudify Management service is a cluster of at least two Manager nodes running in an active/active mode.
- PostgreSQL database cluster – This service provides a high-availability PostgreSQL cluster based on Patroni. The cluster must consist of at least 3 nodes.
- RabbitMQ cluster – This service provides a high-availability RabbitMQ cluster based on the RabbitMQ best practices. The cluster must consist of 3 nodes.
- An optional service is the load-balancer that is used to distribute the load between the different manager nodes.
This guide describes the process of configuring and installing such a cluster:
- [Certificates Setup] (/install_maintain/installation/installing-cluster/)
- [Installing Services] (/install_maintain/installation/installing-cluster/)
- [Post Installation] (/install_maintain/installation/installing-cluster/)
Certificates Setup
The Cloudify Manager cluster uses the SSL protocol for:
- Communication between the PostgreSQL cluster nodes.
- Communication between the RabbitMQ cluster nodes.
- Communication between the Cloudify Management service cluster nodes and the other services.
Note: Each time the term “CA” shows, it means the CA certificate of the CA that signed/issued the host’s public certificate.
Remark: All the following mentioned files should exist on the relevant instance
For each PostgreSQL and RabbitMQ cluster node we will configure the following:
- CA certificate path - The CA certificate should be the same for all cluster nodes. Meaning, the nodes’ public certificates are signed by the same CA.
- certificate (cert) path - A public certificate signed by the given CA that specifies the node’s IP.
- key path - The key associated with the certificate.
For each Cloudify Management service cluster node we will configure the following:
- PostgreSQL nodes’ CA path (CA is the same for all the cluster nodes).
- RabbitMQ nodes’ CA path (CA is the same for all the cluster nodes).
-
In case the PostgreSQL service requires a client SSL verification we will also need to configure the following for each node:
- certificate (cert) path - A certificate signed by the given CA that specifies the node’s IP.
- key path - The key associated with the certificate.
Example of creating certificate and key for host myhost with 1.1.1.2 IP address using a configuration file:
-
Writing a configuration file:
[req] distinguished_name = req_distinguished_name x509_extensions = v3_ext [ req_distinguished_name ] commonName = _common_name # ignored, _default is used instead commonName_default = myhost [ v3_ext ] basicConstraints=CA:false authorityKeyIdentifier=keyid:true subjectKeyIdentifier=hash subjectAltName=DNS:myhost,DNS:127.0.0.1,DNS:1.1.1.2,DNS:localhost,IP:127.0.0.1,IP:1.1.1.2 -
Generating a certificate and an associated key using a CA certificate, a CA key, and a configuration file: The first command will generate a certificate and key using the configuration file, and the second one will sign the created certificate with the given CA.
sudo openssl req -newkey rsa:2048 -nodes -batch -sha256 -config conffile -out myhost.crt.csr -keyout myhost.key
sudo openssl x509 -days 3650 -sha256 -req -in myhost.crt.csr -out myhost.crt -extensions v3_ext -extfile conffile -CA ca.crt -CAkey ca.key -CAcreateserial
Installing Services
The Cloudify Manager cluster best-practice consists of three main services: PostgreSQL Database, RabbitMQ, and a Cloudify Management Service.
Each of these services is a cluster comprised of three nodes and each node should be installed separately by order.
Another optional service of the Cloudify Manager cluster is the Management Service Load Balancer, which should be installed after all the other components.
The following sections describe how to install and configure Cloudify Manager cluster services. The order of installation should be as follows:
- [PostgresSQL Database Cluster ] (/install_maintain/installation/installing-cluster/)
- [RabbitMQ Cluster] (/install_maintain/installation/installing-cluster/)
- [Cloudify Management Service] (/install_maintain/installation/installing-cluster/)
- [Management Service Load Balancer] (/install_maintain/installation/installing-cluster/)
PostgreSQL Database Cluster
The PostgreSQL database high-availability cluster is comprised of 3 nodes (Cloudify best-practice) or more.
Note Make sure the following ports are open for each node:
| Port | Description |
|---|---|
| tcp/2379 | etcd port. |
| tcp/2380 | etcd port. |
| tcp/5432 | PostgreSQL connection port. |
| tcp/8008 | Patroni control port. |
Externally Hosted PostgreSQL Database Installation
- Make sure the PostgreSQL instance is publicly available and reachable from the local Cloudify Management service cluster nodes.
- Retrieve the PostgreSQL instance CA certificate and save it locally for future use in the Cloudify Management service cluster nodes configuration.
- Keep your PostgreSQL database username and password for the later configuration of the Cloudify Management service cluster nodes.
Azure DBaaS for Postgres
Cloudify supports Microsoft’s Azure Database for Postgres as an external database option replacing Cloudify’s PostgreSQL deployment.
Azure Database for Postgres is a fully managed database-as-a-service offering that can handle mission-critical workloads with predictable performance, security, high availability, and dynamic scalability. It is available in two deployment options, as a single server and as a Hyperscale (Citus) cluster (preview).
Setting up Azure database for PostgreSQL as the Cloudify database
The DBaaS of Azure supports a clustered instance and a single instance available for resizing on demand.
As opposed to other DBaaS vendors, Azure doesn’t give access to the postgres user with SuperUser privileges, so while working with Azure DBaaS is fully supported, the configuration is a bit different than regular Postgres installations.
Using Azure DBaaS (either the single instance or the clustered instance), requires specific setup changes to the Cloudify manager configuration.
Azure connection string for the users must be in the form of <username>@<dbhostname>, so for a DB user named cloudify and a db hostname named azurepg, the user that needs to be configured should be: cloudify@azurepg.
So, for example, if we created an Azure DBaaS for Postgres instance with the following information:
- Server name:
azurepg.postgres.database.azure.com - Admin username:
testuser@azurepg
So the following settings in /etc/cloudify/config.yaml need to be configured as follows:
postgresql_client:
  host: 'azurepg.postgres.database.azure.com'
  ca_path: '/path/to/azure/dbaas/ca/certificate'
  server_db_name: 'postgres'
  server_username: 'testuser@azurepg'
  server_password: 'testuserpassword'
  cloudify_db_name: 'cloudify_db'
  cloudify_username: 'cloudify@azurepg'
  cloudify_password: 'cloudify'
  ssl_enabled: true
  ssl_client_verification: false
server_username will be used by Cloudify to make the initial connection to the DB and create all the resources Cloudify needs to operate, which include, among other resources, the cloudify_username
cloudify_username will be used by Cloudify after the installation for day-to-day operations
Note that both server_username and cloudify_username have the postfix @azurepg added to them, as it is required by Azure DBaaS for Postgres
Locally Hosted Cloudify PostgreSQL Database Cluster Installation
Configure the following settings in /etc/cloudify/config.yaml for each PostgreSQL node:
postgresql_server:

    postgres_password: '<strong password for postgres superuser>'

    cert_path: '<path to certificate for this server>'
    key_path: '<path to key for this server>'
    ca_path: '<path to ca certificate>'

    cluster:
        nodes:
            <first postgresql instance-name>:
                ip: <private ip of postgres server 1>
            <second postgresql instance-name>:
                ip: <private ip of postgres server 2>
            <third postgresql instance-name>:
                ip: <private ip of postgres server 3>

        # Should be the same on all nodes
        etcd:
            cluster_token: '<a strong secret string (password-like)>'
            root_password: '<strong password for etcd root user>'
            patroni_password: '<strong password for patroni to interface with etcd>'

        # Should be the same on all nodes
        patroni:
            rest_password: '<strong password for replication user>'

        # Should be the same on all nodes
        postgres:
            replicator_password: '<strong password for replication user>'

    enable_remote_connections: true
    ssl_enabled: true
    ssl_only_connections: true

    # If true, client certificate verification will be required for PostgreSQL clients,
    # e.g. Cloudify Management service cluster nodes.
    ssl_client_verification: false

services_to_install:
    - database_service
Execute on each node by order:
cfy_manager install [--private-ip <PRIVATE_IP>] [--public-ip <PUBLIC_IP>] [-v]
RabbitMQ Cluster
The RabbitMQ service is a cluster comprised of any amount of nodes, whereas Cloudify best-practice is three nodes.
Note Please refer to the RabbitMQ networking guide - Ports to verify the open ports needed for a RabbitMQ cluster installation.
Externally Hosted RabbitMQ Installation
- Make sure the management plugin is installed on the RabbitMQ instances.
- Retrieve the RabbitMQ instance CA certificate and save it locally for future use in the Cloudify Management service cluster nodes configuration.
- Keep your RabbitMQ username and password for the later configuration of the Cloudify Management service cluster nodes.
- Note Reverse DNS lookup must be available in your network for the RabbitMQ nodes, please refer to RabbitMQ networking guide - DNS for further explanation.
Locally Hosted RabbitMQ Cluster Installation
Configure and install the first RabbitMQ node and then the rest of the nodes.
For the first RabbitMQ, configure the following settings in /etc/cloudify/config.yaml:
rabbitmq:

    username: '<secure username for queue management>'
    password: '<secure password for queue management>'

    cluster_members:
        <short host name of rabbit server 1- e.g. using `hostname -s`>:
            networks:
                default: <private ip of rabbit server 1>
                <other network name>: <address for this node on `other network`>
        <short host name of rabbit server 2>:
            networks:
                default: <private ip of rabbit server 2>
                <other network name>: <address for this node on `other network`>
        <short host name of rabbit server 3>:
            networks:
                default: <private ip of rabbit server 3>
                <other network name>: <address for this node on `other network`>

    cert_path: '<path to certificate for this server>'
    key_path: '<path to key for this server>'
    ca_path: '<path to ca certificate>'

    nodename: '<short host name of this rabbit server>'

    # Should be the same on all nodes
    erlang_cookie: '<a strong secret string (password-like)>'

services_to_install:
    - queue_service
For the rest of the nodes, configure the following settings in /etc/cloudify/config.yaml:
rabbitmq:

    username: '<username for quque management>'
    password: '<secure password for queue management>'

    cluster_members:
        <short host name of rabbit server 1- e.g. using `hostname -s`>:
            networks:
                default: <private ip of rabbit server 1>
                <other network name>: <address for this node on `other network`>
        <short host name of rabbit server 2>:
            networks:
                default: <private ip of rabbit server 2>
                <other network name>: <address for this node on `other network`>
        <short host name of rabbit server 3>:
            networks:
                default: <private ip of rabbit server 3>
                <other network name>: <address for this node on `other network`>

    cert_path: '<path to certificate for this server>'
    key_path: '<path to key for this server>'
    ca_path: '<path to ca certificate>'

    nodename: '<short host name of this rabbit server>'

    join_cluster: '<short host name of the first rabbit server>'

    # Should be the same on all nodes
    erlang_cookie: '<a strong secret string (password-like)>'

services_to_install:
    - queue_service
Execute on each node by order:
cfy_manager install [--private-ip <PRIVATE_IP>] [--public-ip <PUBLIC_IP>] [-v]
Cloudify Management Service
The Cloudify Management service is a cluster comprised of two to ten nodes, whereas Cloudify best-practice is three nodes.
- Make sure the following ports are open for each node:
| Port | Description |
|---|---|
| tcp/80 | REST API and UI. For improved security we recommend using secure communication (SSL), if your system is configured for SSL, this port should be closed. |
| tcp/443 | REST API and UI. |
| tcp/22 | For remote access to the manager from the Cloudify CLI. |
| tcp/5671 | RabbitMQ. This port must be accessible from agent VMs. |
| tcp/53333 | Internal REST communications. This port must be accessible from agent VMs. |
| tcp/5432 | PostgreSQL connection port. |
| tcp/8008 | Patroni control port. |
| tcp/22000 | Filesystem replication port. |
-
You would need to write the node_id for each installed node under the ‘rabbitmq’ and ‘postgresql_server’ sections in the config.yaml file. In order to retrieve the node_id, please run on each node:
cfy_manager node get_id. -
Please notice the ‘networks’ section in the config.yaml file. In case you use a load-balancer, you would need to specify its private IP in order for the different agents to connect to it. Please see further explanation in the “Accessing the Load Balancer Using Cloudify Agents” section of this guide under “Management Service Load Balancer”.
Configure the following settings in /etc/cloudify/config.yaml for each Manager service cluster node:
Note: In case you want to use an externally hosted PostgreSQL database and an internally hosted RabbitMQ or vice versa, please use the relevant section from the following examples and use in your configuration.
-
In case of an externally hosted PostgreSQL database and externally hosted RabbitMQ i.e. “bring your own”:
- Notice Some of the keys in the ‘postgresql_client’ section are relevant only for a few cloud services. Make sure you read the comments provided and follow them.
manager: security: ssl_enabled: true admin_password: '<strong admin password for cloudify>' cloudify_license_path: '<path to cloudify license file>' rabbitmq: username: '<username configured for queue management on rabbit>' password: '<strong password configured for queue management on rabbit>' # The CA path that was retrieved from the RabbitMQ instance ca_path: '<path to ca certificate>' # In case the connection to the RabbitMQ instance uses one IP address, # please specify it as the first cluster node and leave the rest blank cluster_members: <short host name of rabbit server 1>: node_id: <the node`s id> # The node_id can be retrieved by running `cfy_manager node get_id` on the relevant node networks: default: <private ip of rabbit server 1> <other network name>: <address for this node on `other network`> <short host name of rabbit server 2>: node_id: <the node`s id> networks: default: <private ip of rabbit server 2> <other network name>: <address for this node on `other network`> <short host name of rabbit server 3>: node_id: <the node`s id> networks: default: <private ip of rabbit server 3> <other network name>: <address for this node on `other network`> postgresql_server: # If you are not using a PostgreSQL cluster the 'cluster' section should not be filled. cluster: nodes: <first postgresql instance-name>: ip: <private ip of postgres server 1> node_id: <the node`s id> # The node_id can be retrieved by running `cfy_manager node get_id` on the relevant node <second postgresql instance-name>: ip: <private ip of postgres server 2> node_id: <the node`s id> <third postgresql instance-name>: ip: <private ip of postgres server 3> node_id: <the node`s id> postgresql_client: # Host name (or IP address) of the external database. host: localhost # The CA certificate that was retrieved from the PostgreSQL instance ca_path: '<path to ca certificate>' # Server user name (server_username), password (server_password), # and DB (server_db_name) to use when connecting to the database for Cloudify # DB initialization and population. # # If your database is an Azure DBaaS instance, you must set 'server_username' # so it includes the database name as a suffix. For example, if your database # name is "mycfydb" and your username is "test", then "server_username" # should be "mycfydb@test". # # THE PASSWORD WILL BE REMOVED FROM THE FILE AFTER THE INSTALLATION FINISHES. server_db_name: postgres server_username: postgres server_password: '<the postgresql server password>' # Cloudify DB name, user name and password to be created. # # The following apply if your database is an Azure DBaaS instance: # # * "cloudify_username" must include the database name as a suffix. For example, # if your desired database username is "cloudify" and your database name is # "test", then "cloudify_username" should be "cloudify@test". # # * "cloudify_username" must be different from "server_username". cloudify_db_name: cloudify_db cloudify_username: cloudify cloudify_password: cloudify ssl_enabled: true # If true, client SSL certificates will need to be supplied for database connections ssl_client_verification: false # In case you use a load-balancer, you would need to specify its private IP # in order for the different agents to connect to it. networks: load-balancer: <load-balancer private IP address> ssl_inputs: ca_cert_path: '<path to ca certificate>' external_ca_cert_path: '<path to external ca certificate for this server, can be the same one as ca_cert_path>' internal_cert_path: '<path to the certificate generated in the first step>' internal_key_path: '<path to the key generated in the first step>' #If you set 'ssl_client_verification' under 'postgresql_client' to true postgresql_client_cert_path: '<path to cert for this server>' postgresql_client_key_path: '<path to key for this server>' services_to_install: - manager_service -
In case of an internally hosted PostgreSQL database and an internally hosted RabbitMQ:
manager:
    security:
        ssl_enabled: true
        admin_password: '<strong admin password for cloudify>'

    cloudify_license_path: '<path to cloudify license file>'

rabbitmq:
    username: '<username you configured for queue management on rabbit>'
    password: '<strong password you configured for queue management on rabbit>'
    ca_path: '<path to ca certificate>'
    cluster_members:
        <short host name of rabbit server 1>:
            node_id: <the node`s id> # The node_id can be retrieved by running `cfy_manager node get_id` on the relevant node
            networks:
                default: <private ip of rabbit server 1>
                <other network name>: <address for this node on `other network`>
        <short host name of rabbit server 2>:
            node_id: <the node`s id>
            networks:
                default: <private ip of rabbit server 2>
                <other network name>: <address for this node on `other network`>
        <short host name of rabbit server 3>:
            node_id: <the node`s id>
            networks:
                default: <private ip of rabbit server 3>
                <other network name>: <address for this node on `other network`>

postgresql_server:
    cluster:
        nodes:
            <first postgresql instance-name>:
                ip: <private ip of postgres server 1>
                node_id: <the node`s id> # The node_id can be retrieved by running `cfy_manager node get_id` on the relevant node
            <second postgresql instance-name>:
                ip: <private ip of postgres server 2>
                node_id: <the node`s id>
            <third postgresql instance-name>:
                ip: <private ip of postgres server 3>
                node_id: <the node`s id>

    ssl_enabled: true

postgresql_client:
    ssl_enabled: true

    # Same password as the one of the PostgreSQL server.
    # THE PASSWORD WILL BE REMOVED FROM THE FILE AFTER THE INSTALLATION FINISHES
    server_password: '<the postgresql server password>'

    # If true, client SSL certificates will need to be supplied for database connections
    ssl_client_verification: false

# In case you use a load-balancer, you would need to specify its private IP
# in order for the different agents to connect to it.
networks:
    load-balancer: <load-balancer private IP address>

ssl_inputs:
    ca_cert_path: '<path to ca certificate>'
    external_ca_cert_path: '<path to external ca certificate for this server, can be the same one as ca_cert_path>'
    internal_cert_path: '<path to the certificate generated in the first step>'
    internal_key_path: '<path to the key generated in the first step>'

    #If you set 'ssl_client_verification' under 'postgresql_client' to true
    postgresql_client_cert_path: '<path to cert for this server>'
    postgresql_client_key_path: '<path to key for this server>'

services_to_install:
    - manager_service
Execute on each node:
cfy_manager install [--private-ip <PRIVATE_IP>] [--public-ip <PUBLIC_IP>] [-v]
Management Service Load Balancer
The Cloudify setup requires a load-balancer to direct the traffic across the Cloudify Management service cluster nodes. Any load-balancer can be used provided that the following are supported:
- The load-balancer directs the traffic over the following ports to the Manager nodes based on round robin or any other load sharing policy:
- Port 443 - REST API & UI.
- Port 53333 - Agents to Manager communication.
- Note Port 80 is not mentioned and should not be load balanced because the recommended approach is to use SSL.
- Session stickiness must be kept.
Accessing the Load Balancer Using Cloudify Agents
In case you use a load-balancer and you want Cloudify agents to communicate with it instead of a specific Cloudify Management service cluster node, you can use the following Multi-Network Management guide and specify the load-balancer private-IP as the value of the ‘external’ key under ‘networks’. Moreover, In case you want all communication of the Cloudify agents to go through the load-balancer, you can specify its private-IP as the value of the ‘default’ key under ‘networks’ (as shown in the config.yaml above).
Installing a Load Balancer
Note Although the load-balancer is not provided by Cloudify, here is a simple example of HAProxy as a load-balancer.
In order to use HAProxy as a load-balancer, you would first need to download HAProxy to your machine and set the relevant certificates.
Afterwards, you would need to configure HAProxy as the Cloudify Managers’ load-balancer, and you can do so using the following configuration:
global
    maxconn 100
    tune.ssl.default-dh-param 2048
defaults
    log global
    retries 2
    timeout client 30m
    timeout connect 4s
    timeout server 30m
    timeout check 5s
listen manager
    bind *:80
    bind *:443 ssl crt /etc/haproxy/cert.pem
    redirect scheme https if !{ ssl_fc }
    mode http
    option forwardfor
    stick-table type ip size 1m expire 1h
    stick on src
    option httpchk GET /api/v3.1/status
    http-check expect status 401
    default-server inter 3s fall 3 rise 2 on-marked-down shutdown-sessions
    server manager_<first manager private-ip> <first manager public-ip> maxconn 100 ssl check check-ssl port 443 ca-file /etc/haproxy/ca.crt
    server manager_<second manager private-ip> <second manager public-ip> maxconn 100 ssl check check-ssl port 443 ca-file /etc/haproxy/ca.crt
    server manager_<third manager private-ip> <third manager public-ip> maxconn 100 ssl check check-ssl port 443 ca-file /etc/haproxy/ca.crt
Post Installation
Setup Cloudify HA cluster status reporters
- Collect the following data:
- A list of the current private IP addresses of the Cloudify managers, There must be at least one address, that list will be updated automatically afterward.
- Run the following command on each of the Cloudify managers to retrieve specific internal communication tokens:
cfy_manager status-reporter get-tokensThis will return a list of three tokens named ‘manager_status_reporter’, ‘db_status_reporter’ and ‘broker_status_reporter’, please copy aside ‘db_status_reporter’ and ‘broker_status_reporter’ tokens.
- Please copy to all cluster nodes, expect Cloudify management’s service ones, the CA certificate that was specified in the config.yaml at the section ‘ssl_inputs’ of field ‘ca_cert_path’. This will be used for a secure connection between the reporters and Cloudify system.
- To enable Cloudify’s monitoring of the RabbitMQ cluster status, the node’s status reporter needs to be configured, execute (on every node’s machine):
cfy_manager status-reporter configure --token <broker status reporter token> --ca-path <Cloudify-rest CA certificate local path> --managers-ip <list of current managers ip>
- To enable Cloudify’s monitoring of the PostgreSQL cluster status, the node’s status reporter needs to be configured, execute (on the node’s machine):
cfy_manager status-reporter configure --token <db status reporter token> --ca-path <Cloudify-rest CA certificate local path> --managers-ip <list of current managers ip>
- Verify the configuration was applied successful by running the following command (all status are OK):
cfy cluster status
Update the CLI
Update all remote CLI instances (not hosted on the manager) to the newly deployed Cloudify version. Please refer to the CLI installation guide for further instructions.
Run the following command from the client in order to connect to the load-balancer:
cfy profiles use <load-balancer host ip> -u <username> -p <password> -t <tenant-name>
In case you haven’t mentioned the license path in the config.yaml file of the Manager installation, you can upload a valid Cloudify license from the client using the following command:
cfy license upload <path to the license file>
Day 2 cluster operations
Please refer to the Day 2 cluster operations guide for further operations regarding the Cloudify active-active cluster.