Create a Blueprint from a Terraform module
This getting started guide introduces you to creating a blueprint from a Terraform module. You will also deploy and install the environment.
Prerequisites
- Cloudify Manager Version 6.4 or later
- Terraform module archive available from a URL or local zip file
- Credentials to a cloud provider, such as AWS
Overview
In this guide we will perform the following steps to create a blueprint from a Terraform module and test it:
- Prepare the manager by defining secrets that contain cloud credentials
- Provide a URL to the Terraform archive and choose the right module
- Define the Terraform variables for the module
- Define the environment variables for the Terraform execution
- Define the outputs and capabilities of the blueprint
- Create a deployment to test the created blueprint
Creating and deploying the blueprint
Step 1: Define Credential Secrets
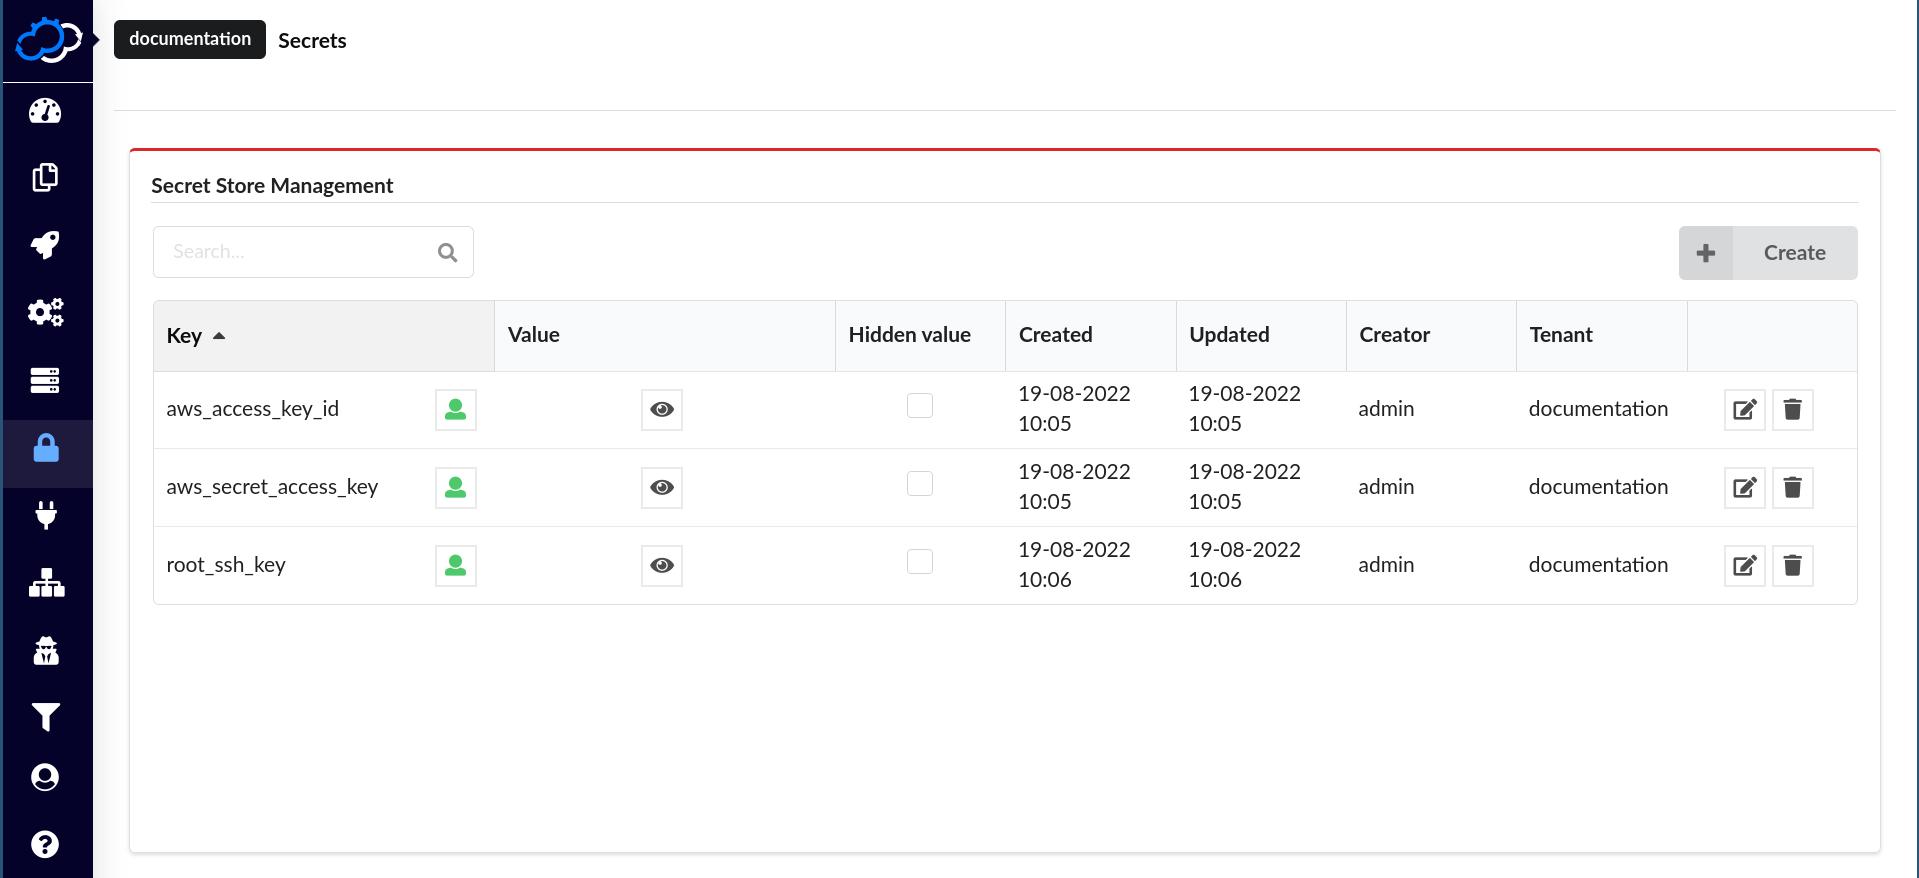
In this step we will define secrets for the cloud, such as AWS, that you would like to use. The secrets, such as an AWS Access Key ID and Secret Access Key, are defined on the Secrets page under the Resources section in the sidebar menu.
In this example we will use an AWS account and define the following secrets:
aws_access_key_id- AWS access key idaws_secret_access_key- AWS access key secretroot_ssh_key- SSH public key for a user that will be able to log into the created EC2 instance
Step 2: Open the Upload dialog and define the blueprint name.
Next, we will open the Upload dialog for Terraform modules. Navigate to the Blueprints page and select the “Upload” dropdown. Select the “Upload from Terraform module” option.
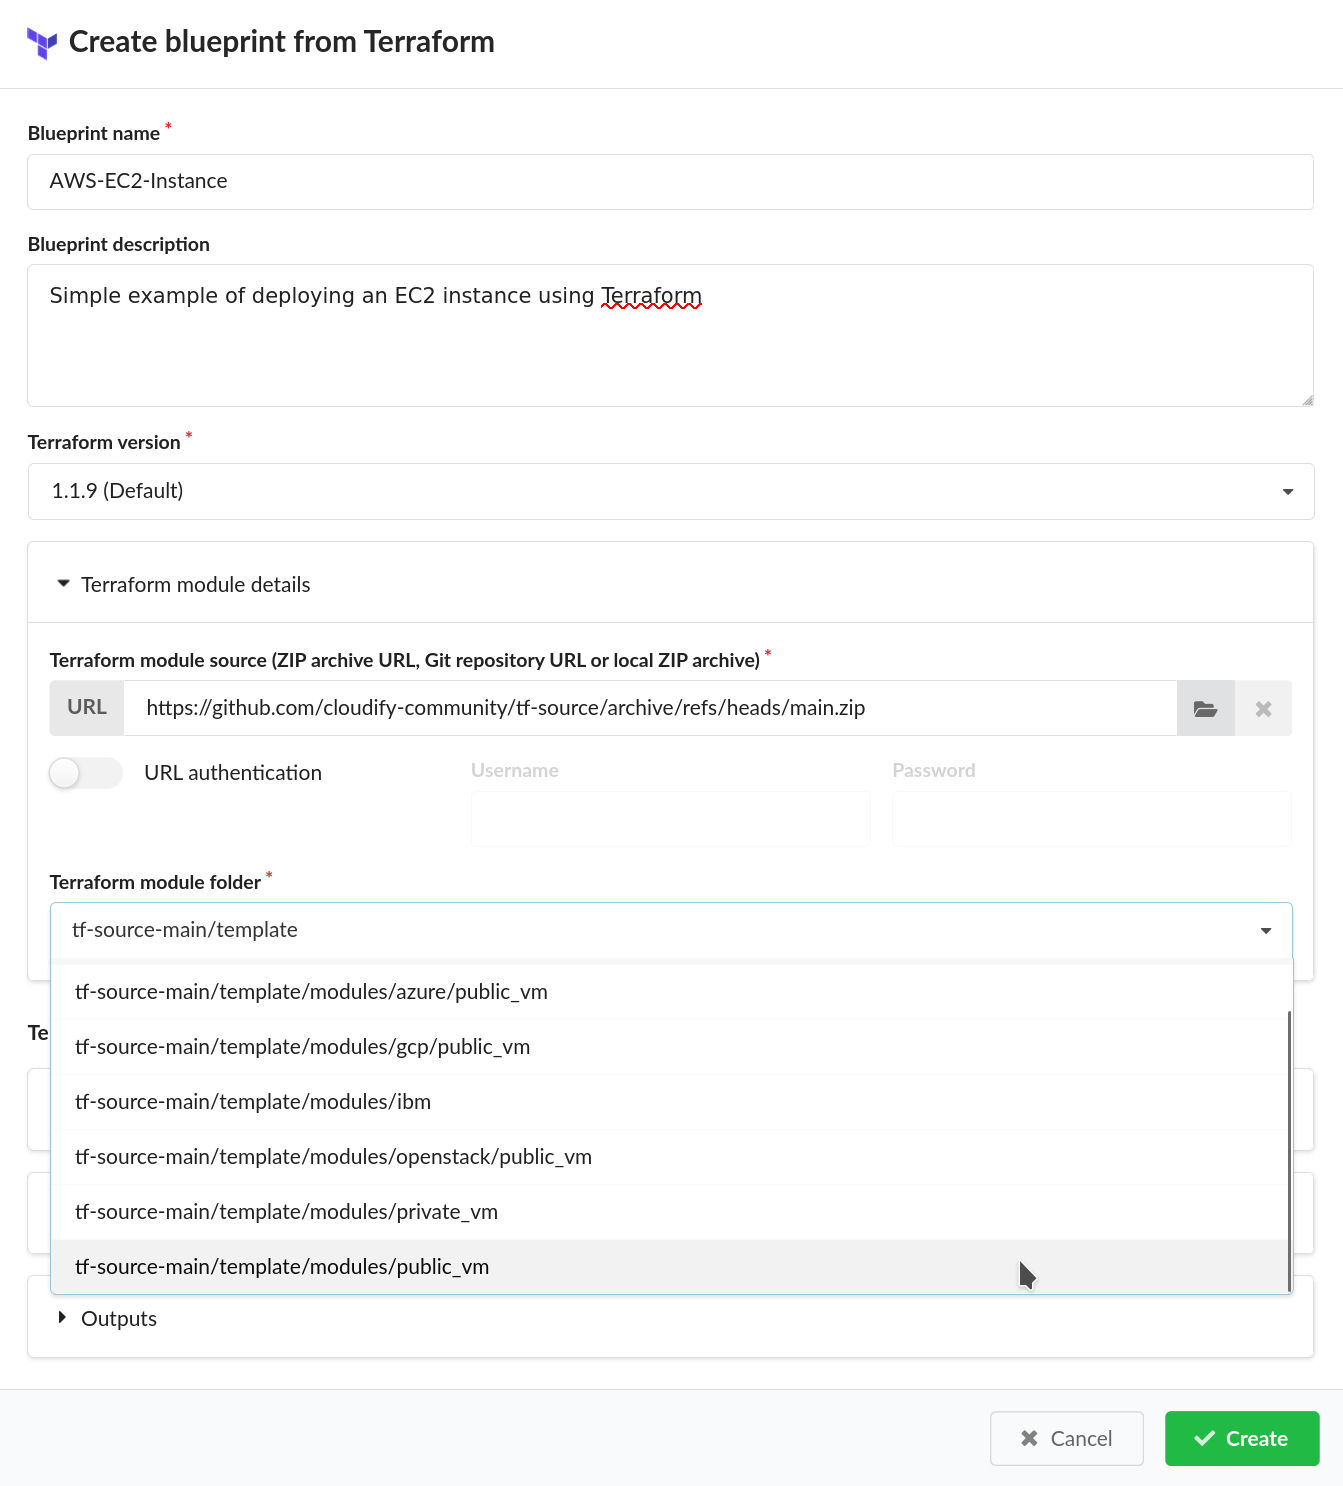
This will launch the “Create blueprint from Terraform” dialog. Provide the following initial information:
- Blueprint name: Provide a name for your blueprint. This will appear in the blueprint catalog.
- Blueprint description: Provide an optional description for your blueprint. This will also appear in the blueprint catalog to provide extra context for the blueprint.
- Terraform version: Select the version of Terraform that you want the blueprint to use.
Step 3: Upload the Terraform archive and select the module
Next, we will provide the Cloudify Manager with the location of the Terraform module. Terraform modules can be provided as ZIP archives from a remote URL (such as an artifact server) or from a local ZIP file uploaded to the Cloudify Manager. This example will use a URL for the ZIP archive.
There are a few things that you should know about the structure of Terraform module ZIP archives:
- The folder structure of the archive should start with a single root folder. This root folder can contain the Terraform module or subfolders with multiple modules.
- It is possible to use archive URLs that are generated by services like Github (as we do in this example).
- For archives that contain multiple modules, you are able to choose the module you need by selecting the path in the dropdown.
In this example, we will use an example module from the Cloudify Community GitHub repository. Provide the following information under the “Terraform module details” section:
- Terraform module source: Provide the following URL to the community example: https://github.com/cloudify-community/tf-source/archive/refs/heads/main.zip
- Terraform module folder: Select
tf-source-main/template/modules/public_vmfrom the dropdown menu.
A dialog will pop up on the screen and ask you if you want to automatically define detected variables and outputs. Click “Yes” on this dialog.
Step 4: Define the variables for the Terraform module
Cloudify Manager 6.4 includes the ability to automatically detect Variables and Outputs for Terraform modules. Once the Variables have been automatically detected, you can fine-tune how those Variables are exposed in the blueprint. In this example, we are going to adjust a few of these variables to provide the best user experience when deploying from the blueprint.
Variables can come from three sources when deploying an environment:
- Static - A value that will always be assigned to the Variable. This is hardcoded in the resulting blueprint and cannot be changed across deployments.
- Secret - A value that will be taken from the Cloudify Manager’s internal secret store.
- Input - A value that will be set by an input when the user creates a new environment deployment. This gives the ability to set a value of their choice.
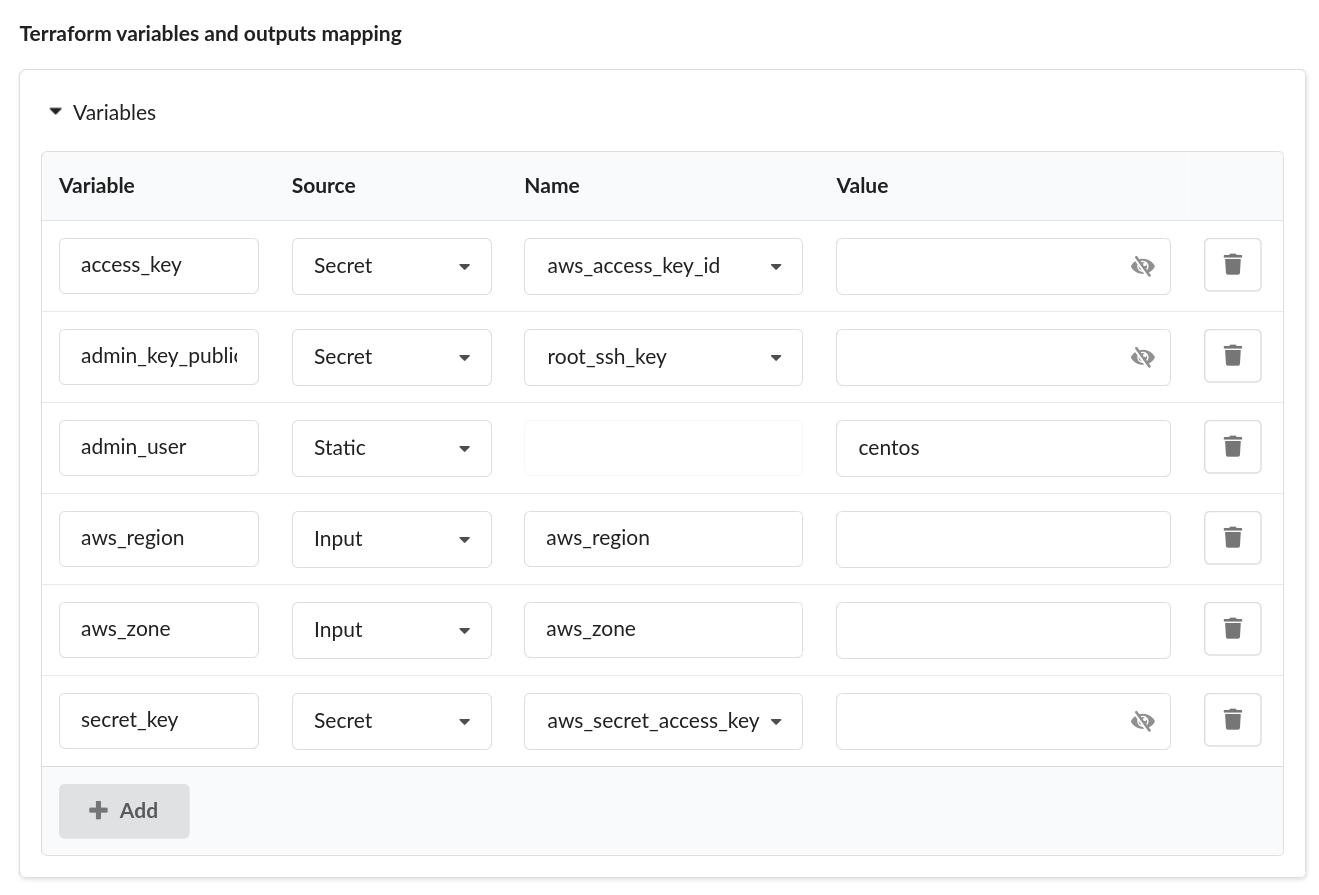
We are going to adjust the variables that have been automatically detected by the Cloudify Manager. First, remove any variables so that only the variables below remain:
- access_key
- secret_key
- aws_region
- aws_zone
- admin_user
- admin_key_public
Any variables that are not defined will be left at their default values in the Terraform module.
Next, define the source for each input:
| Variable | Source | Value / Secret key / Input name |
|---|---|---|
| access_key | Secret | aws_access_key_id |
| admin_key_public | Secret | root_ssh_key |
| admin_user | Static | centos |
| aws_region | Input | aws_region |
| aws_zone | Input | aws_zone |
| secret_key | Secret | aws_secret_access_key |
This example uses a Terraform module that accepts credentials as Variables. However, not all modules work in this way. Some may require credentials to be set as environment variables. See the “Passing provider credentials as environment variables” section below if you are using a module that behaves in this way.
Step 5: Define outputs and capabilities
The outputs of the Terraform module can be made available in the outputs and capabilities in the Cloudify Manager. Outputs and capabilities allow you to expose information to the end user of your blueprint in different ways:
- Outputs are used to display information directly to the user or export information to other systems
- Capabilities are used to expose information to other deployments and are used in Service Composition
The Cloudify Manager automatically detects and imports any Outputs from the provided Terraform module. You can then choose whether to expose these as Outputs or Capabilities within the blueprint. For this example, we will define the value as an Output for the end user:

Step 6: Create the blueprint
Once all information has been filled out, you can click the “Submit” button. The Cloudify Manager will automatically generated a blueprint based on the Terraform module, Inputs, and Outputs or Capabilities that you have defined in the dialog. If there are any errors with your blueprint definition, they will be displayed in dialog.
Once the blueprint has been generated, you will automatically be redirected to the Deploy dialog for the blueprint.
Step 7: Create a deployment and test the blueprint
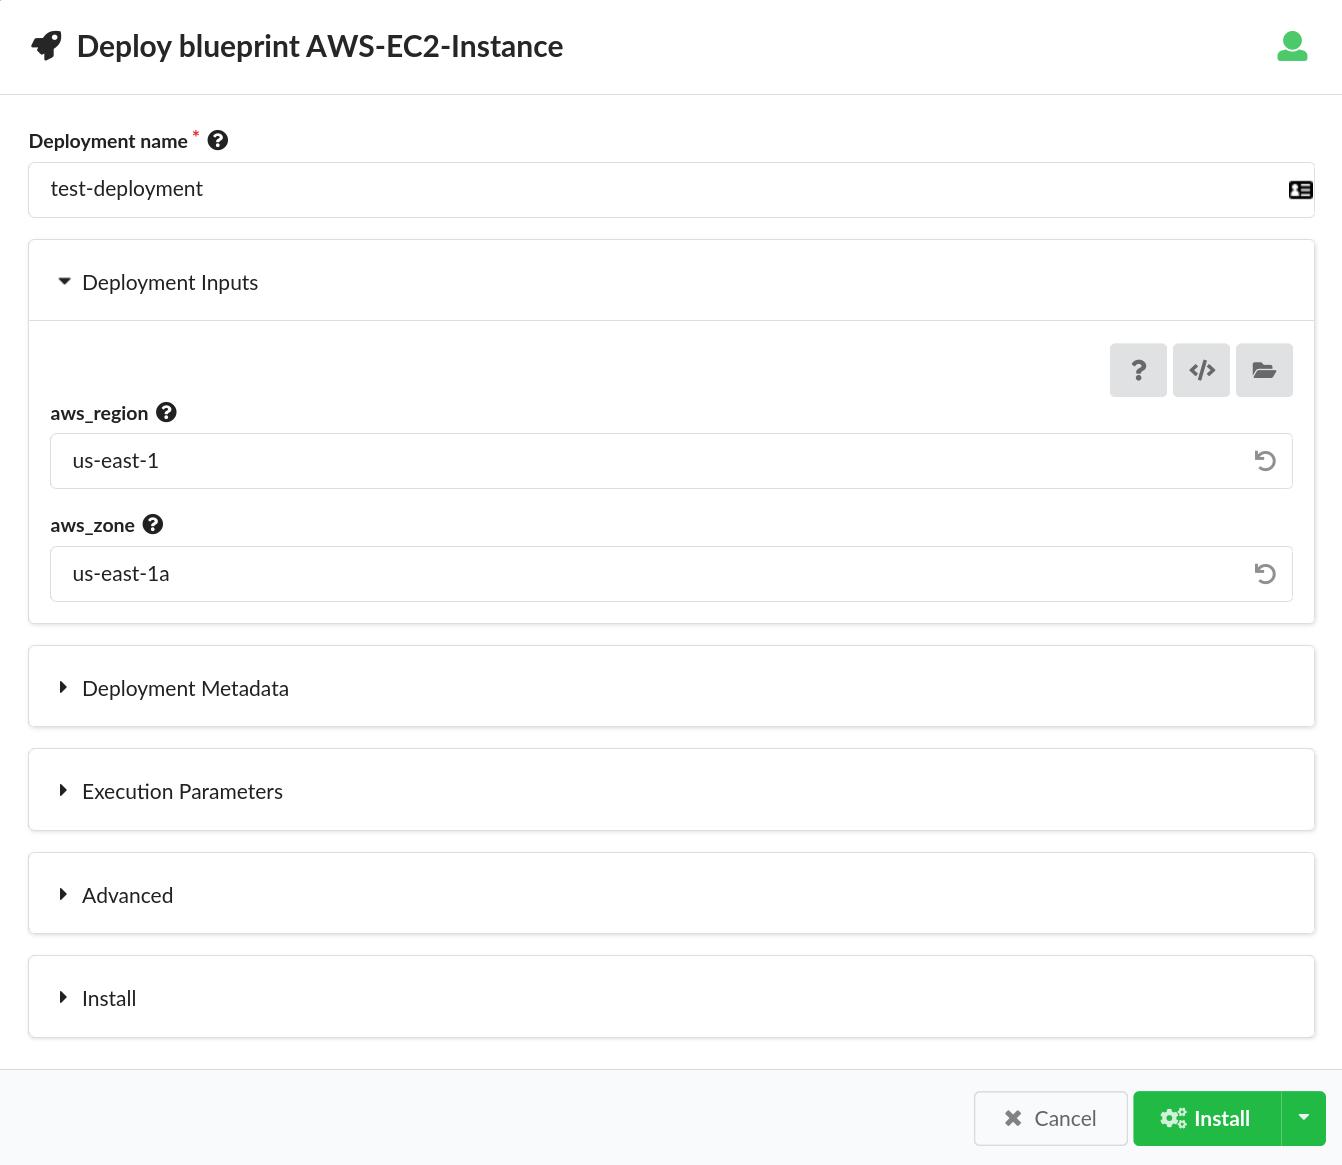
Once the blueprint has been created, you can create a new deployment to test out the end-to-end flow. You should have already been redirected to the Deploy dialog for the blueprint.
Perform the following steps to create a new deployment:
- Fill out any necessary Inputs in the Deploy dialog
- Click the “Install” button
The Cloudify Manager will begin orchestrating all of the steps necessary to deploy a new environment from your blueprint. The Cloudify Manager provides several pieces of information about the deployment, so please take the time to explore some of the following features on the deployment page:
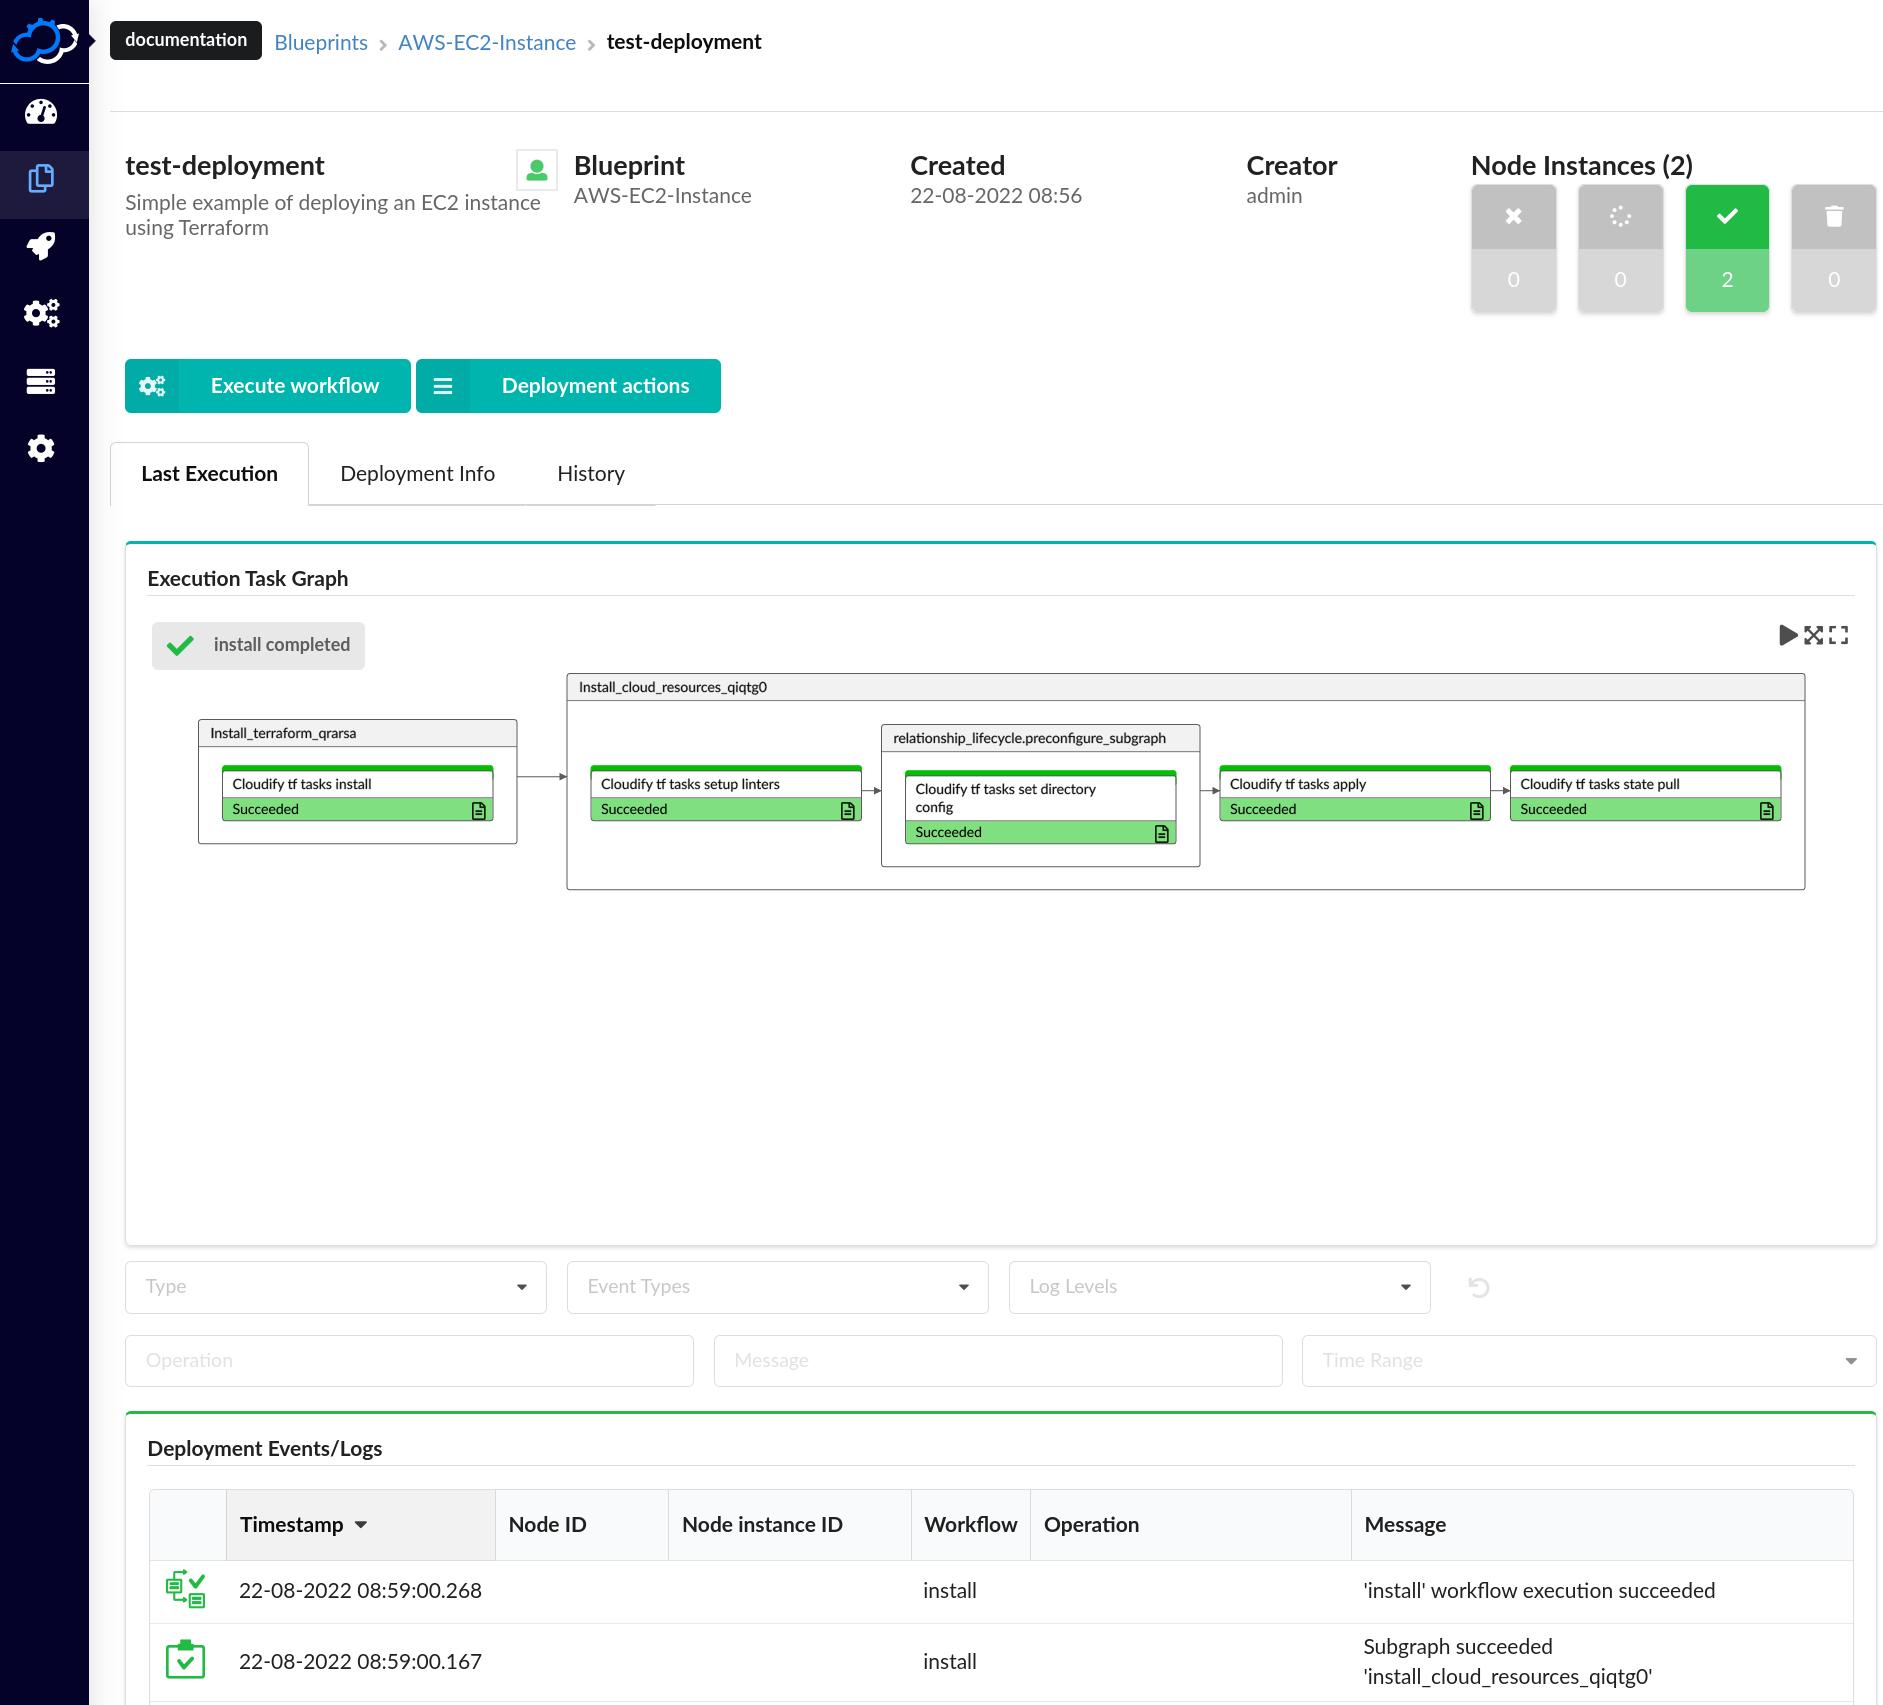
- Inspect the Install workflow Execution Task Graph until it is finished. The bars of the graph will turn green as operations complete. The Execution Task Graph is a powerful feature that visualizes workflows and includes the ability to resume workflows from the point of failure.
- Review the logs, located in the “Deployment Events/Logs” section of the deployment page
- Navigate to the Deployment Info page and review the Outputs that were defined during blueprint creation. These correspond to the Terraform module’s Outputs.
- Navigate to the Deployment Info page and review the Inputs. These represent the values that were provided to the Cloudify Manager during deployment.
Passing provider credentials as environment variables
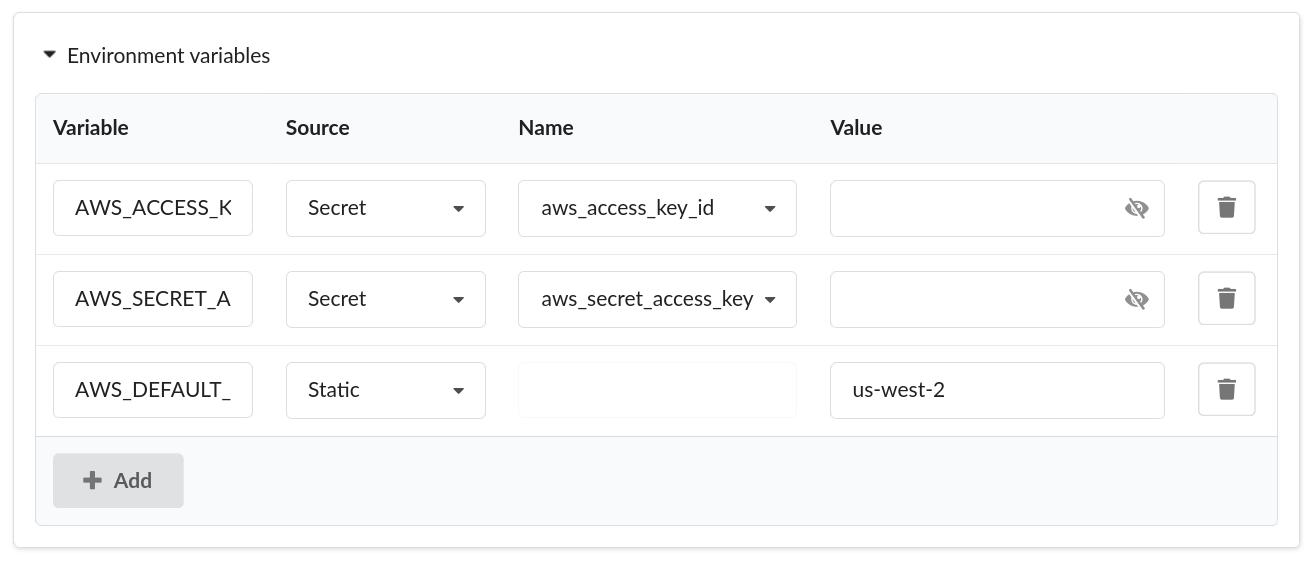
Some Terraform modules, such as those downloaded from the Terraform Registry, rely on environment variables to supply credentials and other information to the providers. You can define environment variables and assign values in the “Environment Variables” section of the “Create blueprint from Terraform” dialog. For example, the screenshot below shows AWS credentials provided as environment variables from the internal secret store:
Troubleshooting
If you used the example Terraform module provided in this article, then the deployment should be successful. However, you may occasionally run into issues when uploading Terraform modules from other sources. The table below lists some common errors and potential solutions to issues that you may face when importing Terraform modules as Cloudify blueprints.
| Error | Cause | Solution |
|---|---|---|
| Value for undeclared variable. The root module does not declare a variable named “AWS_ACCESS_KEY_ID” but a value was found in… | The credentials were defined in the variables section instead of the environment variables section | Ensure that credentials and any other variables are defined in the appropriate location |
| Could not load plugin. Plugin reinitialization required. Please run “terraform init”. | The version of Terraform selected is too old for the Terraform module you have uploaded. | Ensure that the correct version of Terraform is specified |
| Configuring Terraform AWS Provider: no valid credential sources for Terraform AWS Provider found. | Credentials were not defined | Ensure that credentials are defined in the appropriate location (e.g., as an Input or environment variable) |
