Trying it out locally
Get the latest docs
You are looking at documentation for an older release. Not what you want? Go to the current release documentation.
In this tutorial you will start a Cloudify Manager within a Vagrant box on your laptop, and install a sample blueprint on it.
The blueprint that you’ll be deploying describes a nodejs application that connects to a MongoDB database and presents a wine catalog.
IMPORTANT: Before You Begin
You’ll need to have the following setup in your environment:
- Oracle VirtualBox (this box has been tested with version 4.3 or higher, but earlier versions should work as well).
- Vagrant (Make sure that you are using version 1.5 or above!).
- At least 2GB of free RAM
Running inside a VM
Your Hypervisor must support nested virtualization in order to run Virtualbox inside a VM. Unless you know you can run a VM inside a VM, please run the box from either your laptop or on a bare metal server.
Notes for Windows users
- Do not run the command prompt as Administrator (privilege escalation).
- Hyper-V & Virtualbox do not play nice together. Disabling Hyper-V is
possible by running the
bcdedit /set hypervisorlaunchtype offcommand (reboot is needed).
Step by Step Walkthrough
Step 1: Download Vagrantfile and run VM
The first thing you’ll need to do is download the Vagrantfile that Vagrant will use to create a virtual machine with the Cloudify manager and CLI pre installed.
Download this Vagrantfile to your local directory. Then, run this command:
vagrant up
Once the Cloudify Vagrant box is up, you can access the manager web console through your local browser by pointing the browser to http://10.10.1.10/.
Step 2: SSH to the Vagrant Box and Connect to the Running Manager
To connect to the newly Up’d box, type:
vagrant ssh
…after which Cloudify’s CLI will be at your disposal.
Step 3: Download the blueprint
Cloudify uses blueprints to describe the overall application orchestration, including the application nodes, workflows, and relationships.
You’ll have to clone a sample blueprint from our Github repository from the Vagrant box.
cd blueprints
git clone https://github.com/cloudify-cosmo/cloudify-nodecellar-example
cd cloudify-nodecellar-example/
git checkout tags/3.3
Step 4: Upload the Blueprint and Create a Deployment
Now, we upload a sample blueprint to the Cloudify manager and create a deployment based on it.
In the cloudify-nodecellar-example directory that you just cloned, you can see a blueprint file (named simple-blueprint.yaml) alongside other resources related to this blueprint.
To upload the blueprint run:
cfy blueprints upload -b nodecellar -p simple-blueprint.yaml
DNS address
The DNS address used by cloudify in the getting-started box is set to 8.8.8.8.
The -b flag specifies the unique name we’ve assigned to this blueprint on the Cloudify manager.
Before creating a deployment, let’s see what this blueprint looks like.
Point your browser at the manager’s URL again and refresh the screen. You will see the nodecellar blueprint listed there.
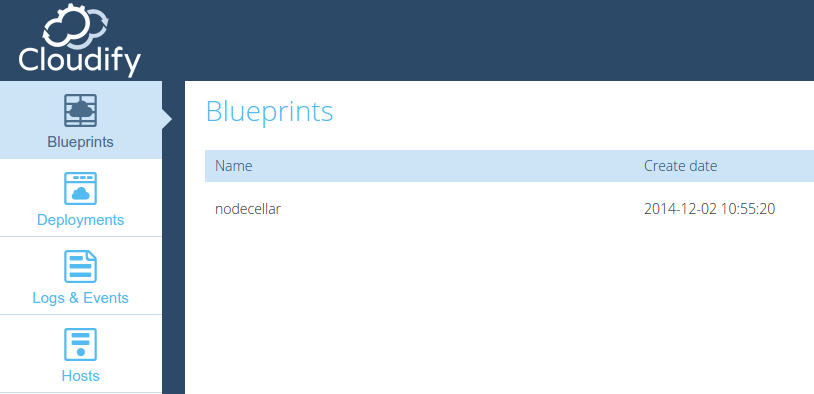
Click the blueprint. You can see its topology. A topology consists of elements called nodes.
In our case, we have the following nodes:
- One VM
- A nodejs server
- A MongoDB database
- A nodejs application called nodecellar (which is a nice sample nodejs application backed by mongodb).

This blueprint defines some input parameters:
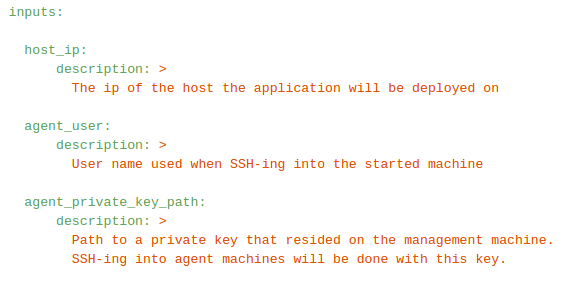
The inputs values are located at ~/cloudify/blueprints/inputs/nodecellar-singlehost.yaml.
These are the values relevant for our example:
agent_private_key_path: /home/vagrant/.ssh/id_rsa
agent_user: vagrant
host_ip: 10.10.1.10
Limitations
Because the Vagrant box is a self-contained example, these values cannot be changed, and are presented here only for the sake of clarity.
Now, we need to create a deployment.
In Cloudify, a deployment represents a virtual environment on your Cloudify Manager with all of the software components needed to execute the application lifecycle described in a blueprint, based on the inputs provided in the cfy deployments create command.
To create a deployment, type the following command:
cfy deployments create -b nodecellar -d nodecellar --inputs ../inputs/nodecellar-singlehost.yaml
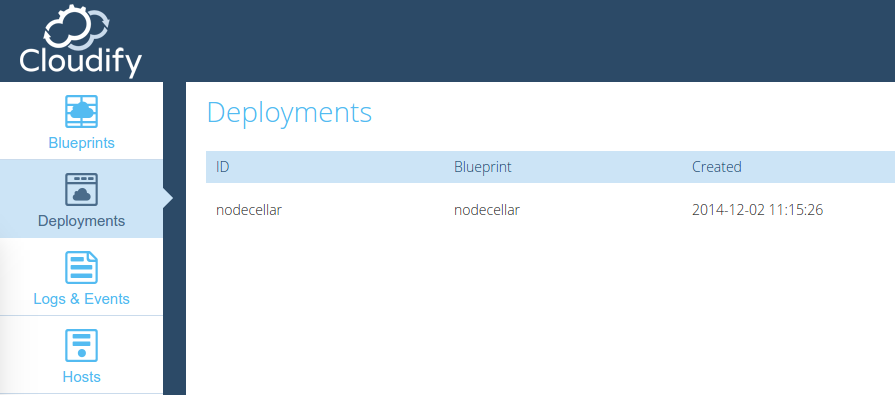
We’ve now created a deployment named nodecellar based on a blueprint with the same name.
This deployment is not yet materialized, since we haven’t issued an installation command. If you click the “Deployments” icon in the left sidebar in the web UI, you will see that all nodes are labeled with 0/1, which means they’re pending creation.
Step 5: Install the Deployment
In Cloudify, installing a certain deployment is done by executing the install workflow.
Type the following command in your terminal:
cfy executions start -w install -d nodecellar
This will take a couple of minutes, during which the resources will be created and configured.
You can track the installation progress in the web console or in your terminal application. In your terminal, you will see that each event is labeled with its time, the deployment name, and the node in our topology that it relates to, e.g.
2014-12-02T09:46:05 CFY <nodecellar> [nodejs_d36c8] Creating node
In the Web UI, you can checkout the Logs/Events page for an overview of all logs and events in your manager.
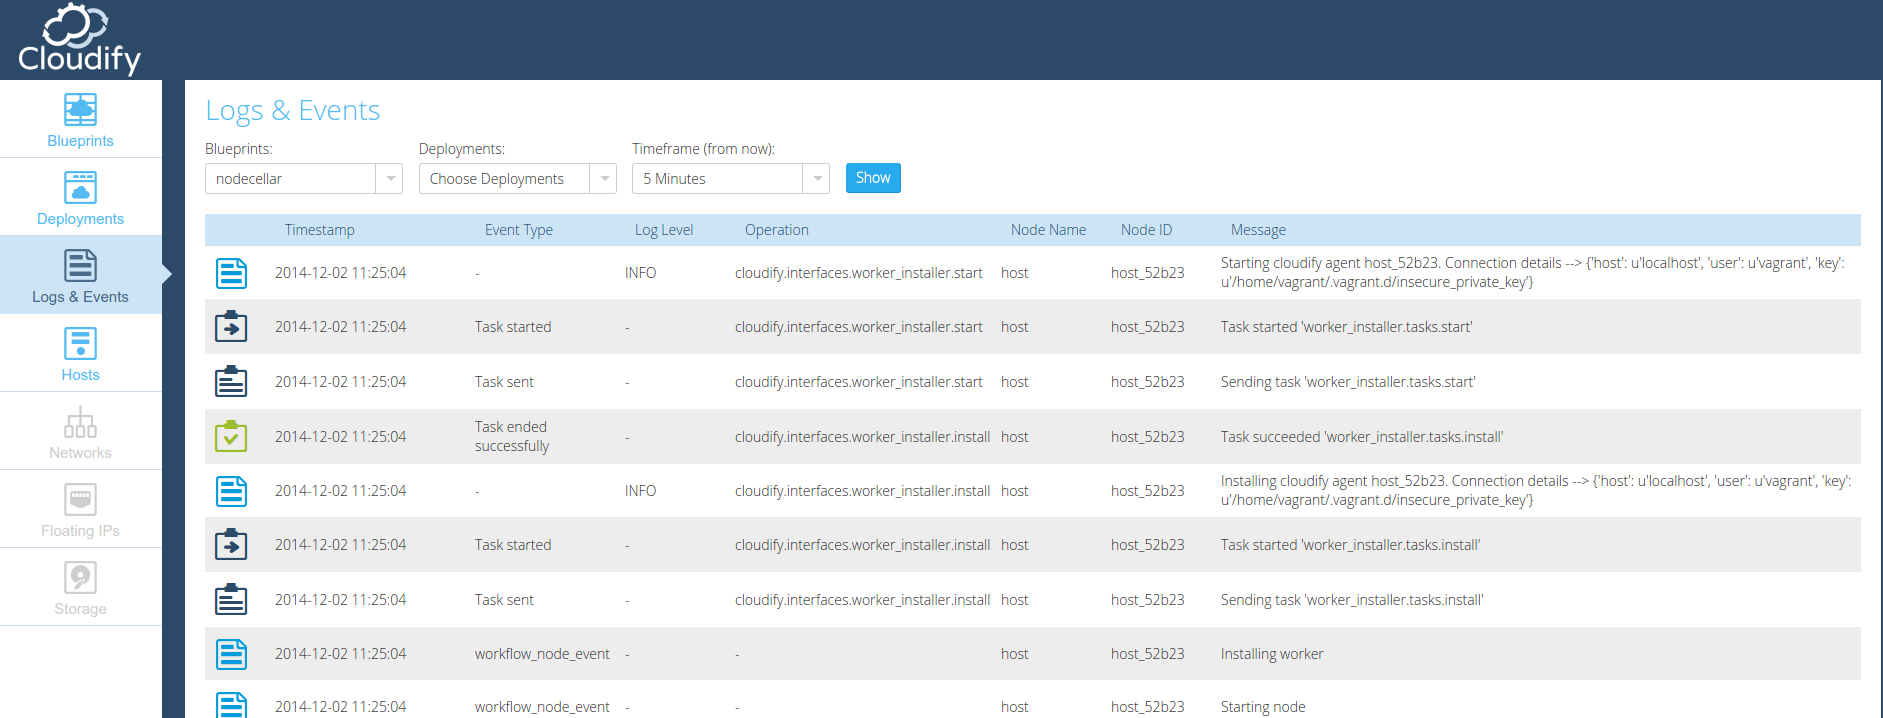
Alternatively, click on a specific deployment in the deployment tab. A list containing events and logs for the deployment will be shown.
You can also have a look at the Monitoring tab and see some default metrics:
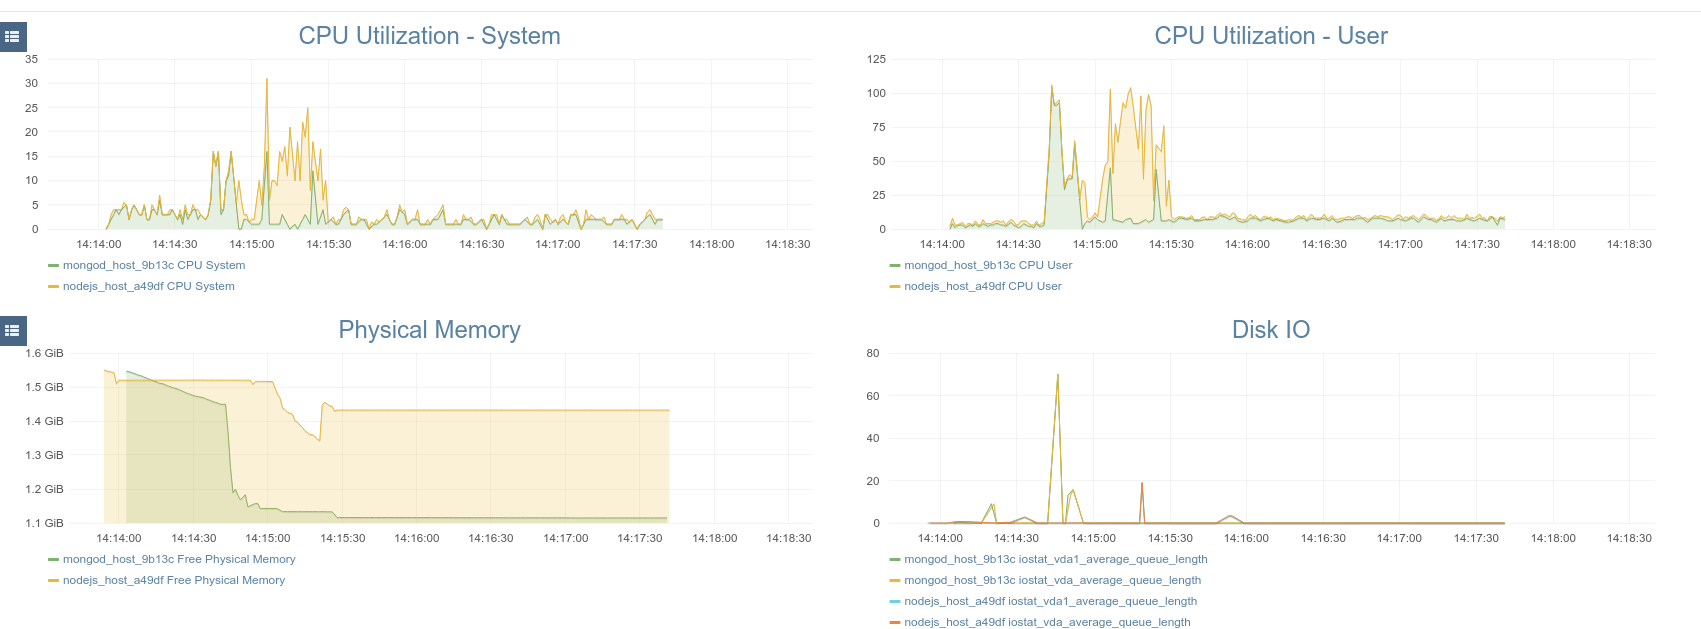
Note
The blueprint we installed actually defines a custom collector for the Mongo database. To add mongo related graphs to the dashboard, have a look at Adding Custom Graphs.
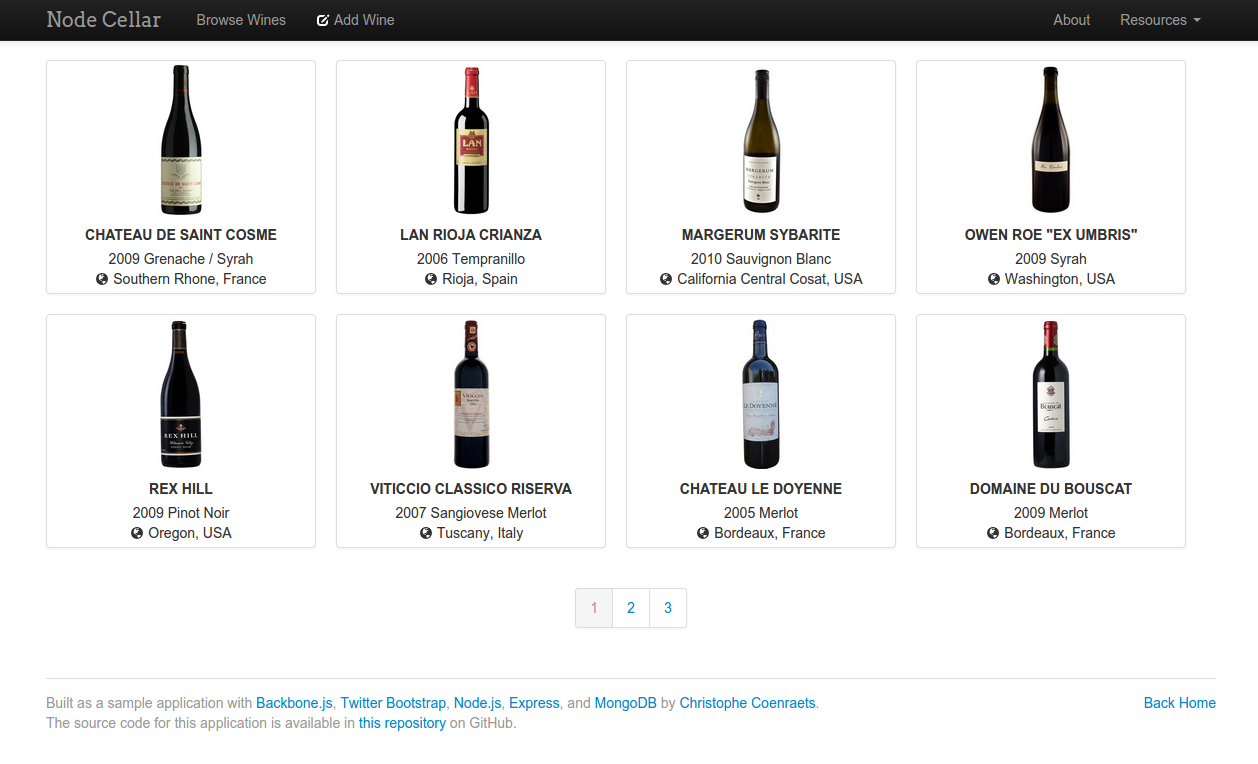
Step 6: Test Drive the Application
To test the application, you will need to access it using its public IP address. Go to http://10.10.1.10:8080 to access it from your web browser. The marvelous nodecellar application should be up on your screen. Click the “Browse wines” button to verify that the application was installed successfully and can access the mongodb database to read the list of wines.
Step 7: Uninstall the Deployment
Uninstalling the deployment is just a matter of running another workflow. In our nodecellar example, this will teardown all the resources provisioned by the install workflow.
To run the uninstall workflow, type the following command:
cfy executions start -w uninstall -d nodecellar
Like with the install workflow, you can track the progress of the uninstall process in the CLI or the web UI using the events that are displayed in both.
Once the workflow is completed, you can verify that the resources were indeed destroyed.
In a real cloud deployment, each and every resource provisioned by the deployment will be destroyed. Since this is a single host example, there aren’t any external resources, only application related ones.
Step 8: Delete the Deployment
The next step is deleting the deployment. Assuming the uninstallation went fine, all of the application resources will have been removed.
The deployment itself still has record on the manager. All of its static and runtime properties are still stored in the manager’s database. To clean up the deployment’s information on the manager, delete the deployment by running this command:
cfy deployments delete -d nodecellar
Step 9: Tear down the Manager
If you have no use for it, you can tear down the manager. This can be done by issuing the following command:
cfy teardown -f
In a real cloud deployment, this will terminate the Manager VM and delete the resources associated with it.
In our case, since the manager is installed on the same machine the CLI is installed on, it will not teardown the machine.
Once you’re done, you can exit the ssh session.
If you want to destroy the machine, run:
vagrant destroy -f
If you want to start the same machine again, just “Up” it. If you want to completely remove the box from your machine, run:
vagrant box remove cloudify-box
What’s Next
- Understand the requirements for bootstrapping your very own Cloudify Manager.