Installing Cloudify Manager
Get the latest docs
You are looking at documentation for an older release. Not what you want? Go to the current release documentation.Cloudify Manager comprises Cloudify’s code and several underlying open-source tools, which have been integrated to create a dynamic environment, and will support the different operational flows that you might be interested in when deploying and managing your application.
Using different Cloudify plugins, the bootstrap process will create the infrastructure (servers, networks, security groups and rules, etc..) required for Cloudify’s Manager to run in that environment.
Manager Blueprints
Bootstrapping a Cloudify Manager, much like deploying any other application, means installing a blueprint. This blueprint, while not functionally different from any other blueprint, is designed to create the infrastructure for the manager and deploy its applicative requirements.
By utilizing blueprints, users can potentially design their own Cloudify managers for additional scalability or functionality.
Manager blueprints for different IaaS providers are provided by the Cloudify Team. You can find these blueprints in the cloudify-manager-blueprints repo.
See the reference for bootstrapping on Openstack or AWS for information on the environment specific requirements.
To bootstrap a Cloudify Manager:
Initialize a Working Directory
Navigate to a directory of your choosing, and initialize it as a Cloudify working directory using this command:
$ cfy init
Initialization completed successfully

...
This will create a folder in the current directory named .cloudify.
Prepare the Bootstrap Configuration
Note
Please verify the prerequisites before bootstrapping.
If you installed Cloudify using one of the premade packages, the manager blueprints should already be available to you.
- On Linux under /opt/cfy/cloudify-manager-blueprints
- On Windows under c:\Program Files (x86)\Cloudify\cloudify-manager-blueprints-commercial
If you didn’t install using premade packages, download and extract the cloudify-manager-blueprints repository from GitHub.
For Windows, download and extract the archive.
For Linux or OSX:
$ mkdir -p ~/cloudify-manager
$ cd ~/cloudify-manager
$ curl -L https://github.com/cloudify-cosmo/cloudify-manager-blueprints/archive/3.4.tar.gz -o cloudify-manager-blueprints.tar.gz
$ tar -xzvf cloudify-manager-blueprints.tar.gz
$ cd cloudify-manager-blueprints-3.4
$ ls -l
...

-rw-r--r--  aws-ec2-manager-blueprint-inputs.yaml
-rw-r--r--  aws-ec2-manager-blueprint.yaml
-rw-r--r--  openstack-manager-blueprint-inputs.yaml
-rw-r--r--  openstack-manager-blueprint.yaml
-rw-r--r--  simple-manager-blueprint-inputs.yaml
-rw-r--r--  simple-manager-blueprint.yaml
-rw-r--r--  vcloud-manager-blueprint-inputs.yaml
-rw-r--r--  vcloud-manager-blueprint.yaml
-rw-r--r--  vsphere-manager-blueprint-inputs.yaml
-rw-r--r--  vsphere-manager-blueprint.yaml
...
As you can see there are manager blueprints for different environments. Each of these blueprints provisions resources (like a vm, security groups, ip’s, etc..) required for the manager to run and installs the different components on the vm.
Now let’s move on to configuration.
Each manager blueprint has an inputs.yaml file associated with it. That inputs file is the configuration for the environment the manager should be bootstrapped on and general configuration for the manager itself.
While defaults are provided for most inputs, some inputs are required since they relate to your specific provider’s account like credentials for example.
The inputs file contains a description of each input. You should modify the inputs file to contain the relevant information for your environment.
For example, for AWS:
# Credentials and identification in order to connect to ec2
aws_access_key_id: my_access_key_id
aws_secret_access_key: my_secret_access_key

# This is the Amazon AMI that you will run and install the manager components on.
# The default value is matched to the default instance_type and ec2_region_name.
# This may also vary by account.
image_id: 'ami-61bbf104'

# This is the Amazon instance type.
# The default value is matched to the default image_id and ec2_region_name.
# This may also vary by account.
instance_type: 'm4.xlarge'

...
After providing all required inputs, you can now go on to bootstrap your manager.
Bootstrap Validations
During the first steps of the bootstrap process, some validations take place. By default, if any of the validations fail, the bootstrap process will also fail. The process validates things like the amount of physical memory and disk space available on the host; that the relevant resources required for the bootstrap process are available for download, that you’re using the supported OS distributions for the Manager host and more.
To override validation preferences, see the Bootstrap Validations section in the inputs.yaml file corresponding with your chosen Manager blueprint.
Note
While you can ignore validations or change their defaults, we do not recommend doing so unless there’s a good reason for it.
Offline Environment
Info
If you are planning to bootstrap a manager in an envrionment with internet connection, this section can be skipped.
In order to bootstrap a manager in an environment with no internet connenction, it is needed to download the manager resources package and store it in a fileserver, accessible by the manager’s vm. The manager resources package URL can be found in the manager blueprint inputs file:
...

#############################
# Manager Resources Package
#############################
#manager_resources_package: http://repository.cloudifysource.org/org/cloudify3/3.4.0/ga-RELEASE/cloudify-manager-resources_3.4.0-ga-b400.tar.gz

...
After downloading the manager resources package, and placing it in an accessible fileserver, change its URL in the inputs file to point to the accessible location, for example:
#############################
# Manager Resources Package
#############################
manager_resources_package: http://my-fileserver:8080/cloudify-manager-resources_3.4.0-ga-b400.tar.gz
Bootstrap the Manager
Finally, run the cfy bootstrap command, pointing it to the manager blueprint file and the inputs YAML file, like so:
$ cfy bootstrap --install-plugins -p /path/to/manager/blueprint/file -i /path/to/inputs/yaml/file
...
Depending on the cloud environment and the server specifications you provided, this should take between 10 to 20 minutes to complete.
After validating the configuration, cfy will create the management VM, related networks and security groups, download the relevant packages and install all of the components.
At the end of this process you should see the following message:
...

bootstrapping complete
management server is up at <YOUR MANAGER IP ADDRESS>

...
To validate this installation, point your web browser to the manager IP address (port 80) and you should see Cloudify’s Web UI. At this point there’s nothing much to see since you haven’t uploaded any blueprints yet.
When the process is complete, you’ll have an operational Cloudify manager on the desired provider. You can verify this by making a status call.
An example output:
$ cfy status
...

Getting management services status... [ip=46.137.95.124]

Services:
+--------------------------------+---------+
|            service             |  status |
+--------------------------------+---------+
| InfluxDB                       | running |
| Celery Management              | running |
| Logstash                       | running |
| RabbitMQ                       | running |
| AMQP InfluxDB                  | running |
| Manager Rest-Service           | running |
| Cloudify UI                    | running |
| Webserver                      | running |
| Riemann                        | running |
| Elasticsearch                  | running |
+--------------------------------+---------+

...
Deploying a Manager Image
Images are provided with all dependencies and the manager pre-installed for AWS and OpenStack. These allow you to get up and running with Cloudify with minimal user input required.
(These images make sensible assumptions about how the manager is set up. If you want fine-grained control over your manager setup have a look at the AWS or OpenStack bootstrapping guides instead).
Prerequisites
- Account credentials for the platform you are deploying on
- For the command-line install, the
cfycommand
To run Cloudify Manager using an Image:
Download an image from the downloads page
Choose the image that corresponds to your platform. If you are using AWS you can use the public AMI provided through the link above, skip to creating an instance.
Upload it to your cloud environment as an image
Create an instance based on the image you’ve uploaded.
Make sure you enable inbound traffic from your security settings in the instance’s security group. Port
22is required forsshaccess, and ports80and443are required for HTTP(S) access.Make a note of the IP/hostname
$ CLOUDIFY_HOST={your-manager-public-ip}
Deploying a manager image - Web UI
In your browser, navigate to http://{your-manager-public-ip}
The manager VM may take some time to start up, so if it doesn’t load immediately don’t worry.
If security is enabled, your browser will complain that the TLS/SSL certificate is not valid. Temporarily allow the connection: A new certificate will be generated as part of this setup process.
If asked, authenticate using
cloudifyas both the username and password.Create a new deployment of the
CloudifySettingsblueprint: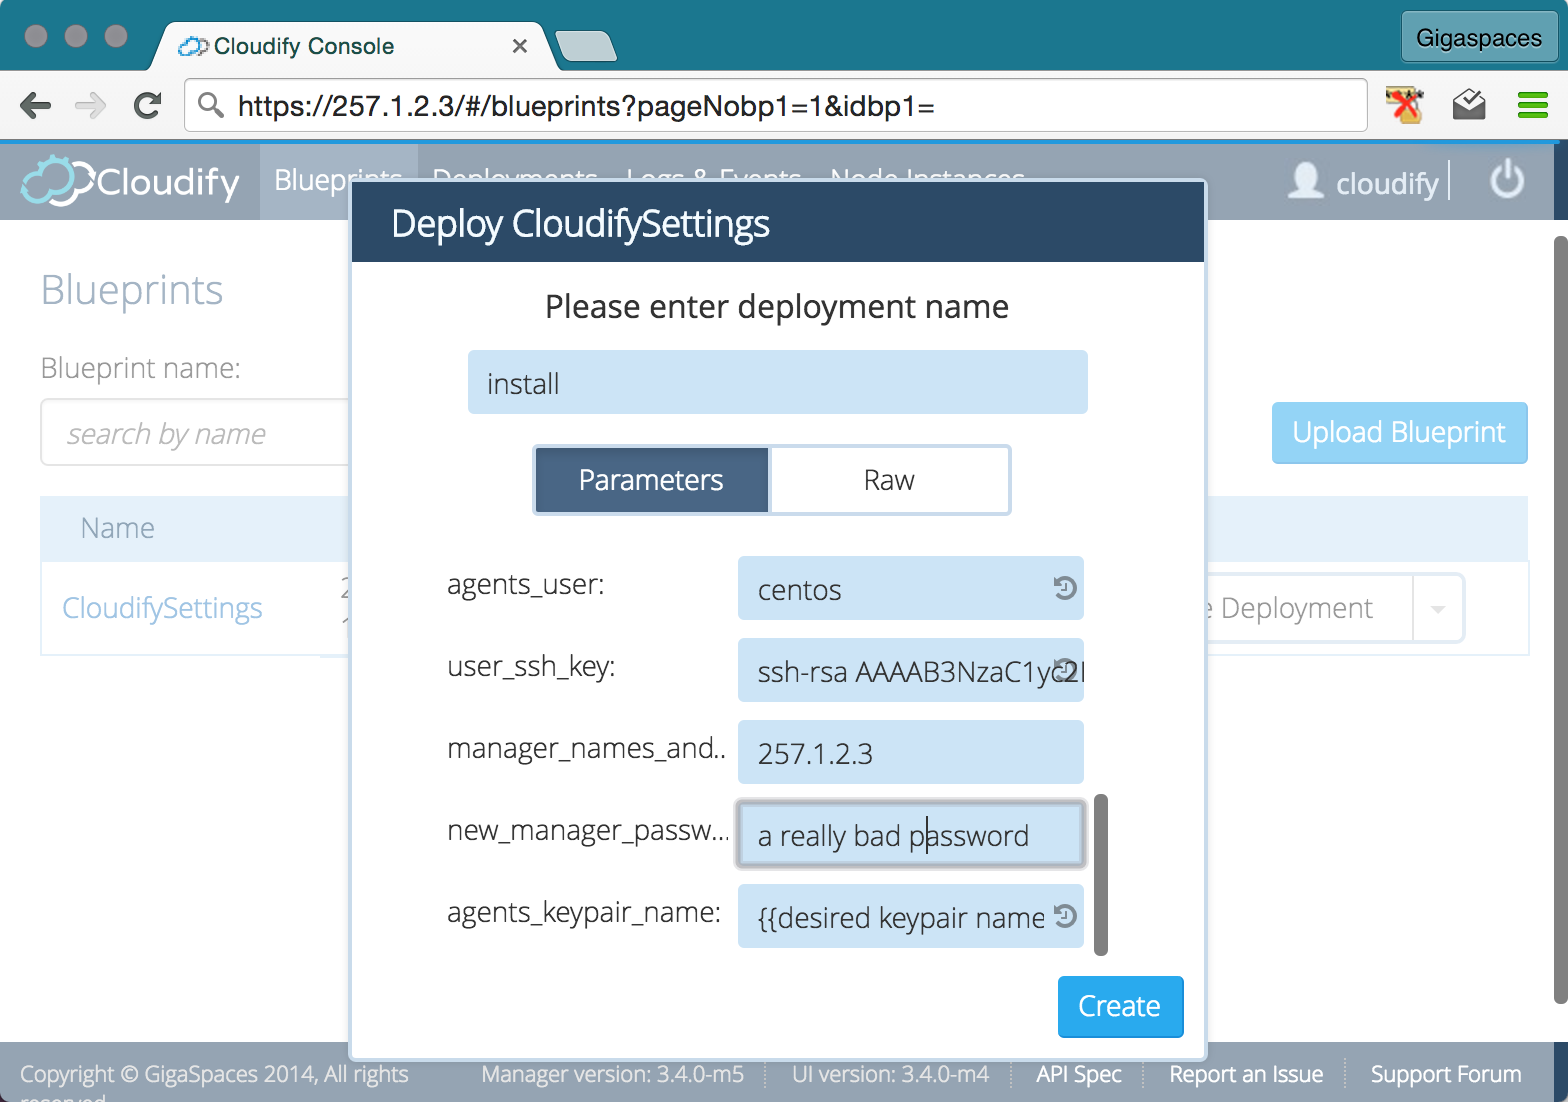
Fill in the input fields: If you are intending to make a quick start and nobody else in your environment is testing cloudify managers you only need to fill in the blank fields. These will be the platform credentials or access keys and the user_ssh_key, which can be set to “no key provided” if you already have access to the VM (otherwise, see the details of that setting below).
If you are using a secured manager you will also need to enter a username and password to log into the cloudify manager, and at least the manager’s public IP in manager_names_and_ips. You can enter only localhost in broker_names_and_ips if you will not be accessing it directly (e.g. for monitoring).
name notes user_ssh_key This will be added to ~/.ssh/authorized_keys in addition to any key you specified when initializing the instance, allowing you to connect to the manager using SSH even if the platform you are using does not support adding SSH keys on instance creation. This should be your actual public key, e.g.: "ssh-rsa AAAAA<...snip...>mTgG user@example". This key can be generally be retrieved on Macs or Linux by opening the file ~/.ssh/id_rsa.pub in a text editor. If you do not want to use this you can simply enter "no key provided". The username used to ssh to the manager will likely be "centos" if this is an official cloudify image. AWS Only aws_access_key Access key to use when accessing AWS API. aws_secret_key Secret key to use when accessing AWS API. agents_security_group_name Security group to be generated and used for accessing agents on VMs. This must not already exist as the `install` workflow will create a new one. You only need to change this if you are in a shared environment where other managers may be deployed. agents_keypair_name Keypair to be generated and used for accessing agents on VMs. This must not already exist as the `install` workflow will create a new one. You only need to change this if you are in a shared environment where other managers may be deployed. OpenStack Only openstack_username Username to use when accessing openstack API. openstack_password Password to use when accessing openstack API. openstack_auth_url Authentication URL to use when accessing openstack API. e.g. http://myopenstack:5000/. openstack_tenant_name Tenant name to use when accessing openstack API. openstack_region Region to use when accessing openstack API. Secure Builds Only manager_names_and_ips These names & IPs will be added to the newly generated SSL certificate which the manager will use. You should include the manager's public IP here, as well as any DNS names you want to assign to the manager (comma separated). Internal IPs on your platform will be added automatically. e.g. 192.0.2.54,mycloudify.example.com,mycloudify.dev.example.com,192.0.2.100 broker_names_and_ips As above, but for the broker (RabbitMQ) SSL certificate. Both inputs should ususally be the same. new_manager_username New username for the cloudify manager. new_manager_password New password for the cloudify manager. new_broker_username New username for the message broker. new_broker_password New password for the message broker. Advanced Options agents_user User to be used for accessing agents on VMs. This should be `centos`. agents_to_manager_inbound_ports Comma separated list of tcp ports to allow from the agents to the manager. This should contain at least: "5671,5672,8101,53229". You are unlikely to need to change this from its default. Once the new deployment is ready, execute the
installworkflow:
Once you have started the
installworkflow it will take a few minutes to run.If you have chosen a security-enabled build the Web UI will become unresponsive as several services need to be restarted. Depending on your web browser it may be necessary to refresh the whole page. You will also need to accept a new self-signed certificate as the certificate is regenerated as part of the
CloudifySettingsblueprint. Once the certificate has been regenerated and you’ve successfully connected to the manager again, setup is complete.
Deploying a manager image - Command Line
Switch to the new manager:
$ export CLOUDIFY_USERNAME=cloudify
$ export CLOUDIFY_PASSWORD=cloudify
$ export CLOUDIFY_SSL_TRUST_ALL=true
$ cfy use --port 443 --management-ip ${CLOUDIFY_HOST}
If you chose one of the
-insecuremaster images then use port 80 (the default) instead (in this case theexportlines above are not required):$ cfy use --management-ip ${CLOUDIFY_HOST}.Create an input file for the
CloudifySettingsblueprint$ echo >install.yaml <<EOF { "aws_access_key": "{your access key}", "aws_secret_key": "{your secret key}", "agents_security_group_name": "{your desired group}", "user_ssh_key": "{your ssh key}", "agents_user": "centos", "agents_keypair_name": "{your desired keypair name}", "new_manager_username": "cloudify", "new_broker_password": "{a secure password for RabbitMQ}", "broker_names_and_ips": "localhost", "new_broker_username": "cloudify", "manager_names_and_ips": "${CLOUDIFY_HOST}", "new_manager_password": "{your desired manager password}" } EOFCreate the deployment
bash
$ cfy deployments create --deployment-id CloudifySettings --blueprint-id CloudifySettings --inputs install.yaml
Start the
installworkflowbash $ cfy executions start --deployment-id install --workflow installSave the TLS certificate for use with
cfyin future# Stop trusting all: $ unset CLOUDIFY_SSL_TRUST_ALL $ export CLOUDIFY_SSL_CERT=${CLOUDIFY_HOST}.cert # echo stops openssl getting stuck | download the certificate | pipe it to sed to grab just the certificate from the output >pipe to file $ echo | openssl s_client -connect ${CLOUDIFY_HOST}:443 2>/dev/null | sed -n '/^-----BEGIN CERTIFICATE-----$/,/^-----END CERTIFICATE-----$/p' >${CLOUDIFY_SSL_CERT}
What’s Next
Now that you have a manager running, you can upload your blueprint.